Honda's V4 Interceptors
V4 Dreams
  • Home
  • Shop Blog
  • Maintenance
  • Products
  • My VFRs
  • Historical

VFR Streetfighter Custom For Sale in Canada

4/20/2021

0 Comments

 
Yeah, I know…every redneck who takes a tumble through a local hay field pieces Humpty together again sans the trashed plastic and calls it a streetfighter. Done it myself — well, minus the crash. But those hapless souls have nothing to do with this build. This is a proper custom, planned and executed with vision and skill. The result is beautiful to look at and, I'm sure, a joy to ride in its native western Canada.
Picture
Click on image for the forum ad.
Long-time readers of this page will recognize this build from a post I did a few years back. The builder is apexandy from VFRdiscussion.com and he's reluctantly decided to part with his project. Visit Andy's ad and you'll be treated to some background and links to the build thread, a running video, and a Marketplace ad with more details and photos.

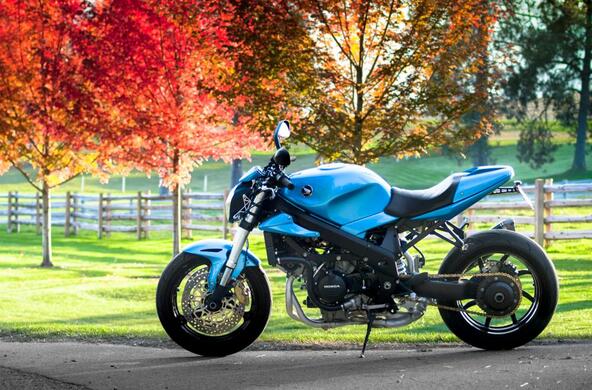
Andy's term for his build is "OEM+" and I think his baby is beautiful — the stance, the hardware, the unique choice of a V4 power plant. And it's no small feat to expose a bike which was designed to be clothed, its tubes, wires and relays hidden under sheets of ABS. I've always liked the look of the fourth-gen tuned headers and Andy highlights his in silver ceramic. His rear-end treatment is clean and he resisted the temptation to litter the aesthetics with unnecessary badging and lettering…or trendy brown seat…or gummy grips.

The streetfighter is a sport bike extension of the bobber genre, and it's an enduring one, not a fad like choppers and flat trackers, and that's because it's a natural expression of the human condition that makes us want to take our machines down to their essence for the raw look and raw riding experience of an unfettered machine. To erase the store-bought sameness and show our personal vision of what a motorbike should look and feel like. Like the post WWII bobbers and the minimalistic customs littering the internet today, these builders are simply saying, "Now, that's what a proper motorcycle should look like." Andy thinks this is what a V4 custom should look like and, personally, I can't disagree.

The asking price is $8400 CDN which translates to $6700 USD. A selling price is a reflection of value, and that value is whatever a buyer and seller agree upon. There is no way this bike could be replicated for that money, for whatever that's worth, and it should never lose value. But customs can be a hard sell — personal taste varies and is…well…very personal. I hope this one finds a caring home near some twisty roads.
0 Comments

Fully Modded Fifth-Gen In Texas

4/15/2021

0 Comments

 
PictureClick on image for the VFRd link.
What: 1999 VFR800 FI
Where: Houston, Texas
Why: Pampered, farkled
Price: $3900 asking

Often considered a "tweener" in the VFR lineage, the 5th-gen Interceptors benefited from a chassis redesign and bump in displacement, plus the addition of fuel injection, but retained the signature gear-driven cams — a trademark of the early VFRs.

This example shows about 28,000 miles, the seller describing it as "amazing in every sense of the word." That's a heady claim but this bike seems to back it up in condition and cool modifications. The list is long (see the ad) and includes upgraded suspension front & rear, Sebspeed see-thru clutch cover, updated brakes, BOS exhaust, electrical upgrades, silicon hoses and full maintenance. The asking price of $3900 seems fair — I couldn't replicate this bike for that. Some lucky buyer is going get an exceptional ride.
(click on an image to enlarge)

0 Comments

Saving A Carb Slide

4/9/2021

0 Comments

 
I'm currently working on a long-neglected 1987 carburetor set which sat for years in old gasoline. This is one of the results as the gas turns to a sticky brown varnish, gluing everything together — in this case the plastic slides were stuck in their bores and the jet needles coated in crusty badness.

To free the slides I soaked the bores in Ballistol, a WD-40-like penetrant, cleaner, and lube. Some gentle prying and the slides released, revealing this mess. I feared that the needles were corroded beyond saving, but with some patient cleaning all the slides and needles survived.
Picture
Picture
After some experimenting, I discovered that my go-to adhesive remover, 3M General Purpose Adhesive Cleaner, would dissolve the varnish with a gentle massaging using a scuff-free pad.

This entire carb set was affected — the throttle butterfly valves were stuck closed, jets clogged, enrichener (choke) pins stuck in their bores, even the tiny spring pins on the float valves were stuck. The ultrasonic cleaner helped here, but mostly hours of detailed hand cleaning. What would typically be a four-hour job turned into eight.

The photo below shows the same slide and needle ready for reassembly.

Picture
0 Comments

Magic Eraser

4/7/2021

0 Comments

 
PictureClick on image for the Amazon link.
I'm prepping the bodywork for paint on Project 29, a red/white/blue 1986 VFR750, and one of the more time consuming tasks is removing the decals. I detail how I approach this for plastic parts on the "Maintenance" page under "Decal Removal - No Mar," but there's a quicker way in the case of the metal fuel tank. Simply referred to as an eraser wheel, this device chucks up in my drill and does just what it says — quickly "erasing" the decal. After about five minutes of effort, I'm left with a lot of decal dust and some adhesive left behind, which I remove with 3M adhesive remover and plastic razor blade (below).

I'm left with a ridge of clearcoat paint along the edge of the decal's shadow which will need to be sanded smooth. I used some 320-grit wet/dry sandpaper followed by something like 800-grit over the entire tank. At that point I'll turn the tank over to a professional for final finishing and paint.

​TIP: If you have one of these r/w/b tanks repainted, you'll need to follow a specific sequence. Because the decals are translucent, the entire tank is first painted blue, then the red decal applied, then the lower edge of the decal is taped off, then the white applied. Finally, apply clearcoat over the entire tank. If this sequence isn't followed, the division line between white and blue will be visible under the red stripe. I learned this the hard way.
Picture
Picture
So, does the magic eraser work on plastic parts? I grabbed a scrap fairing and gave it a go. The answer is, no. The wheel treats the underlying plastic just like a decal and easily digs through the paint and into the plastic, creating divots as you go. I'm guessing that this is a result of the heat generated by the wheel.

I recommend using an eraser wheel outdoors due to the large amount of dust created.

​Off to the painter!

0 Comments

    THE SHOP BLOG
    •••

    An on-going account of miscellaneous information, project bikes and noteworthy VFRs for sale


    Archives

    May 2025
    April 2025
    March 2025
    February 2025
    January 2025
    December 2024
    November 2024
    October 2024
    September 2024
    August 2024
    July 2024
    June 2024
    May 2024
    April 2024
    March 2024
    February 2024
    January 2024
    December 2023
    November 2023
    October 2023
    September 2023
    August 2023
    July 2023
    June 2023
    May 2023
    April 2023
    March 2023
    February 2023
    January 2023
    December 2022
    November 2022
    October 2022
    September 2022
    August 2022
    July 2022
    June 2022
    May 2022
    April 2022
    March 2022
    February 2022
    January 2022
    December 2021
    November 2021
    October 2021
    September 2021
    August 2021
    July 2021
    June 2021
    May 2021
    April 2021
    March 2021
    February 2021
    January 2021
    December 2020
    November 2020
    October 2020
    September 2020
    August 2020
    July 2020
    June 2020
    May 2020
    April 2020
    March 2020
    February 2020
    January 2020
    December 2019
    November 2019
    October 2019
    September 2019
    August 2019
    July 2019
    June 2019
    May 2019
    April 2019
    March 2019
    February 2019
    January 2019
    December 2018
    November 2018
    October 2018
    September 2018
    August 2018
    July 2018
    June 2018
    May 2018
    April 2018
    March 2018
    February 2018
    January 2018
    December 2017
    November 2017
    October 2017
    September 2017
    August 2017
    July 2017
    June 2017
    May 2017
    April 2017
    March 2017
    February 2017
    January 2017
    December 2016
    November 2016
    October 2016
    September 2016
    August 2016
    July 2016
    June 2016
    May 2016
    April 2016
    March 2016
    February 2016
    January 2016
    December 2015
    November 2015
    October 2015
    September 2015
    August 2015
    July 2015
    June 2015

    Categories

    All

    RSS Feed

Site powered by Weebly. Managed by HostGator