When Honda introduced the updated RC36/2 in 1994, one of the talking points was the change to "semi-flat slide" carburetors. Sounds cool, but what's that mean to us?
More common in racing and dirt bikes, the flat slide is simply a different shape designed into the throttle slide, and an evolution from the well-used round design. The photos below show the progression of slide design through the VF/VFR's carburetor years; 1983-97. The round slide was the standard till the 1994 change, with just a hint of a small flat for '90-93.
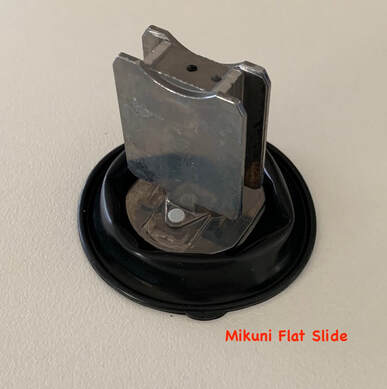
The "semi" part the semi-flat slide is evident when comparing the RC36/2 to a true flat slide Mikuni pictured at right. Why did Honda do this? Flat slide technology was developed for high-performance applications where the throttle spends most of its time wide open, or close to it. This is why flat slides are also common in small displacement machines, like scooters, which routinely run all out. Here's as good an explanation as I've found:
"Round slide carbs tend to be easiest to tune — the round shape of the slide helps them transition smoothly from idle to mid-range to full throttle. Flat slides can offer incredible throttle response and are hard to beat in the mid and upper revs. In the lower revs it can be a challenge to get and maintain good fuel air flow and mixture. They can test your patience with tuning. Between the two is the other flat slide, the "D slide." It has the lovely low end smoothness of the round slide combined with most of the characteristics of the flat slide at higher revs."
So we see more of a "D slide" shape in the RC36/2, likely a compromise Honda made to achieve the best of all worlds for a high performance, but civilized, street bike like the VFR. I've ridden all of these carb'd VFRs, and my butt dyno has always felt that the semi-flat slide RC36/2 has crisper, slightly more aggressive throttle response than the earlier versions, and also just seems to exhibit more "thrust," though published HP numbers don't support that.
I suppose this whole discussion represents the pinnacle of carb development for Honda street bikes, as the next generation RC46 debuted fuel injection, relegating carbs to the history books. Still, there's nothing quite like the progressive, analog feel of a well-tuned set of high-performance carburetors connected via steel cable to your right hand.
More common in racing and dirt bikes, the flat slide is simply a different shape designed into the throttle slide, and an evolution from the well-used round design. The photos below show the progression of slide design through the VF/VFR's carburetor years; 1983-97. The round slide was the standard till the 1994 change, with just a hint of a small flat for '90-93.
The "semi" part the semi-flat slide is evident when comparing the RC36/2 to a true flat slide Mikuni pictured at right. Why did Honda do this? Flat slide technology was developed for high-performance applications where the throttle spends most of its time wide open, or close to it. This is why flat slides are also common in small displacement machines, like scooters, which routinely run all out. Here's as good an explanation as I've found:
"Round slide carbs tend to be easiest to tune — the round shape of the slide helps them transition smoothly from idle to mid-range to full throttle. Flat slides can offer incredible throttle response and are hard to beat in the mid and upper revs. In the lower revs it can be a challenge to get and maintain good fuel air flow and mixture. They can test your patience with tuning. Between the two is the other flat slide, the "D slide." It has the lovely low end smoothness of the round slide combined with most of the characteristics of the flat slide at higher revs."
So we see more of a "D slide" shape in the RC36/2, likely a compromise Honda made to achieve the best of all worlds for a high performance, but civilized, street bike like the VFR. I've ridden all of these carb'd VFRs, and my butt dyno has always felt that the semi-flat slide RC36/2 has crisper, slightly more aggressive throttle response than the earlier versions, and also just seems to exhibit more "thrust," though published HP numbers don't support that.
I suppose this whole discussion represents the pinnacle of carb development for Honda street bikes, as the next generation RC46 debuted fuel injection, relegating carbs to the history books. Still, there's nothing quite like the progressive, analog feel of a well-tuned set of high-performance carburetors connected via steel cable to your right hand.


 RSS Feed