The bodywork is away being refinished so I'll mount up a substitute set and get some shakedown miles on the bike — if winter ever lets go here in the upper midwest. Here's a sound bite....
|
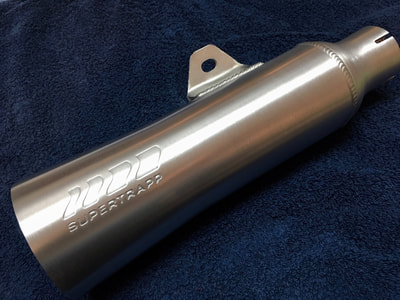
After months of work I finally fitted one of the final pieces of the Project 13 puzzle; the mufflers. Yesterday I was able to hook up the 87-octane I.V. and push the magic button. There's always a lot of apprehension at that moment, but the engine fired immediately and warmed normally, no surprises. The SuperTrapp mufflers put out exceptionally deep and purposeful music, especially in the confines of the garage. The bodywork is away being refinished so I'll mount up a substitute set and get some shakedown miles on the bike — if winter ever lets go here in the upper midwest. Here's a sound bite....
0 Comments
Project 13 is rounding the corner to home. Today the bike was started up for the first time since I acquired it 3 1/2 years ago. At that time I had finished all the mechanical checks and everything was in order. So the cylinders were fogged, oil changed and she was put in hibernation.
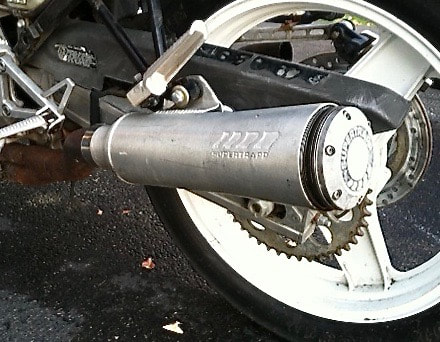
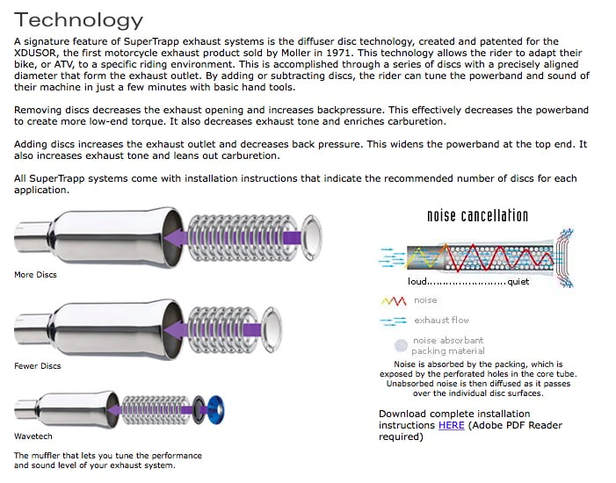
Fortunately, neither muffler had any dents or road rash. And they're aluminum, so they can actually be massaged to an altered look without too much effort. I began by experimenting with various types and grades of sandpaper to remove the corrosion which had begun to take hold on the old muffler. It eventually got to a very presentable stage, but was definitely not a match to the new one. With more than a little trepidation I began sanding the sparkling new muffler and was relieved to find it slowly coming around. With a final machine polishing the mufflers are nearly identical. Next came a multi-day soak in rust remover for the neglected mid-pipes, followed by a lot of sanding and finally several coats of hi-heat black paint. Refitting the system went as smoothly as I could hope for. The SuperTrapp is a unique design which allows a degree of exhaust tuning. You do this by varying how many of the eight baffling discs are in use. This is accomplished by placing the solid "blocking plate" disc closer or farther from the exhaust exit point. I arbitrarily chose position six (of eight in this case), leaving five open baffles. Adjusting the baffling also affects the decibel meter, of course, and I was a little surprised how loud it is, but with a very satisfying bass growl. I'll be experimenting with the tuning and sound once we're on the road. But, at this point I'm very pleased with the SuperTrapp. Pictures work better than words....
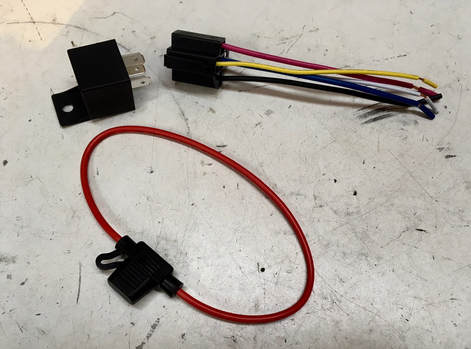
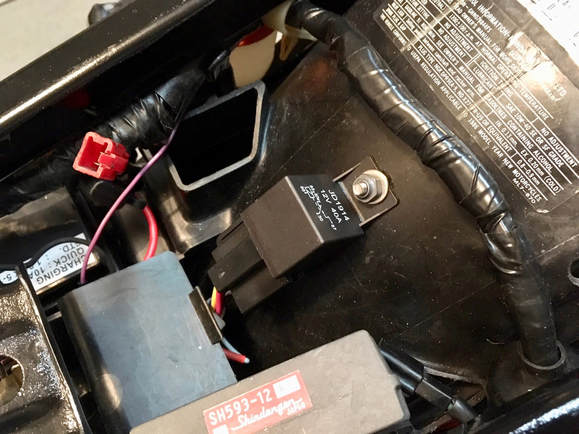
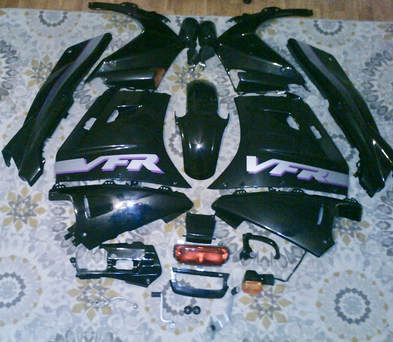 Click on image for eBay link. Click on image for eBay link. Anyone who's had to search for plastic bodywork for the third-gen VFRs knows that this stuff is becoming rare as good sushi in Nebraska. But here's an eBay seller with a complete set from a black 1992. He offers a complete description of each part and everything looks useable as is or would be a great set for a restoration or custom build. Bidding is light, currently at $450 + $113 shipping. If you're interested, you'd better hurry — auction ends Saturday afternoon. Two upgrades I'm making to Project 13 involve the movement of electrons. The trick with electricity is getting those mysterious subatomic particles moving in the right direction while keeping their smoke-producing potential properly confined within the wires. While it's true that basic electrical principles are, well, pretty basic, things can get out of hand quickly when some of us start to get creative. Which is why I stick to the KISS principle and keep it simple. I'm adding heated grips to this bike along with a SAE quick disconnect for a GPS mount. This requires a power source to the front of the bike, but one that's controlled by the ignition key. We don't want to accidentally leave the grips on while stopping for a coffee break only to find a dead battery upon our return. One solution I've used in the past is to simply tap into a keyed wire under the headlight fairing. Some, but not all, of the second-gen bikes have an unused 2-lead wire (positive & ground) sitting just behind the headlight — it was there for the parking light feature required for other world markets. This makes life much easier, but this '86 model doesn't have that wire. Another shortcut is to simply tap into one of the turn signal running light wires. That's a 10-amp circuit with little else drawing from it, which should also work fine. (Above) But on this bike I've decided to provide the required power with a 5-wire relay. The purpose of any relay is to remotely switch power on & off without the need for an additional physical switch, or to switch high-amp devices (like a headlight) using a low-amp (handlebar) switch. The two items needed are a fused power lead and a relay, both available cheaply from various online sellers. Once I decide on a mounting location, I simply need to solder up wire extensions to their appropriate spots. The power wire (IN) comes directly from a power source, like the battery or the starter solenoid's battery post and is connected to the black wire on the relay harness. The red lead is power (OUT) to the appliance so is extended to wherever it's needed, the headlight area in this case. The relay is tripped on & off by a 12-volt signal through the yellow wire, and so requires a convenient switched (keyed) power source. The tail light or license plate light wires are handy so that's what I used. Finally, a ground is needed so the white lead is connected to a nearby ground — I used one of the regulator's mounting screws. That leaves the fifth, blue, wire. This particular wire actually performs just the opposite function of the rest of the relay. It's powered on with the key OFF, and powers off with the key ON. So it could be used for an alarm system, I suppose, or in my case I'll connect the battery tender lead. (Above) Here, I've mounted the relay on the rear fender near the battery. The power lead takes mini blade fuses and I'll use a 5-amp, as the grips draw only 1.5 amps at max power. After about an hour of soldering and running wires here and there, everything is in place and ready to wire in any accessories you wish to add, knowing that none will be be left on to ruin your day with a dead battery. Next, I'll mount the grip heaters, their switch and new hand grips.
Interweb forums are great for information sharing. And inspiration. There are some talented builders out there who think outside the box and aren't afraid to do their own thing. One of them is Captain 80s and this build documented on VFRworld.com offers some great ideas for those of us who like to play with old motorbikes...or just dream about a future project. This build, 1986 VFR Track Bike Out Of Parts, chronicles a couple of years of transforming this '86 VFR700 into a much too pretty track bike. Some of the modifications include fitting a '93 CBR900RR dual-headlight upper fairing along with lowers from a '95, which meant relocating the fuse block to under the fairing. The fork is from a CBR600F2 with Race Tech emulators installed along CBR wheels and brakes from a '91 VFR750. The rear shock is a remote reservoir from Fox.
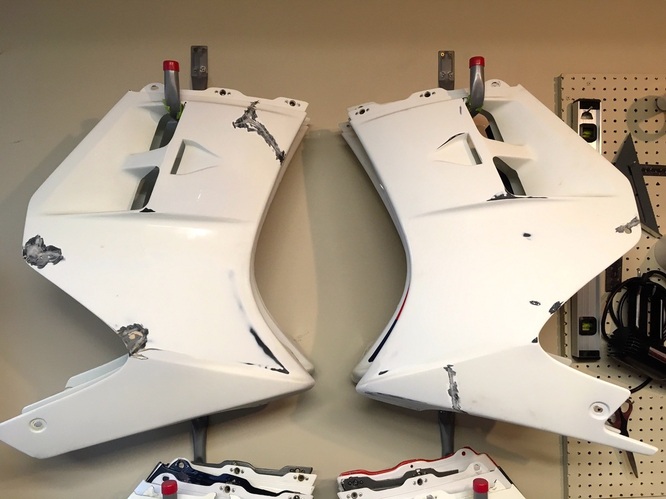
I have a lot of respect for folks who do their own work and the Captain is one of those guys, right down to the machining of one-off parts and painting. The finished product blends original and newer pieces nicely and helps inspire the rest of us, plus his thread is full of tips and technique. (click on an image to enlarge) 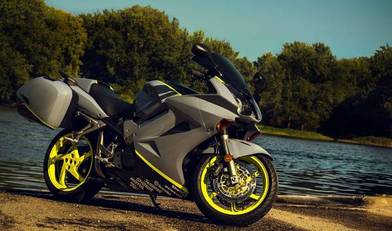 Click on image for the Craigslist ad. Click on image for the Craigslist ad. What: 2002 VFR800 Vtec Where: Milwaukee, Wisconsin Why: Unique & Practical Price: $4200 Custom painted bikes are always a tough call. Manufacturers expend mucho effort to style vehicles with a wide appeal that will hopefully maximize sales. But when an individual exercises his or her own vision the result will often end up appealing to a smaller slice of the market. That's not a bad thing, it's just reality. Here's a case in point. This 2002 Interceptor has been treated to a professional custom repaint and the builder has obviously put a lot of thought into the design. The muted body colors contrast with the bold and creative wheels, and the layout works well with the bike's angles. Even the saddlebags are integrated nicely. Under the lipstick beats the heart of a VFR800 Vtec with a Delkavic exhaust. Maintenance is said to be up to date, and the bike shows just north of 30,000 miles. The asking price is a little over the average for a 2002 model, so our buyer will need to see the custom treatment as above average...which would be easy to do in this case. Nicely done. 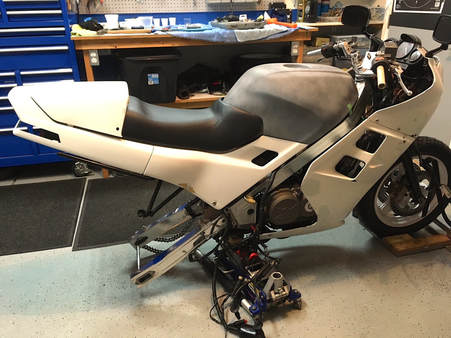 After many hours of finalizing the bodywork repairs to Project 13, I spent the afternoon fitting the pieces to one another. One would hope this wouldn't take half a day, but it did. The only real issue is that the reupholstered seat was given a little extra padding which resulted in the passenger seat cowl being a snug fit. I'll leave everything in place for a few days in hopes that all the plastic will acclimate to its new reality, but overall everything is fitting nicely. 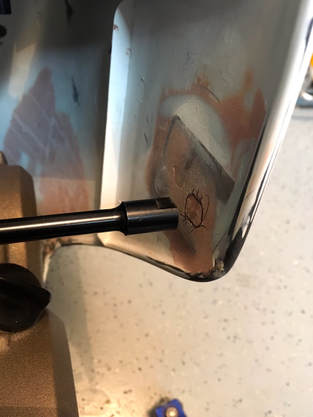 Invariably, the most difficult point to refit is the mid-fairing's middle frame mount. In this case, the right side required such extensive reconstruction that I'm able to simply mark the contact point and drill it out — a perfect fit. On the left side, much tweaking of the various mounting points was required to line up this mount, as it's not adjustable. The next step is to give everything a final inspection, fine tune any Bondo repairs, clean everything and get it all off to the hydrographic shop for film dipping. While that's happening I can finish up lots of details — wiring, heated grips, shock install, GPS mount, brake lines.......Stay tuned. Project 13 is progressing. While awaiting my modified shock from Jamie at Dmr Motorsports, I've been busy with the many bodywork repairs required for eventual hydrostatic dipping of the parts. 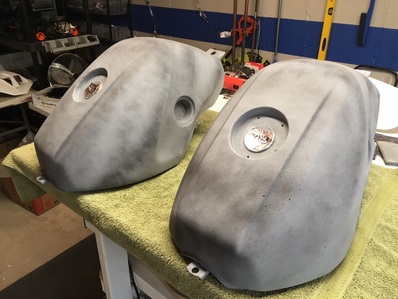 I wisely left the fuel tank repair to a professional. Both of these tanks were in pretty rough cosmetic shape — dents, scrapes and surface rust. The interiors are fine, so they're worth saving. My painter, Bill, brought these tanks to the primer stage, and I'll choose one for Project 13. The other will go on the shelf for a future project. The dipper will begin the process by applying black paint to all the body parts as a base for the film. (Below) A major repair required for this project is to fill in the large turn signal holes in the OEM headlight fairing. I'll be using flush mount turn signals in place of the original stalk-type signals. To begin, I trace a template on stiff paper, then transfer that to some scrap ABS plastic from my stash. The patch is then cut out with the Dremel and carefully fitted to the hole by grinding and filing the edge. I also heat the patch and gently bend it to approximate the slight curvature of the fairing. (click on an image to enlarge) (Below) Next comes the welding. After beveling all the edges, front & back, I weld the entire seam, front & back. The white colored seam indicates the ABS filler weld. An initial sanding with some rough paper prepares the patch for body filler. (click on an image to enlarge) 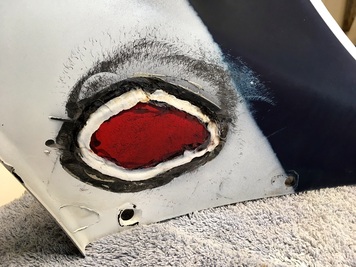 Here's a look at the backside of the patch. This is not visible when mounted so I won't put much effort into finishing the repair. 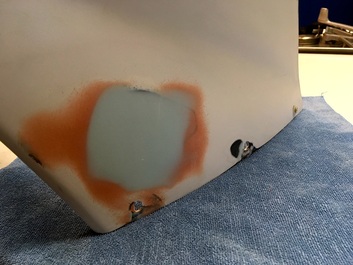 Here the filler is being finish sanded on the left side. The orange filler is Bondo base filler and the blue is a finishing putty called Icing. Two of the three mounting holes also needed welded repairs to their lower edges, where the plastic had been cracked away. 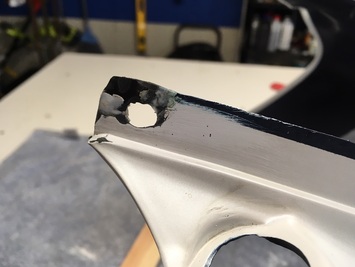 This headlight fairing required a few more spot repairs, including to the rearmost windscreen mounting holes, shown here. (Below) All the body pieces needed some degree of repair. Here, the mid-fairings show off their welding repairs and are ready for body filler. I'm not as fast as an experienced professional, so to get these parts finished to an acceptable level takes a considerable time investment. But, in the end, I'll have a set of body panels that I know were repaired the right way and will be around for a few more decades.
The final step will be to test fit the fuel tank and all the panels to the bike. Then it's off to the dipper! While virtually cruising the USA for nice Interceptors, I came across these two examples from the Southeast — land of The Dragon and Blue Ridge Parkway. 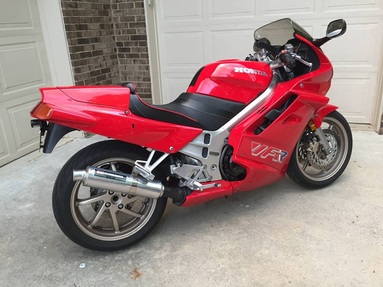 Click on image for the Craigslist link. Click on image for the Craigslist link. First up is this pristine 1991 model with only 17,000 miles, located near Atlanta, Georgia. In original condition and tastefully updated with a Corbin seat and Yoshimura slip-on. Our seller will also include an Ohlins shock at his price of $4000. He indicates exceptional maintenance and care, owned by one family since new. I might take exception to his claims of "VERY rare" and "the most desirable VFR model and quickly becoming a collectors item," but to each his own. In any event this is a great-looking third-gen VFR with the seller's asking price reflecting that. 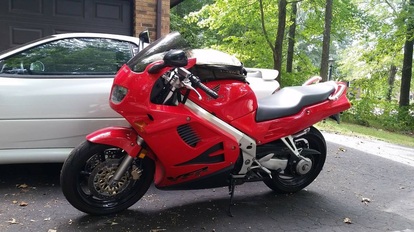 Click on image for the Craigslist ad. Click on image for the Craigslist ad. From western North Carolina comes this 1994 model with 20K miles. The ad doesn't shower us with useful details, but the bike appears to be nearly 100% original, and features bar risers and upgraded alternator, though a solo seat cowl isn't pictured. "Amazing condition" and "looks and performs like new," says our seller. The photos agree, but I'd want some more details and better photos. But, judging by the muffler and seat condition, and general cleanliness, this might be a winner. And the clincher is the $2700 asking price. 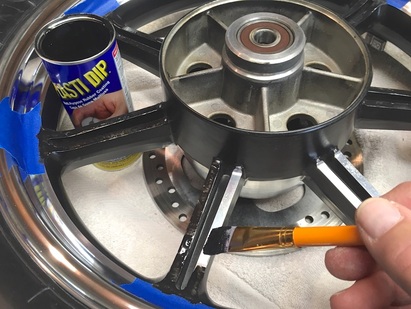 I never jumped onto the Plasti Dip wagon — spraying and dipping everything from wheels to tool handles. But I've finally found a practical use for the gooey stuff. I don't care for the polished cast wheel spokes on my new Bonneville. As a visual experiment I decided to black out the spokes to see what the effect would be. With the wheels on the bench I began by cleaning the surface and applying the first of two coats with a wide artists brush. The finish is a bit lumpy but it will serve its purpose. When the bike is back together I'll see what I think of the new look. And if I don't like it, It'll peel right off. |
THE SHOP BLOG
|







 RSS Feed