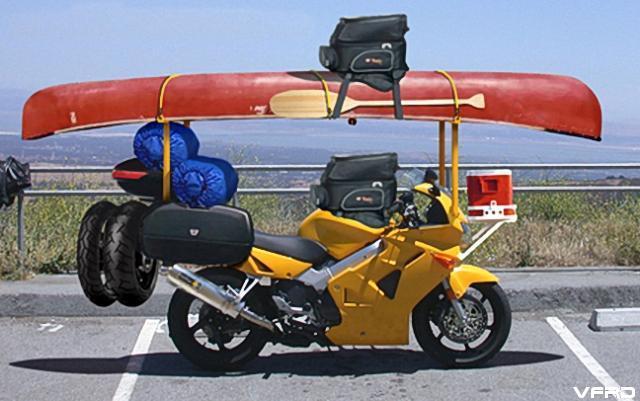
(click on first image for the eBay link)
Well, here's something completely different from the eBay menagerie of old motorbike parts. Our seller, in Portugal, and by some happenstance, is offering an exhaust system and partial bodywork for the 1992 Honda NR 750. "Used but in very good condition," these two bits of rarity are being offered for $9000 USD (!)…or make offer. Less than a day remains in the auction, so to all you NR owners, here's your chance to grab some spares. (click on first image for the eBay link)
0 Comments
This past week I said goodbye and new owner Marty said hello to his new ride, Project 36. This beautiful example of a 1986 VFR750F shows only 4500 miles and has been treated to a few discreet updates to improve its road manners. These include RaceTech fork emulators and springs, along with a custom-built M-Shock from France. As for cosmetics, this RC24 got a full repaint, reproduction turn signals, powder coated valve/engine covers, and a reupholstered seat and bum stop. The mechanical systems were all addressed and fresh Bridgestone BT46 tires are mounted on repainted wheels. Marty (right) looks pleased.
(photo gallery here) ![]() Sold: $6600 After first selling on a BaT auction to a non-paying buyer for $4750 back in May, this 1985 700 Interceptor recently resold for an impressive $6600. I say impressive because the bike still presents as a slightly above average example with lowish miles (10,558) and typical patina. From my original post: "... appears to be in average to above average survivor condition with the usual cosmetic aging issues; some paint discoloration and surface rust on the frame and exhaust headers. The tires are listed as Dunlop K591, so they're likely well past their best-by date. Amazingly, those unobtainable black chrome mufflers appear to be free of road rash." This sale demonstrates the interest that an original survivor can generate and here's hoping that the sale signals a general uptick in 1st-gen values. Well sold. ![]() What: 1985 VF1100S V65 Sabre Where: Hortonville, WI Why: A clean example, no reserve Price: Auction ends Friday One of Bring-a-Trailer's regular flippers has another gem on offer, this lovely V65 complete with Hondaline CBX-style fairing and period correct padded sissy bar. The bike appears to be a survivor but some of the bits look a little too perfect so that's difficult to verify. In any case the bike presents well in the photos. I don't see any corrosion to speak of and the factory mufflers are presentable, but not perfect. This example shows 21,000 miles and would make a stylish vintage sport tourer, assuming you're traveling light — there's no luggage options included. These were powerful but heavy tube-framed bikes with average brakes typical of the time, so, as one BaT commenter notes, "…that motor could write checks the brakes couldn't cash." What a great choice for a sunny Sunday morning ride on some gently curving backroads. Not to be too maudlin, but finishing a project is often a little bittersweet. Yes, they're mechanical objects, a collection of metal, rubber and ABS, but we know that the whole transforms into something more than those parts. As Dr. Frankenstein said, "it's alive!" — and a finished bike is alive; a rumbling, moving, beautiful companion, capable of stirring emotion and physical thrills. Some of us are lucky enough to know the intimate connection that comes from just sitting in the garage with a cup of coffee (or a beer) gazing at a special machine — much like appreciating any piece of art. I hope that Project 36 can do that for Marty, its new caretaker. This bike came to me from Tom in Boise, Idaho, back in December of last year. It has an amazing 4580 miles but had been low-sided on the right side. Tom had made a great start on the bike but I began at the beginning, finishing with a complete repaint and seat upholstery. Some of the upgrades include:
• RaceTech Gold Valve emulators and fork springs • M-Shock set up for Marty's specs • Owner-supplied OEM mufflers & center stand, saved from a previous VFR • Bar risers • Venhill braided brake lines in black • Refinished valve and engine covers Photo Album here Short walk-around video Paint by Steve Nick Customs, Woodstock, IL Upholstery by CM Wiltberger II, Twin Lakes, WI ![]() SOLD: $50,000 Recently sold via eBay auction, this RC30 garnered a single bid at the opening price of $50K. The description indicates that the bike has been stored 30 years and last operated ten years ago, run out of gas and left untouched. The bike is unmodified, which is good, but it's showing some issues from storage and too much time on the salty Florida coast. Inexplicably, the gas cap won't open, so some surprises may lurk there. This rare, low-mile collectible isn't presented particularly well, and I would feel a lot better with a personal inspection. In any event, a buyer has seen the potential and now has his dream machine — some sorting required. ![]() The side fairing panels for Project 38, a 1986 VFR750, are back from paint and are in need of reassembly before they are mounted on the finished bike. Shown at right is the OEM heat/sound foam mat. The original mats have dried with age and usually crumble to the touch, well past their use-by date. I remove them in any case for the painting process. There's no replacement from Honda, so I use a modern foam/foil self-stick mat cut to fit. (Below) I begin with a paper template, cut to shape, and punch out the fastener holes with a hammer and homemade punch. Those spring clips are difficult to remove (gently but forcefully pull upward with a pliers) and sometimes the plastic pegs they attach to break off. No worries, between the remaining pegs and the sticky backing, the new pad will be secure. Here, the center peg is missing. ![]() Next I'll install the plastic ducts, which screw into three fragile plastic towers using expanding brass inserts. If you're very lucky, the securing screws broke free and left the brass inserts intact, but more likely the screws are corroded in place and broke the inserts loose, cracking the towers in the process. One approach is to fill the towers with JB Weld or similar, drill out a suitably sized hole into the filled tower and use a sheet metal screw to secure the duct. In this case, I chose to reuse the brass inserts by doing my best to repair the cracked towers (prior to painting), separating the screws/inserts, and installing the inserts with a few dabs of JB Weld. Once it cures, the original screws can be used to install the duct. This panel is just about ready for the bike. ![]() But wait, there's more…. While I'm at it, I'll need to refurbish the fairing stand-offs. These came in two styles for the 2d-gen bikes; these elegant billet aluminum posts the more common. They were originally black, but we've decided to brighten them by going with the polished aluminum look. Trouble is, that black can be either paint or anodize. We had one of each, so I would first need to remove the anodizing. I do this by soaking the item in spray-on oven cleaner for about 30 minutes in the warm sun followed by a rinse with water. Next, I screw an allen bolt into the open end to allow chucking in a hand drill, then polish with a strip of wet/dry sand paper, 400 to 800 grit, depending upon the condition of the aluminum finish. A quick hand or wheel polishing completes the process. I like to coat the finish with Sharkhide sealant to preserve the shine. What remains for the fairing preparations are to install the headlight and tail light assemblies into their respective fairings and we're ready to make Project 38 look like a motorcycle again.
![]() What: 2000 VFR800 FI Where: Seattle, Washington Why: Well-loved, tastefully farkled Price: $5500 In a bold move, Honda offered the 2000 VFR800 in a single color: Pearl Shining Yellow. And it was the only model year that a yellow VFR would ever be available from the factory, at least in the U.S. By all accounts, the color choice was a success and still is, judging by the vociferous crowd of happy yellow owners out in VFR-land. If your tastes lean in a similar direction, here's a yellow Interceptor that makes most look pretty pedestrian. The bike shows 21,319 miles and the seller confidently states, "you won't find a nicer 5th-gen anywhere." The bike's had recent maintenance and the list of mods is enticing: Staintune high mount exhuast w/ removable DB killer DMr performance suspension front and rear Sargent seat with removable pillion section Full HEL stainless brake lines for the linked brakes Signal Dynamics headlight modulator Signal Dynamics brake light flasher Probolt stainless fairing bolt kit VFRness wiring harness Aftermarket levers (OE included) GIVI tanklock ring The price of $5500 is at the top of the 5th-gen heap, but so is the bike. ![]() My painter has recently finished not one, but two R/W/B 2d-gen projects for me. That's a lot of pieces to keep track of but it's all safely back home and ready to go back on the bikes — well, some reassembly required. Here, we'll work on Project 38, and that begins with the fuel tank. We need to reinstall the fuel cap, petcock, fuel level sensor, heat pad, and front/rear rubber mounts. (Below) The fuel cap is straightforward, but this cap required lots of massaging with Autosol polish to remove spotting on the surface. The cap's anodized finish can be difficult, sometimes impossible, to polish but in this case it worked pretty well. TIP: If your cap is reluctant to close without excessive force, it may be that the rubber seal has hardened with age and exposure to fuel. I've found that applying heat to the seal and then closing it will allow everything to fit nicely. Cover the opening to protect the finish and avoid gas fumes. (click on images to enlarge) ![]() Next I'll tackle the petcock assembly. I'll install a new petcock, but years of neglect usually leave the shiny bits dull and spotted. First, a cleaning, with special attention to the recessed lettering to remove built-up wax which had obscured the black letters. Then a hand polishing with Meguiar's Ultimate Compound brings this bit of bling back to its original look. (Below) Next, I install the low fuel level sensor with fresh o-ring, followed by the heat shield, gently bending the holding tangs. New frame cushions are put in place. For the original location, look for a paint shadow where the old cushions were located. Lastly, a new front mount rubber cushion is slipped into place and the rear rubber fitted. This is a California-spec tank, so I won't forget to put a vent hose onto the tank's forward fitting. This tank is ready to be installed onto the bike. Next, I'll prepare the side fairings.
|
THE SHOP BLOG
|