As your shop manual likes to say, "installation is the reverse of disassembly." Which is true, but here's a few tips I've learned over the years.
Note: I will be syncing these carbs once the engine is running, so before proceeding with this install, I've connected the sync tool's vacuum hose adaptors and hoses — see a previous post ("Preparing For Carb Sync") for details.
Note: Check your carbs for leaks before installing: see my technique at the bottom of this post.
If your carb insulators (manifold boots) are hardened with age, simplify your life by installing fresh boots, which are still available from Honda. First remove the lower clamps and, with a large pliers, give the old boot a firm tug to remove. Clean up the area and push the new boot into place, noting that the groove adjacent to the word "Carb" is oriented to 12-o'clock (below). Install all eight boot clamps, oriented to the left, and tighten the lowers.
(click on any small image to enlarge)


(Below) I wipe a film of grease or something similar on the lip of the boots to help the carbs slip into place. Place the carb set square to the front boots and push firmly down till seated in the front boots, verifying that they're seated with a flashlight. To get the rears in place I maintain downward pressure with my left hand while running the blade of a flat screwdriver along the inside of both rear carb boots with my right hand. If your boots are fresh and supple they will "pop" into place after repeating the screwdriver trick two or three times. Tip: if you're in a cold environment, adding heat to the boots with a heat gun will help soften the boots.


(Below) Tighten the upper boot clamps making sure that the clamp is square in its groove all the way around. Use a flashlight to verify this as you tighten the clamp. The 1990+ clamps have an upgraded design to hold them square, but the earlier models don't. Install the throttle cable ferules, then the cable bracket's two screws. Install the choke cable ferule, then tighten into its clamp. Tip: A long screwdriver is invaluable to reach the right side carbs...and a JIS screwdriver is always recommended.


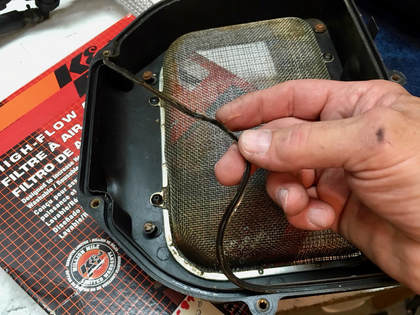
Finally, install the complete air filter housing along with the type of air filter that you plan to use. In this case I'll be using a fresh K&N filter so I'll remember to remove the rubber gaskets in both the top and bottom air filter housings. The K&N won't fit correctly with those gaskets in place. I'll keep them in case a future owner wants to go back to OEM.
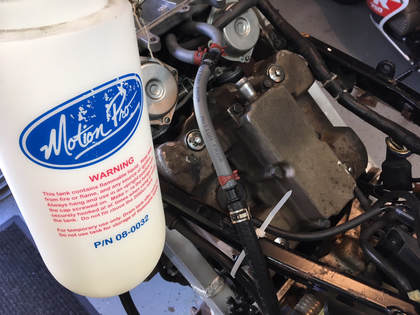
(Right) At this point I'll connect the fuel I.V. direct to the carb intake line in preparation for engine start. If you do this, disconnect the fuel pump power supply at its connector just above the pump. The pump relay can remain connected.
You can also use the fuel tank and pump with all its plumbing hooked up.
With the radiator reinstalled (and filled), double check all your connections, hook up the battery, and we're ready to hit the magic button!
Leak Check
(Below) Here's a tip I learned the hard way. You'll want to check your carb work for leaks, and having the carbs completely mounted is not the best time to do that — if there's a leak it'll be dripping all over your engine or, worse, overflowing the vents directly into the intake manifolds and down into the engine. Save yourself all that potential grief by checking the carbs on the bench.
I simply place the carb set into a large tub, connect the I.V., open the spigot, and let them set for a few hours. Any leaks are contained, and because the carbs are still off the bike, finding and fixing a leak is less painful.

 RSS Feed