|
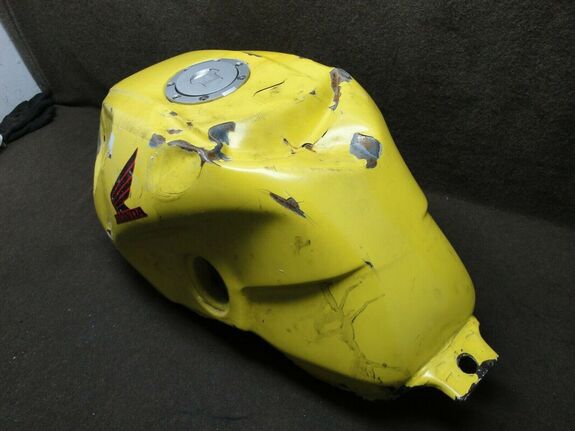
Available on eBay, this 2d-gen fuel tank's best days are definitely behind it. I shudder to think what horrible incident befell this bike (likely beginning with the poor life choice to paint it yellow) but it looks to me like it fell out of an airplane. No indications of the interior condition but, judging by the exterior, we can probably assume the worst. $174.40 includes shipping to CONUS. If you miss out on this one, I've got another I can sell you — if I can find where I tossed it into the swamp.
0 Comments
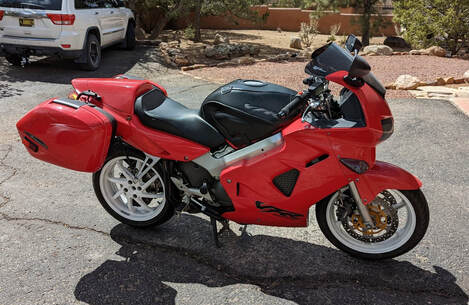
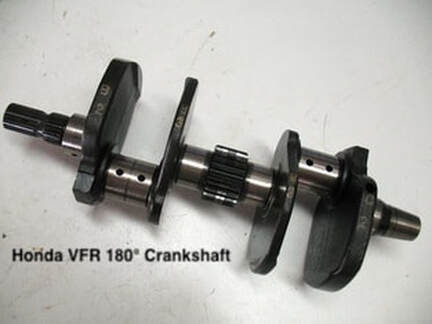
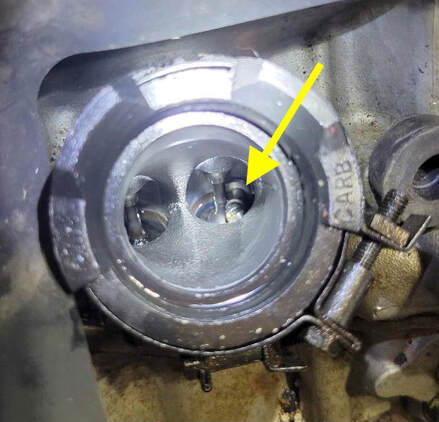
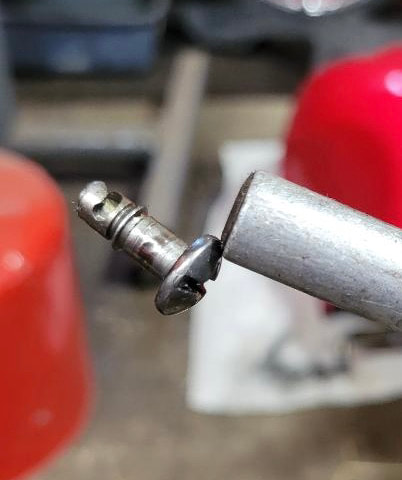
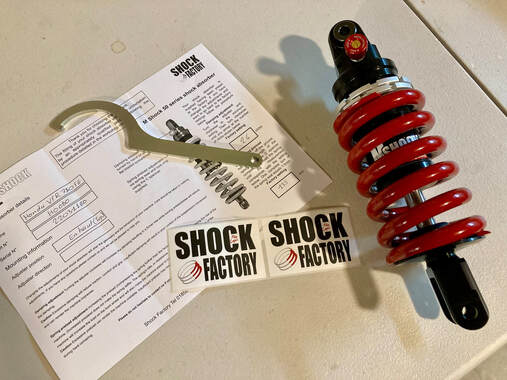
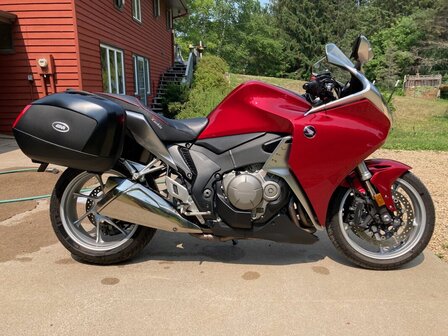
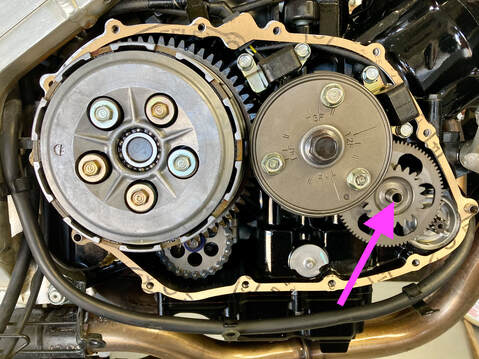
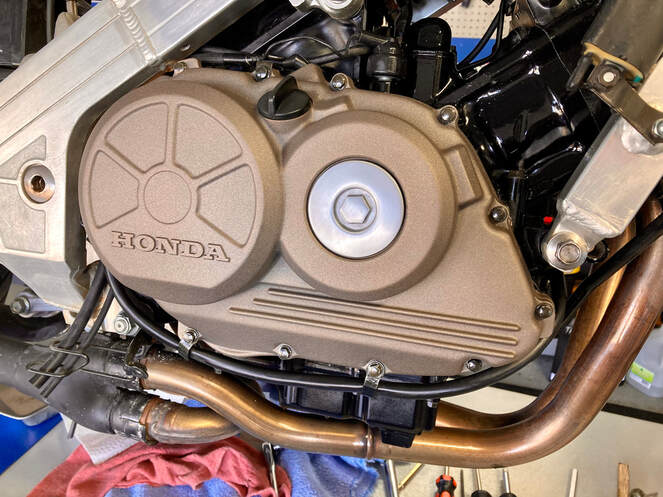
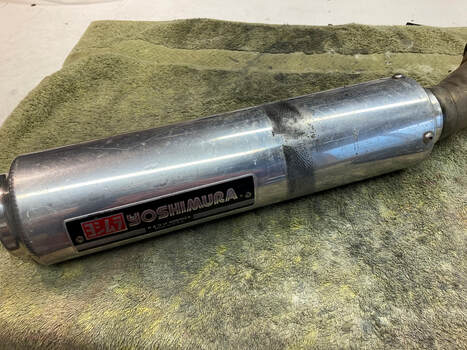
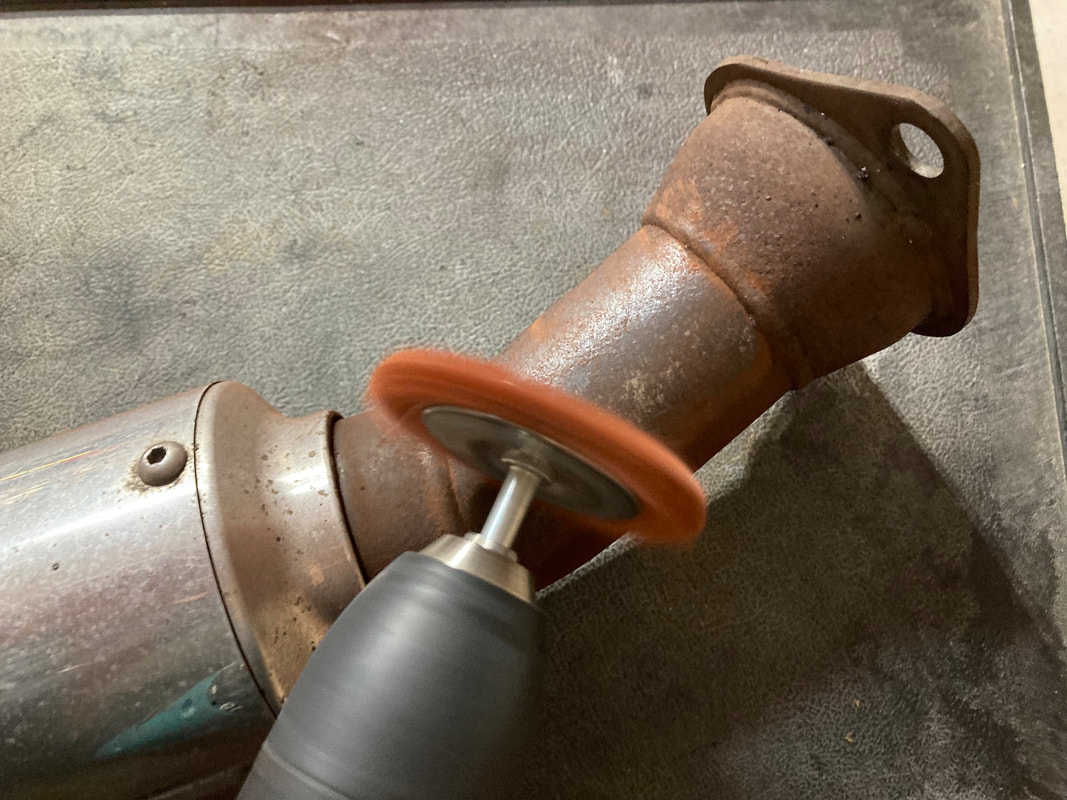
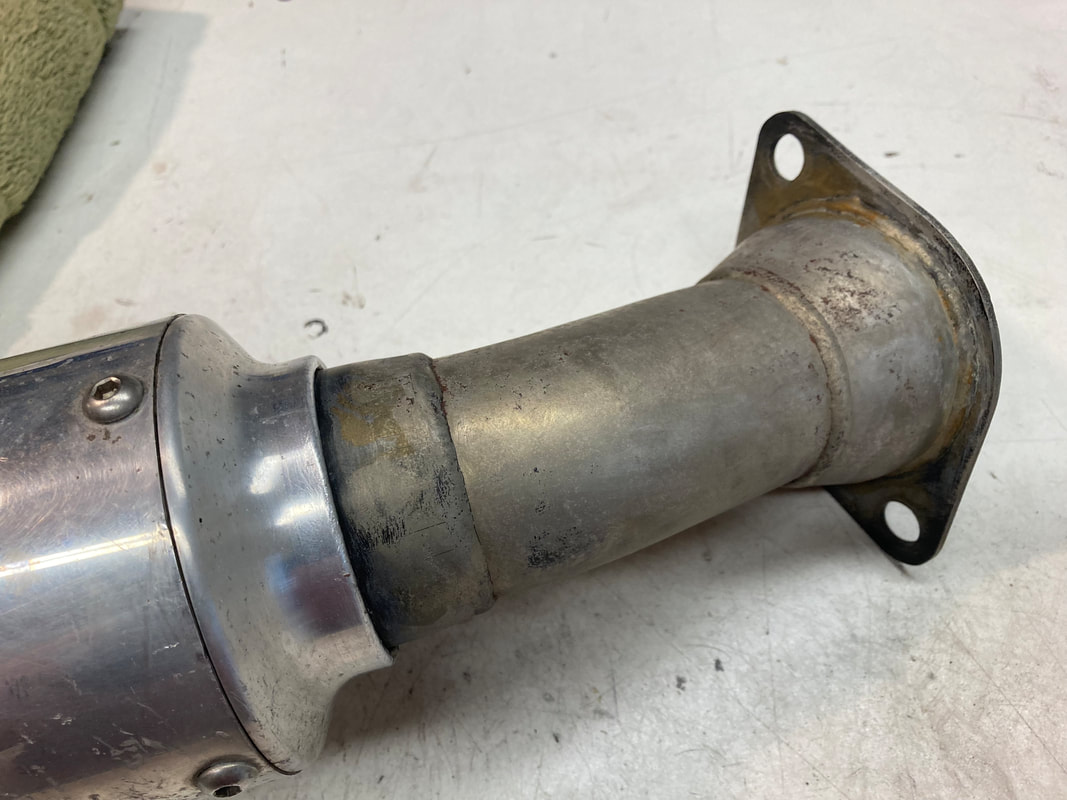
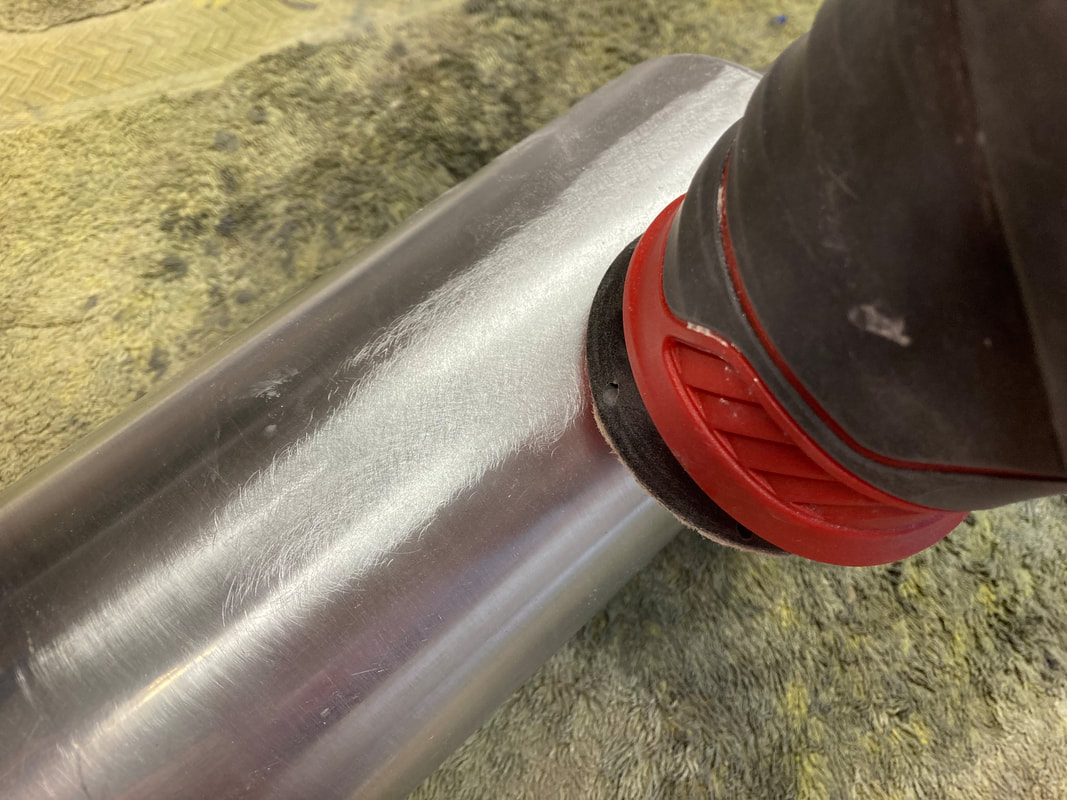
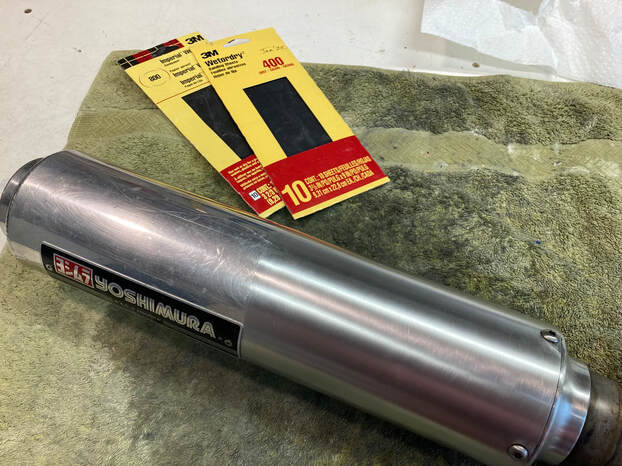
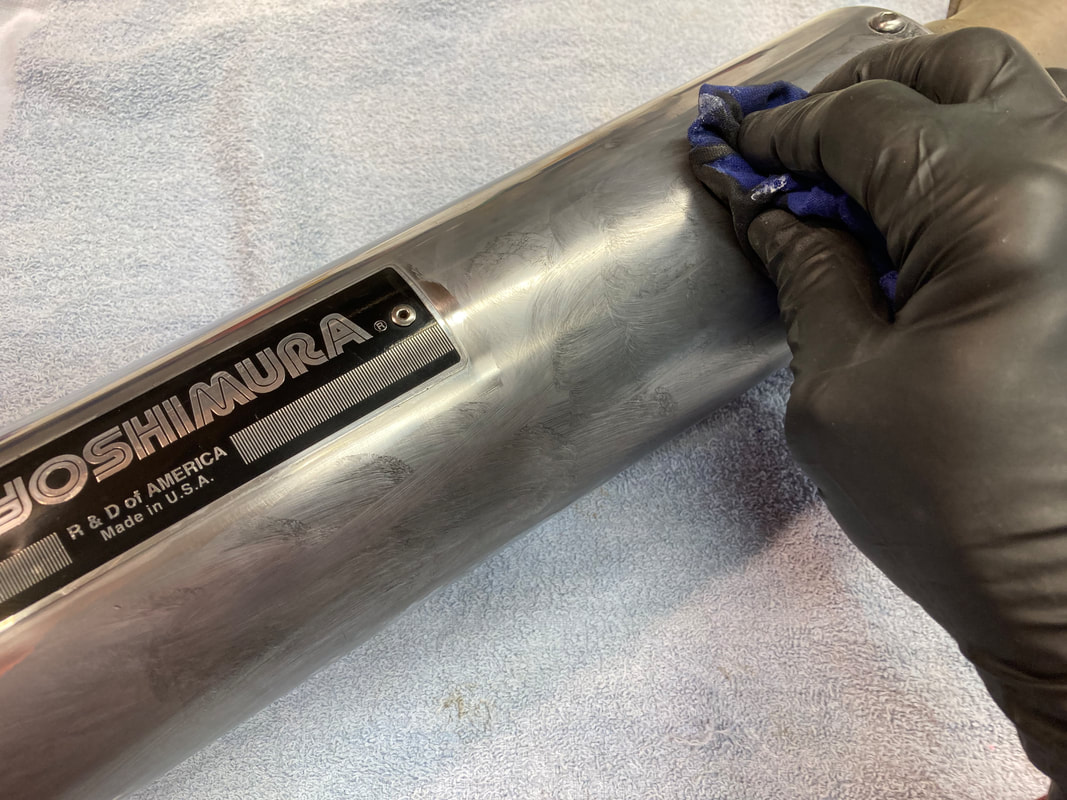
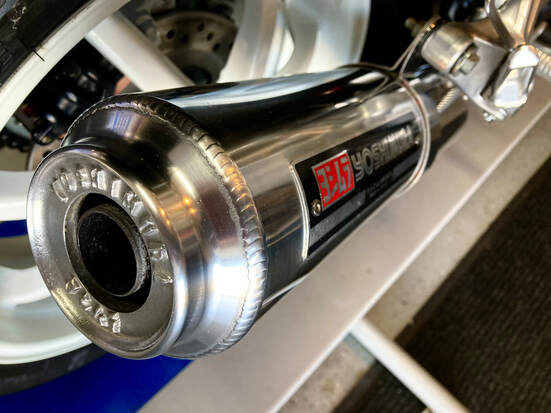
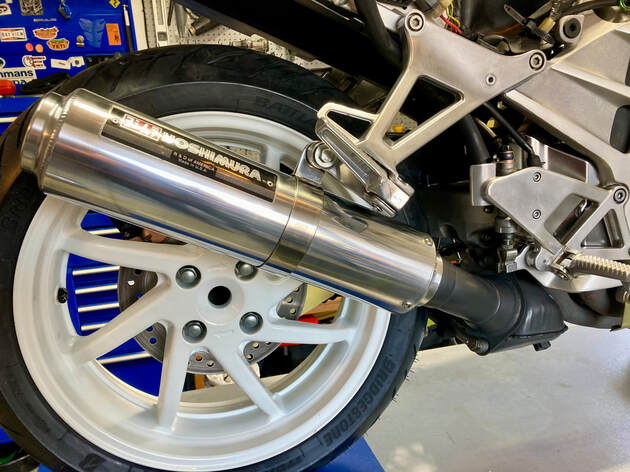
Click on image for the ADVrider link What: 1998 VFR800 FI Interceptor Where: Santa Fe, New Mexico Why: Fully farkled, ready to roll Price: $5000 I know, that's all the money for a 5th-gen VFR, but wait, there's more….From the seller: "1998 VFR 26,000 miles. I am the second owner. Bought locally from a Highway patrolman bone stock. White powder coated wheels from a 3rd-gen. Wolf undertail exhaust (Impossible to find these days), modified brackets to accept bags from a 6th gen. I have a stock solo cowl that is clean, had to cut this one to make it fit. Sargent seat, bagster tank cover. geared 1 down in the front, 3 up in the rear for punch as I'm not really interested in top speed. Ceramic black coated headers, Penske rear, Gold-valved front. Steel braided brake lines, a few little scratches and dings here and there as you would expect from a 24-year old that is ridden. Peg lowering blocks, mirrors from an '01 with Lobsterman extenders so you can see who is trying to catch you. Michelin Pilot sports. VFRness wiring re-done, etc, etc. It's a turn-key got-it-all 5th that I will miss dearly. Box of odds and ends and OEM stuff." So…known history, check. Luggage option, check. Suspension upgrades, check. Cool pipe, check. 8-spoke rear, check. And more, like white wheels which are just icing on the cake for me. A unique, nicely presented VFR just begging for a fly-n-ride from exotic Santa Fe. February 2016 V4 Music Explained While the first generation VF's used a 360° crankshaft design, the redesigned '86 VFR changed to the current 180°. From an engineering perspective the 180° gives up a little midrange power in exchange for some extra boost at high revs and is a bit smoother, but for the rest of us...it just sounds better. Why? Well, something in our brain's aural processing seems to think that an off-beat staccato is more pleasing than a steady one. Ask any Harley lover, or listen at the fence when a MotoGP Ducati or cross-plane crank Yamaha streaks past. The smooth sound of a passing fighter jet may sound impressive but it doesn't get to your groin like the thundering music of a P-51 Mustang. As it turns out, YouTube guy roadracenut has put together a musical and visual explanation of how the VFR makes its beautiful noise. Enjoy.... Reader Mark T. got an interesting surprise recently after removing the carbs from his 4th-gen VFR. While making a cursory flashlight check into the engine's intake tracts, he spied this fairing fastener resting atop a valve! The Dzus fastener was loose, but wouldn't come free until the crankshaft was rotated enough to open the valve, allowing the offender to be lifted out with a magnet. This was a running bike when Mark recently acquired it so he has no idea how long or how many miles the little guy has been rattling around in there. Amazingly, there's no apparent ill effects to the engine nor the fastener. This is a great reminder for all of us to keep these engine openings plugged at all times — and keep track of our fastener hardware! Last week I was shopping for replacement shocks for the 2d-generation VFR and contacted Mike Capon in Morestel, France. Mike runs the Shock Factory, producing his own designs with extensive experience in automotive, motorcycle and competition, and was a successful racer in his own right. He sounds like the guy you want building your suspension. For the 2d-gen bikes he offers his M-Shock, a custom-built unit which features preload adjustment and a unique single-point compression/rebound click adjustment, designed to automatically keep the correct ratio between the two. Spring rate is chosen for your riding requirements and every shock is dyno-tested and factory set. Even a preload C-spanner is provided. And a 2-year warranty. The cost for this goodness was $492 at the current Euro/Dollar exchange rate and, amazingly, the shock arrived at my doorstep six days after placing the online order. Shipping was a bit pricey at $80 (included in the above price), so I guess that bought it an airplane ride to the U.S. The plan is to install the shock on Project 36, a 4500-mile 1986 VFR750, to complement the RaceTech Gold Valve emulators I'm currently fitting to the bike's forks. I can't wait to try it out. It's good to know there's still options out there for our VFRs. Click on image for the VFRworld link What: 2010 VFR1200F Where: Minneapolis, Minnesota area Why: Nice, one-owner, low miles Price: $6500 (asking) Sometimes it's a little shocking to realize that the 7th-gen VFR1200 has been with us for 12 years. Introduced as a sophisticated high-end sport tourer, the model didn't do well in U.S. showrooms, possibly due to its straying too far from the established Interceptor formula. This is a large, heavy, powerful, mile-eating machine in the mold of a European grand touring bike, akin to a BMW K1300GT (though lacking such competitors' electronic aids) — not quite what the VFR faithful had expected. OMG, it even offered a DCT "automatic" option! After four years the VFR800 would return and the 1200 platform would morph into a large capacity adventure-styled bike in the form of the VFR1200X, aka Crosstourer. But all that history leaves us lucky used bike shoppers an exceptional choice for a stable, stylish, reliable sport touring mount just made for a run on the Beartooth Highway…and a fast, comfortable way to get there droning along Interstate 90. The fuel mileage won't be the best, but shaft drive takes away one maintenance concern. And this particular example adds some storage capacity in the form of Givi bags (which look right at home on this bike) plus a little more comfort provided by the Corbin saddle. Add a set of bar risers and a tail pack and point the front wheel towards your next destination — 150 rear-wheel horses making short work of that first on-ramp. This bike shows about 14,000 miles with some recent maintenance (I think a valve check is due at 16K) and is offered by the original owner, who claims this bike was well-loved, well-maintained and never down. The asking price of $6500 is not out of line and represents a typical VFR bargain in the used bike world. I recently replaced the engine and valve covers on Project 36, a 1986 VFR750, with a set of powder coated covers expertly refinished by Tom at Tom's Cycle Recycle. This is a straight-forward parts swap, but the fun comes when removing the stubborn old gasket material which has adhered itself to the engine and cover surfaces. One other point: when removing the clutch-side cover, you'll be hoping that the little starter clutch gear locating dowel (pictured, arrow) remains in place as you pull the cover free. If not, you'll be struggling with a mechanical puzzle attempting to get the gears realigned. Cleaning the cover of old gasket is simple enough on the bench, but the engine casings present the problem of keep the scrapings out of the engine. I carefully insert paper towel into the nooks and crannies and begin scraping, first with a flat gasket scraper then with the very effective pull-style gasket scraper. I finish with a general clean-up with a fine grit emery cloth, carefully pull the paper towel clear and inspect the area for any bits of gasket left behind. A final wipe with solvent and the surface is ready for the gasket. I hang the new gasket, dry, onto the dowel pins, if the casting has them. The alternator cover, for example, does not, so I just hold the gasket in place with an attachment bolt when assembling. If gravity has your gasket drooping downward, apply a smear or two of gasket cement or RTV just to hold it in place as you install the cover. Insert the bolts and snug in an alternating sequence until tight. TIP: The clutch cover swap can be done without draining the engine oil by leaning the bike on its sidestand. Project 37, a 1993 VFR750, arrived at the sprawling V4 Dreams facility (my garage) sporting this very cool period-correct Yoshimura slip-on muffler. It has seen better days, but shows minimal rash and has the mellow bass sound that makes the Yosh so desirable…IMHO. It would never do to mount this piece on this minty VFR refurbishment without doing our best to bring it back to its glory. The aluminum muffler itself is scuffed, scratched and dulled from years of neglect, and its connector pipe is surface rusted. The mounting strap has rubbed a scar into the aluminum but the "Yoshimura" nameplate is in great condition. Aluminum is forgiving, so I know we can perform a little magic on this piece. The sequence I'll use is: • A thorough cleaning • De-rust the connector pipe • Repair the bruises in the aluminum • Sand & polish the aluminum • Paint the connector pipe Lacking a media blaster, I attack the rust mechanically with a rotary brush followed by a soak in gel rust remover. Two applications of the gel together with wire brushing gets me a rust-free surface. I don't want to apply paint at this point as it will be handled a lot during the aluminum work, so I'll save painting for the final step. (click on an image to enlarge) (Below) I'll begin the aluminum work by sanding with the mildest grit wet/dry paper I can use but still aggressive enough to get through the surface corrosion and light scratches, in this case 400-grit. When that's completed, I can see the more severely damaged spots which I'll blend out using a dual-action sander with an aggressive pad. With the scratch blended I'll need to smooth the sanding marks with progressively finer wet/dry paper, ending at 800-grit. Be prepared to spend some time gently massaging the soft aluminum, ending with a sanding motion in a single direction — I go around the muffler, as opposed to lengthwise. For a comparison, here's a look at the muffler with the right half finished-sanded, ready for polish. Next, I'll tape off the "Yoshimura" plate to protect its finish and complete the left side. The "Yosh" plate itself will be buffed with a mild polishing compound. Next, I apply aluminum polish. You can take the polishing to whatever level you wish…I like to just get a nice sheen to show off the "soft" look of aluminum without making it chrome-like. Finally, I tape off the aluminum and apply the high-temp flat black paint to the connector pipe. After a few days, I'll rub the black paint with a dry microfiber cloth which will change the flat finish to a factory-like low sheen. The finished project is a fitting compliment to this beautiful VFR.
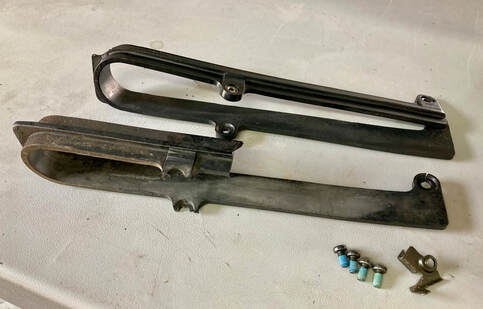
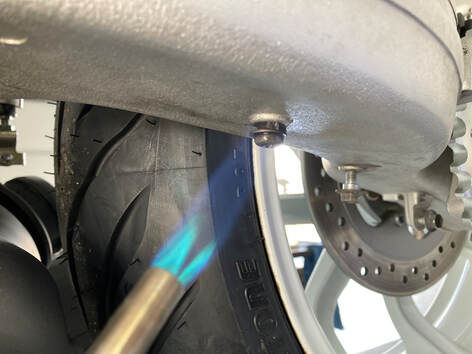
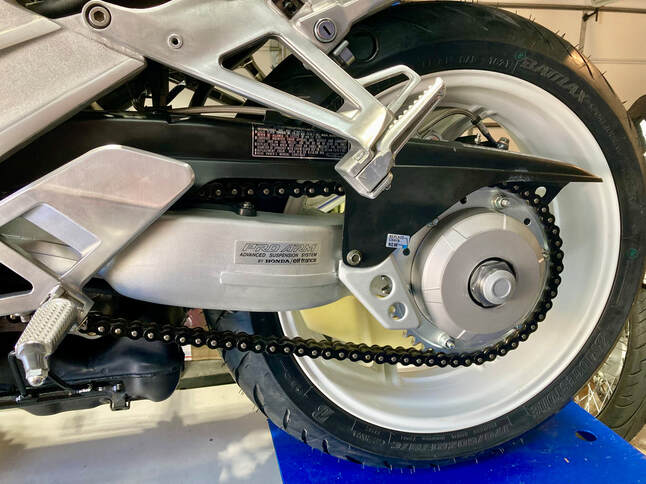
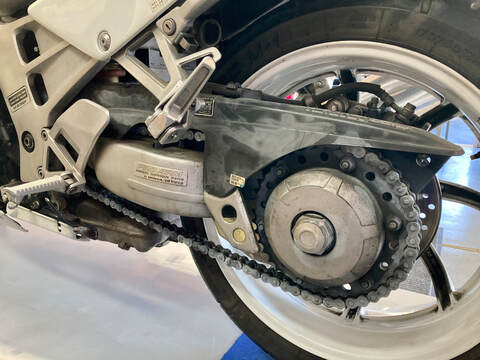
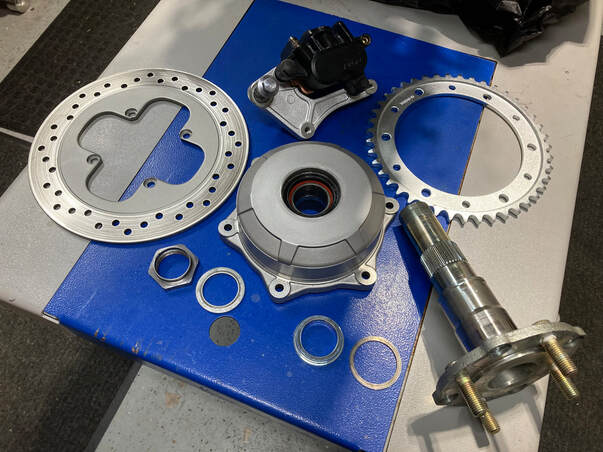
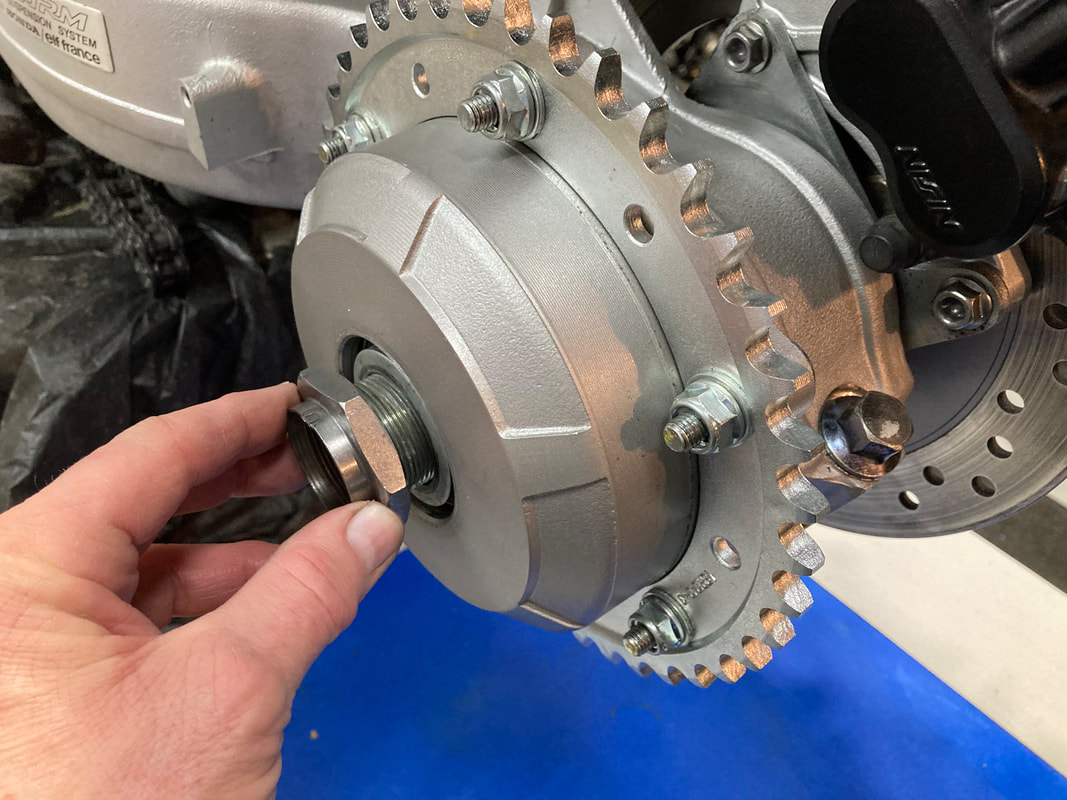
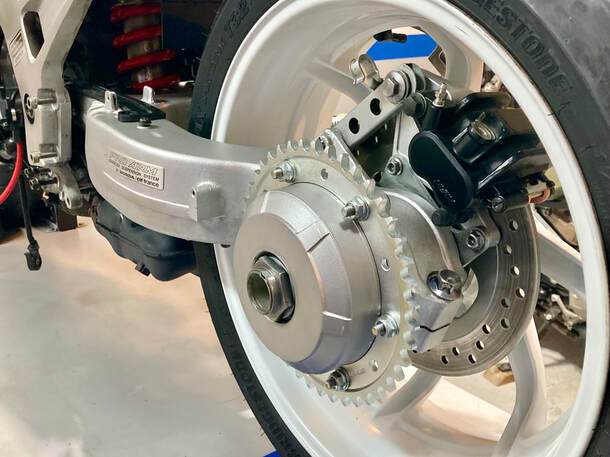
As is often the case when working with our old machines, what appears to be a simple replacement or repair turns into a lengthy project. Case in point; the chain slider replacement on Project 37, a 1993 VFR750. The original slider (lower) was found to be missing three of its four attach points along with half of the lower guard itself. The part is NLA from Honda but I was lucky to find a very nice used replacement on eBay, complete with new mounting hardware, which would come in handy. When I saw the applied thread locker on the replacement screws, I got a bad feeling about removing the four existing screws, in place since 1993. My fears were justified, as none of the screws would budge with a screwdriver, despite my best efforts. I realized that if I simply forced the screws I would risk them shearing off, which would require removal of the swing arm in order to drill out the broken screw and tap fresh threads. Finesse over force would be called for. (Below) My approach was to soak the screws overnight with penetrating fluid and next day heat the screws with a mild flame, then gently work each screw loose in a back-and-forth motion with a vice grip. It worked, but the threads were tenacious, requiring the vice grip for every turn till the screw was out. The upper forward screw holds a metal bracket which wouldn't allow the vice grip to seat on the screw head, so I had to tear the bracket free, bit by bit, then work the stubborn screw. This project wasn't done with me yet, as the new screws wanted the swing arm threads to be tapped before they would allow themselves to be seated without undue force. In the end I would win this little battle, and our "new" chain guard will do its job — hopefully for a long, long time. Sometimes pictures don't do justice to the foreboding task ahead; the rear drive area of Project 37 is a perfect example (right). Let's list what's involved in refurbishing this area. There's the wheel, the brake caliper, brake disc, chain, sprockets, sprocket carrier, swingarm, chain guard, and, in this case, the chain slider (all four mounting points on the slider were broken or missing). This 1993 VFR750 was in typically neglected condition — years of caked on oil/dirt/brake dust, worn chain, nasty brake disc, discolored chain guard and a sticky caliper in need of complete rebuild. The process begins with raising the rear of the bike off the ground and a complete disassembly of all the components. Then everything is cleaned; in this case the initial dirt removal went quickest with localized cleaning using brake cleaner and a toothbrush, followed by a general cleaning with water-based degreaser and a rinse. The bearings on this bike (16,000 miles) don't need replacement so they're left in place. I then began the refurbishing of each component and associated fasteners. In this case I would be fitting new chain & sprockets, repainting the brake disc and the little plastic axle hole cover, while everything else cleaned up beautifully. I was lucky to source a NLA chain slider from eBay (see separate post) and the caliper rebuild went smoothly. Even the blackened wheel came back to its gleaming original condition. I wanted to preserve the chain guard's original stickers (in excellent condition) so a cleaning, light sanding and three applications of 303 Vinyl Protectant brought back the black. Ready for reassembly. (Below) The first step is refitting the brake disc, as it's held captive behind the stub axle. Next I'll apply a coating of molybdenum grease to the needle bearings and a light application of spline lube to the drive splines. (click on an image to enlarge) (Below) The stub axle is then carefully inserted from the right side and the chain adjust mechanism is rotated fully forward in preparation of a new chain being fitted. This will allow a full range of adjustment in the future. Next, the caliper is mounted on the torque arm, rotated onto the disc and torqued onto its carrier. (Below) The sprocket carrier is then fitted to its splined counterpart. Then the large nut is installed and will later be torqued to 141 lb/ft. I put down some tape to help protect the carrier from the 46mm socket. Installing the chain will need to await the arrival and installation of the chain slider, but this rear drive assembly is looking pretty.
|
THE SHOP BLOG
|


RSS Feed