With the rear end components installed on Project 41, a 1987 VFR700 F2, it's time to fit fresh chain and sprockets. From the wide selections available at Motosport (.com), I chose JT brand steel sprockets in stock sizes (16/45 tooth), and a Bikemaster X-ring chain in nickel finish. I also opted for a rubber-damped front sprocket, just because.
Here, I'm guiding the new chain around the front sprocket — it's not obvious, but the rear tire is clear of the lift so that the wheel rotates as I guide the chain through the frame and over the sprocket. Notice the notes on the frame and rear sprocket to remind me to torque the fasteners once the chain is installed and the tire lowered.
Here, I'm guiding the new chain around the front sprocket — it's not obvious, but the rear tire is clear of the lift so that the wheel rotates as I guide the chain through the frame and over the sprocket. Notice the notes on the frame and rear sprocket to remind me to torque the fasteners once the chain is installed and the tire lowered.

(Below) I'm using my trusty Motion Pro chain breaker/riveting kit. Chains are often packaged with the correct number of links, but this one came with about five extra links, which I marked and drove out the necessary rivet. Here, you can see the driven rivet and its o-rings. The new master link is greased and ready to install. This is a rivet-style master link, the "clip" style is not appropriate for high performance street bikes.
(click on an image to enlarge)
(click on an image to enlarge)


(Below) Next, I install the new master and o-rings from the backside. The front plate then needs to be "pressed" to achieve the correct width. Be sure to keep the rivets centered in the tool's holes, so as not to inadvertently mushroom the rivet (pink arrow). As I'm pressing the plates, I pause to check the width, matching it to its neighbors.


(Below) With the correct width, I reconfigure the tool to rivet, basically mushrooming the soft rivet to lock the plate in place (no photo). The rivet needs to be just right, too tight and the link won't want to pivot as the chain wraps around the sprockets, too loose and you risk the plate coming off — you can imagine the result. Here, I'm measuring the pressed rivet's diameter — the chain manufacturer will provide a recommended diameter range; 5.48mm is perfect. This is what your finished rivets should look like.


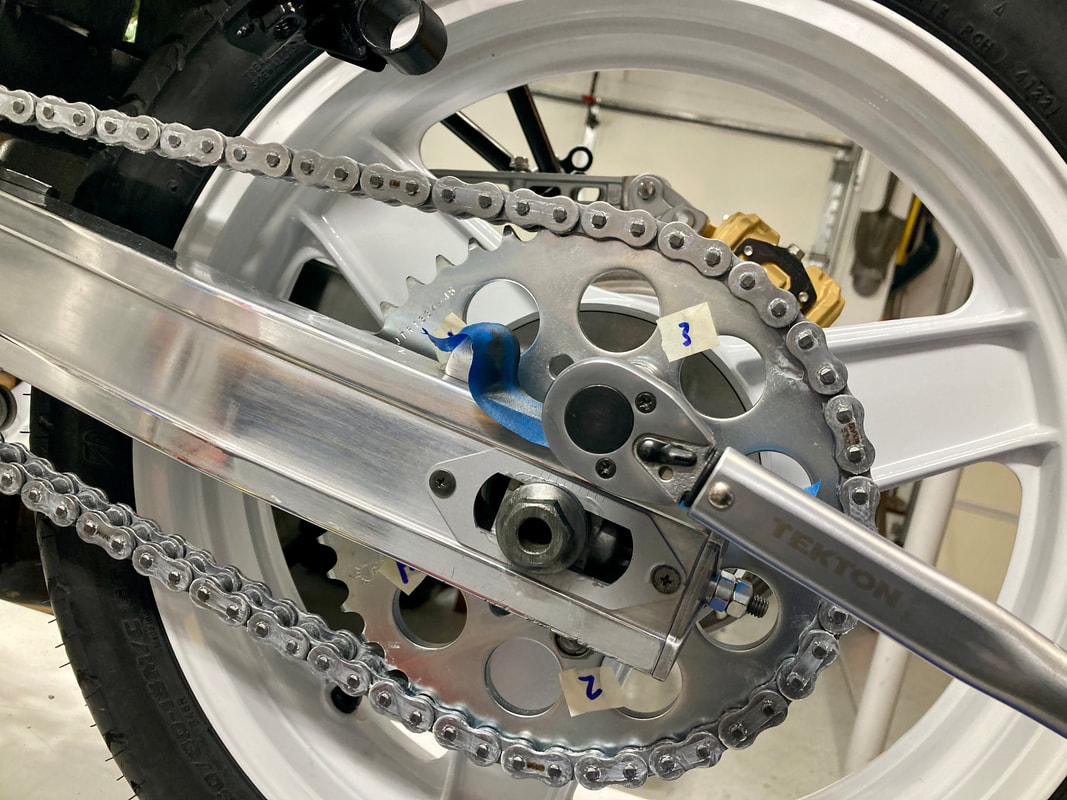
(Below) Finally, with the sprockets now held firmly in place by the chain, I'm able to torque the sprocket fasteners. At the rear, I've numbered the nuts to help me torque them in a crosswise pattern (you have to raise/rotate the wheel to access each nut, and you can easily loose track). After torquing the front bolt, I add a line of white paint. This allows a quick inspection through the sprocket cover to verify that the bolt hasn't loosened.
Rear nuts: 58-72 ft-lb
Front bolt: 38 ft-lb
After adjusting the chain tension, this job is finished. Next, I'll install the sprocket cover and a very special clutch slave cylinder.
Rear nuts: 58-72 ft-lb
Front bolt: 38 ft-lb
After adjusting the chain tension, this job is finished. Next, I'll install the sprocket cover and a very special clutch slave cylinder.

 RSS Feed