Here's How I Repair Those Leaking Carburetor Fuel Tubes — 1986-1993
Honda calls their plastic fuel distribution tubes "fuel joint sets," but I just call them tubes. Their job is to distribute fuel from the inlet line to each carb. There's two tubes, one for carbs 1 & 3, and one for carbs 2 & 4. The point where they enter the carburetor needs to be removable for service and also have a bit of flexibility in use, so they're sealed with o-rings. Like all of our rubber fuel parts they were not designed with modern fuel chemicals in mind, including ethanol. This fact, combined with age, makes them a weak point in the fuel system. I replace them as a matter of course on all my projects, along with the inlet lines. Today we have the advantage of VITON o-rings and TYGON fuel line which can stand up to anything the chemical engineers can throw our way.
The plastic tubes with o-rings are still available from Honda for about $30 each. There's also an eBay seller who offers metal replacement tubes/o-rings for about $85 a set. On my "Products" page I offer a repair kit consisting of four o-rings, two fuel lines and clamps for $16. Whichever direction you choose, the installation is the same, and here's how I do it....
Note: the carbs are numbered as follows: Viewed from the rider's seat, #1 is left rear; #2 is left front; #3 is right rear; #4 is right front.
As Hippocrates famously said, "First, do no harm." The idea here is to separate one of the carbs from the set in order to slide the tubes away, replace the o-rings, and reassemble, disturbing the carb set as little as possible. I separate #4 because it affects the others the least. And remember that the tubes are plastic so be gentle.
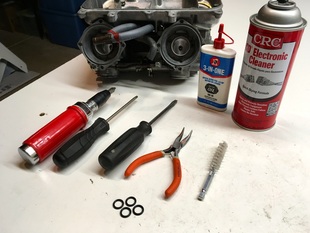
Here's the required tools: impact driver, screwdrivers, needle nose pliers, cleaning brush, cleaning solvent and oil. A dental pick or tiny screwdriver is also useful for removing the old o-rings.
Here's the required tools: impact driver, screwdrivers, needle nose pliers, cleaning brush, cleaning solvent and oil. A dental pick or tiny screwdriver is also useful for removing the old o-rings.
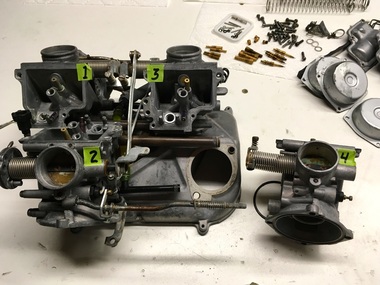
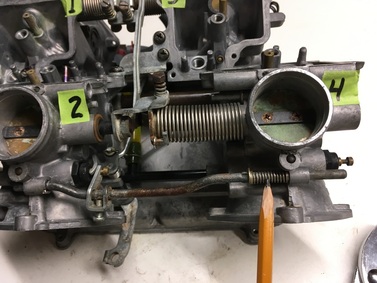
Like everything mechanical, this process is easier with the carb rack cleaned. We begin by removing the plenum screws — 8 inside the plenum plus 2 on the sides (Note: '90-'93 do not have the two side screws). These screws often require an impact driver to loosen (carefully). With the carb rack then turned upside down (plenum down) on the bench with carbs #2 & 4 facing me, remove the center bracket and its 4 screws. All the linkages will remain in place except the choke rod to carb #4. (click on a photo below to enlarge; '86-87 carbs shown)


I now remove #1 & 4 tiny sync springs (not the screw and spring, just the springs underneath). It helps to first unscrew them about 5 turns and, after reinstalling the spring, screw the same amount back in. The #3 sync spring needn't be removed. Also remove the two large throttle shaft springs — the ones between the sync screws, not the long heavy springs.
Finally, remove the choke shaft bracket at #4 by loosening it's set screw and sliding the bracket off the shaft. Also loosen the same bracket at #2, visible in the upper left corner of this photo. This will allow the choke shaft to slide free of #4 when we separate it from the plenum. On '90-'93 loosen the bracket and slide the rod free through #4. The spring and bracket will fall free.
I wriggle completely free carb #4 and loosen (but leave in place) the remaining carbs. Note that the carb bases are located to the plenum on dowel pins with large sealing o-rings.
Now is the time to note how the lines are routed, you may want to take a photo. I then cut the old fuel lines (assuming they’re being replaced) as short as possible to get them out of the way (don't pull on them, you could break the plastic tubes) and gently free the #2/4 fuel tube and then the #1/3 tube.
Now is the time to note how the lines are routed, you may want to take a photo. I then cut the old fuel lines (assuming they’re being replaced) as short as possible to get them out of the way (don't pull on them, you could break the plastic tubes) and gently free the #2/4 fuel tube and then the #1/3 tube.
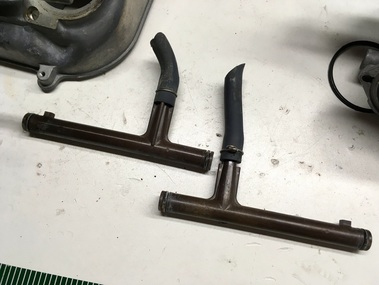
The tubes are identical -- just installed in a mirrored fashion. There are fitting nubs, one per tube — one goes into carb #1 and one into #4 — have a look (note: '90-93 have no fitting nubs).
Those old, hardened fuel lines will make installation more difficult and really should be replaced. Now's your chance.
The two smaller, black air vent tubes will have fallen free, just let them be till installation (note: '90-93 have four vent tubes).
Those old, hardened fuel lines will make installation more difficult and really should be replaced. Now's your chance.
The two smaller, black air vent tubes will have fallen free, just let them be till installation (note: '90-93 have four vent tubes).
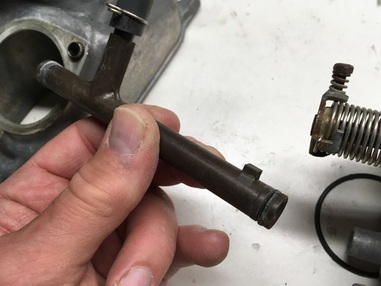
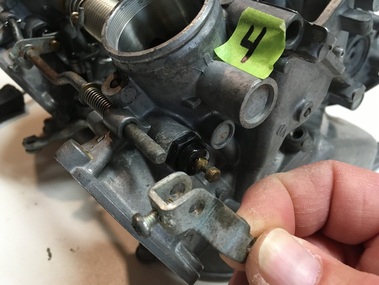
The fitting nub for carb #4 ('86-87).
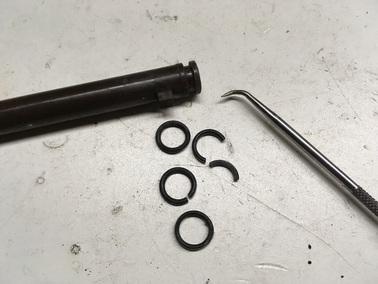
Remove the old o-rings, clean the grooves and install the new.
I now take a moment to clean the holes where the o-rings will seat with a bit of electronic cleaner (not brake solvent) and small brush, taking care to avoid any debris going into the carbs. If your carbs are disassembled like those in the photo, just blow air or cleaner into the threaded float valve hole visible at the upper left to ensure there's no gunk left behind.
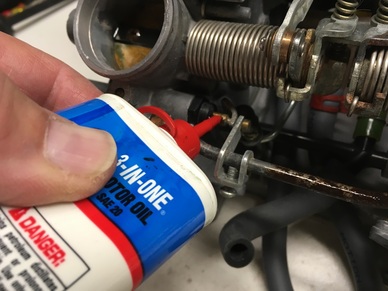
Installation, as they say, is the reverse of disassembly. Only in this case all the pieces have to line up, a bit like herding flys, but it can be done. Note that the longer fuel line locates alongside carb #3 and the shorter one is centered between the carbs. Coat the new o-rings and their receiving holes with a bit of motor oil or grease, mount the new fuel lines and clamps (if replacing) and then work #1/3 tube back into place followed by #2/4 (don't forget the choke shaft — see below), taking care to put the locating nubs back into their slots on carbs #1 & 4.
The choke shaft will have fallen free of #4, so be sure it and its spring are back in place before mounting #4 on the plenum. When all the fuel and vent tubes are lined up, work all the carbs back into place and fit onto their respective plenum mounting dowels. Don't forget the large o-rings between each carb and plenum — make sure they're back in their grooves.
None of this requires force. If you find yourself reaching for a hammer, take a breath and figure out why. It's a three dimensional puzzle, but it does fit back together.
None of this requires force. If you find yourself reaching for a hammer, take a breath and figure out why. It's a three dimensional puzzle, but it does fit back together.
When everything's back in place, hold the whole affair together while carefully righting the carb rack and loosely reinstall the 8 plenum screws, 2 side screws and then the center bracket on the underside — again, they should all go in and bottom easily if everything is lined up. Once all are in place, tighten them up. Flip the rack upside down and reinstall the missing shaft and sync springs (be careful, these will try to escape across the room). The larger shaft spring goes between #2/4 and the smaller between #1/3. During the reassembly process, you should be continually checking that the throttle and choke mechanisms are free and correct. There should be no binding.
Apply a bit of motor oil to the pivot and sliding areas of the choke and throttle linkages. Visually check that all the carbs are seated square and flush.
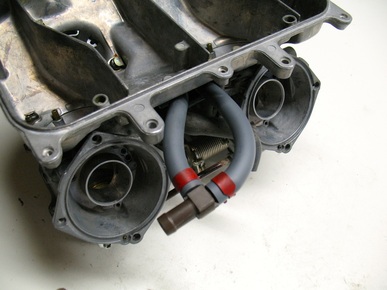
Install the fuel lines onto the "T" fitting. When installed correctly, the different length replacement fuel lines will look like this, facing carb #1 just like from the factory.
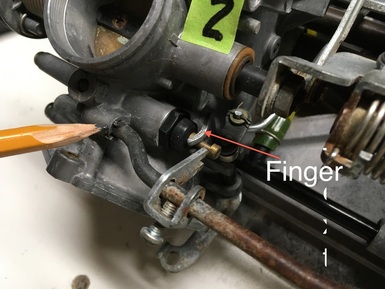
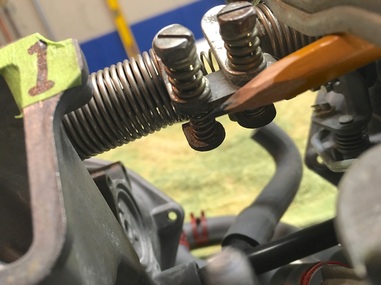
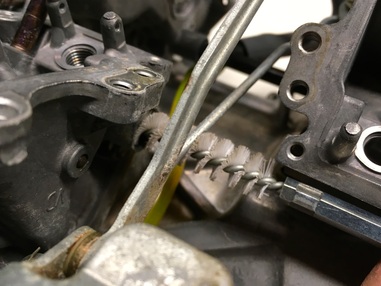
At this point I determine if the choke (actually enrichener circuit) is opening fully. If the bike would barely run when cold-started with full choke or just didn't seem to be choking enough, I carefully bend the forked fingers (where the choke linkage meets the carb) at carbs #2 & 3 in order to provide more leverage, opening the slides farther. This is done delicately, and requires that the little screw-secured bracket on the shaft be moved out of the way during bending. On the '90-93 the shaft simply slides free through the outboard carb, but for the '86-87 there's a trick to easily moving that bracket out of the way and involves loosening the brackets’ holding screws, sliding the entire shaft free of their little locating pins (the pencil is pointing to it), and rotating the shaft, which allows the bracket to be slid out of the way. Reverse the dance to put the brackets back into place. Play about with it.
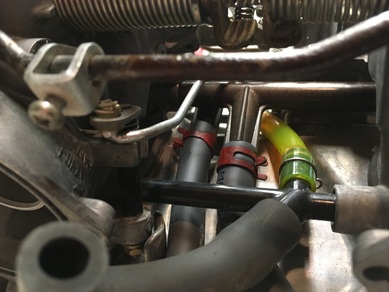
Here's a reference photo ('86-87). On this carb set the vent line is green-colored and gives a good reference to how the grey fuel lines should be routed. Here we're looking between carbs #1 & 3.
After all this fiddling about, the carbs will need to be sync'd on the running bike. Syncing is an important step on any multi-cylinder, multi-carb engine and shouldn't be ignored.
Congratulations, you're done! Your carburetors thank you.
After all this fiddling about, the carbs will need to be sync'd on the running bike. Syncing is an important step on any multi-cylinder, multi-carb engine and shouldn't be ignored.
Congratulations, you're done! Your carburetors thank you.
 RSS Feed