1993 VFR750 — Project 39

Click on image for the full photo album
It's finally finished. I've actually had this bike on the road for the past year, but never quite arrived at the vision I've had in mind since she rolled off the transport trailer 27 months ago. Here's her story….

In early 2022, reader Quinn began a conversation with me about finally getting his '93 back on the road after some ten years under cover in southeast Florida. At some point he decided the project was outside his wheelhouse and made me a proposition: If I promised to do my best to rescue his girl, he would gift me the bike. Attached to the email were some grainy photos, this one showing the sad situation — cowering in a dark corner of an open lean-to ten blocks from the ocean, the humid salt air slowly working its evil on every metal part of the machine. A depressing shadow of its former self.
This VFR has some known history. It was owned by a friend's son before Quinn acquired it. At some point it had been stolen, and when attacking the ignition switch with a screwdriver failed to start the engine, it was tossed into a ditch. The insurance company totaled the bike due to damaged bodywork, but the owner bought it back and had the parts repaired/repainted. Years went by and disuse eventually brought the bike to the state seen here.
It would have to be rescued, of course. I located a shipper and on April 19, 2022 the VFR arrived at my shop. As I peeled away the layers of neglect the picture became progressively more bleak. Steel and aluminum had succumbed to corrosion, the fuel tank was a write-off, the Corbin seat trashed, the paintwork in sorry shape, the brakes and clutch non-functioning, Below are typical examples of what I found.
(click on an image to enlarge)


Undaunted, and with almost $600 (!) invested at this point, I proceeded with step one: Do we have a working engine? After a week of soaking the cylinders in Marvel Mystery Oil, the engine turned over by hand, smooth as butter. I then spun it over with a hand drill to circulate the fresh oil. The compression readings were good but a valve check indicated all but four valves would require re-shimming, so out with all the cams. Reassembled with freshly rebuilt carburetors, the V4 burst to life and, typical Honda, purred happily. Below is a video on the first startup from my YouTube channel, V4 Dreams, and there's several more videos to be found there on this (and other) projects.


The next part of my job is at once difficult and enjoyable. With a cup of coffee (or beer) in hand, I get to sit staring at the naked bike on the lift, contemplating the direction I will take with this project. It's enjoyable because the possibilities are limitless, but difficult because, well, the possibilities are limitless. It's a holistic approach for me as I consider the bike in its entirety. For example, in this case there's the salvage title, somewhat offset by the low entry cost. Am I selling or keeping the bike? Building for oneself is very freeing, building for the mass market is limiting. How about the dollar investment for parts and paint — this bike will need lots of both. There's also the things that can't be practically changed, like mileage (31,612 in this case) or maybe a scratched frame or damaged wheel rim.
In addition, this 1993 is a desirable year in its beautiful Pearl Crystal White. If there's collectible VFRs, this is near the top of that list, so do I keep the original color? As for originality, how far do I want to stray from that ideal? In the world of classic vehicles, original equals higher value, or at least salability, while personalized aesthetics tend to lower perceived value. In my experience, originality is always the most difficult consideration going forward.
In addition, this 1993 is a desirable year in its beautiful Pearl Crystal White. If there's collectible VFRs, this is near the top of that list, so do I keep the original color? As for originality, how far do I want to stray from that ideal? In the world of classic vehicles, original equals higher value, or at least salability, while personalized aesthetics tend to lower perceived value. In my experience, originality is always the most difficult consideration going forward.

But, sometimes, something simple helps out, and this time it was a shock absorber. Years ago I happened upon a fortuitous eBay find — a freshly rebuilt shock from DMr. This fully adjustable Honda CBR929 shock was re-valved, re-sprung, adapted to the Gen 3…and never mounted. I didn't have a use for it at the time but at only $213 I virtually grabbed it and put it on the shelf. With that shock in mind, I decided that this bike's build would proceed from there.
Step one will be to match the front suspension to the new rear. For this I turned to Race Tech and a set of their .95kg straight-wound springs, installed to their specs. The fork lowers were repainted to the original silver and everything mounted up with fresh tapered steering bearings from All Balls.
The forks were bolted up to a repainted and polished upper triple clamp, repainted HeliBars (came with the bike) and topped off with a RAM ball mount for a phone or GPS.


Focusing on the rear, the swingarm was disassembled, inspected, degreased and associated hardware cleaned up as much as the Florida damage would allow, brake caliper rebuilt and painted, rotor repainted and EBC HH pads fitted. The well-worn subframe was also exchanged for a more presentable unit I had on the shelf. The footpeg brackets were painstakingly disassembled, cleaned, painted/polished, and refitted. I don't carry passengers on my VFRs, so those peg brackets were deleted. I decided to eliminate the centerstand, saving eight pounds, as I have a lift and paddock stand for maintenance.
About this time, something interesting happened — the work thus far was responding so well that I began thinking in terms of "my" VFR.
About this time, something interesting happened — the work thus far was responding so well that I began thinking in terms of "my" VFR.


Turning to the engine, I found that its bare aluminum finish didn't fair well over the years, so I attacked the flakey white corrosion with soft brass brushes mounted on a Dremel tool, followed by an application of metal protectant. It's not polishing in any sense, but an improvement nonetheless, and Honda did a good job of hiding the engine behind the fairings. When the shock was off, I took the opportunity to remove the rear PAIR injection tubing and plug the ports, followed by the fronts. The exhaust pipes were sanded and polished, responding moderately well, the black portions de-rusted and painted satin black.
I've always liked the textured "bronze" finish exclusive to the 1986 bikes' engine covers, so I had the clutch cover powdercoated with a polished timing hole cap. On the left side, I happened to have a similarly-colored sprocket cover in my stash, then stripped/painted the alternator and water pump covers and clutch slave a gloss black. Downstream, a 520 chain/sprocket conversion from Superlite was fitted, with an RK chain and 17-tooth front sprocket, up from the OEM 16-tooth, to provide a slightly relaxed highway RPM.
A full set of AS3 silicone hoses/clamps were installed and the radiator fully detailed, its fins straightened and filled with Honda HP coolant.
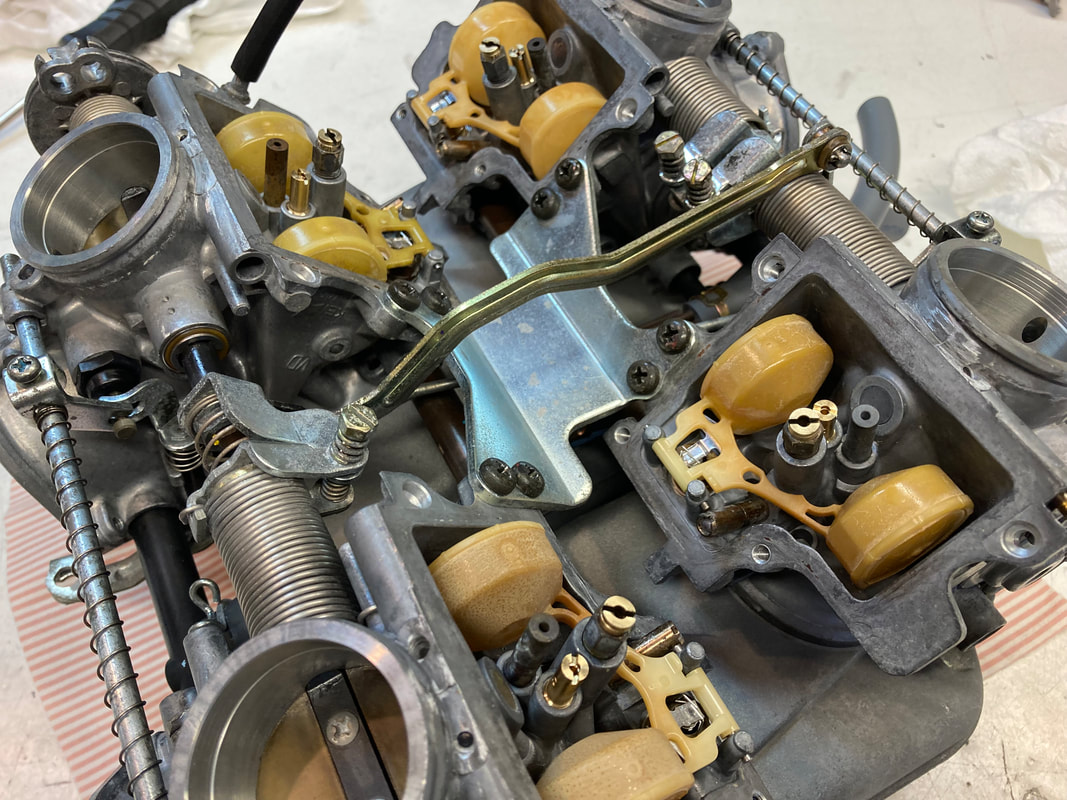
The carburetors were treated to a full rebuild, ultrasonic cleaning, tuning, syncing, fresh intake boots, and K&N air filter.
I've always liked the textured "bronze" finish exclusive to the 1986 bikes' engine covers, so I had the clutch cover powdercoated with a polished timing hole cap. On the left side, I happened to have a similarly-colored sprocket cover in my stash, then stripped/painted the alternator and water pump covers and clutch slave a gloss black. Downstream, a 520 chain/sprocket conversion from Superlite was fitted, with an RK chain and 17-tooth front sprocket, up from the OEM 16-tooth, to provide a slightly relaxed highway RPM.
A full set of AS3 silicone hoses/clamps were installed and the radiator fully detailed, its fins straightened and filled with Honda HP coolant.
The carburetors were treated to a full rebuild, ultrasonic cleaning, tuning, syncing, fresh intake boots, and K&N air filter.


The hydraulic systems received a full rebuild; calipers, masters, and clutch slave. Patriot Racing supplied stainless brake lines front and rear, in black. I had a Galfer stainless clutch line on the shelf so also fitted that. The front brake and clutch masters got fresh paint and new sight glass lenses.


Electrically, I began with a basic upgrade: installation of a Mosfet regulator/rectifier and Super Harness from Roadster Cycle. I also added their LED Voltage Monitor, a small light which alerts me to lowering voltage in the event of a charging system malfunction. I mounted the LED just below the instruments. Previous paperwork indicated that the stator had been replaced in 2008.
Being a fan of warm hands on chilly evenings, I installed a set of under-grip heaters from Tusk, mounting the hi-lo switch on a fabricated bracket near the left controls. While I was running wiring, a plug-in lead was added to power the GPS unit — both circuits are switched to the ignition switch. Speaking of the ignition switch, I sourced a correct used switch from a VFR forum member to replace an incorrect one installed after the bike was stolen. A battery tender was also hardwired into two unused leads freed up when the new R/R was installed. A final electrical mod was required due to the bulkier CBR929 shock; its remote reservoir was pressing against the starter relay, so I relocated the relay and mount to the right side of the battery box.
Being a fan of warm hands on chilly evenings, I installed a set of under-grip heaters from Tusk, mounting the hi-lo switch on a fabricated bracket near the left controls. While I was running wiring, a plug-in lead was added to power the GPS unit — both circuits are switched to the ignition switch. Speaking of the ignition switch, I sourced a correct used switch from a VFR forum member to replace an incorrect one installed after the bike was stolen. A battery tender was also hardwired into two unused leads freed up when the new R/R was installed. A final electrical mod was required due to the bulkier CBR929 shock; its remote reservoir was pressing against the starter relay, so I relocated the relay and mount to the right side of the battery box.


The paintwork on this project was a mix of good and bad. The fuel tank's interior was so badly rusted that I did something I've never done — tossed it in the trash bin. Fortunately, years before I had happened upon a used '92 black tank in nearly perfect condition for the bargain price of $40 including shipping…from Hawaii. Again, I had no use for it at the time, but I couldn't pass on that price. Perfect.
As mentioned above, the bike had been repaired/repainted in the past but by now several pieces were in need of TLC. The right side tail light fairing became a spiderweb of plastic welds as did the right chin fairing, which was so broken that I considered saving it as a personal challenge. I knew that I wanted to visually "lighten" the look of the bike by toning back some the expansive white plastic. I would accomplish this by changing the chin fairings to a dark color (GM Dark Spiral Gray Metallic with matte clear, which matches the gray in the "VFR" decal above) and outright eliminating the lower rearmost metal fairing pieces on both sides, including the odd kickstand fairing. However, I wanted a future owner to be able to return to the original look, so I sourced two extra chin fairing pieces from a seller in England, accomplished a few repairs and had those painted with the rest of the pearl white parts.
All the signal lenses were severely weathered from the Florida sun requiring lots of sanding and polishing.
I don't particularly care for Honda's graphics on the '93 model, so I kept the large side "VFR" but created my own tail decals, bringing back the "V4 Gear Driven Cams" notation from the earlier generations. For the tank, I passed on the uninspired black winged logo and went with OEM Honda 3-D illusion badges. I intentionally did not have my decals clearcoat painted, allowing the originals to be applied in the future, if desired, and I have a full reproduction decal set which will remain with the bike. I can't locate his name in my records, but I would like to give an anonymous shoutout to a VFR forum member who provided me with both the black plastic side fairing air ducts, which I'd tried in vain to locate for a couple of years…thank you!
The wheels were finished in the body's white, with no pearl. I added some red detail on the rears' embossed directional arrows, and also applied my "Enkei" directional decals front and rear for an additional pop of red. The rotors were repainted in original silver.


Miscellaneous

The hand grips are my favorite barrel style gel grips from Biltwell. They're mounted on HeliBar risers and paired with Throttlemeister throttle lock bar ends. I prefer the OEM levers, fully rebuilt and polished.
The original windscreen was unusable but I found a taller Givi touring screen offered on a VFR forum and thought I'd try that, eventually deciding I prefer the original, so I got a reproduction directly from MRA, in dark tint.
The Corbin seat that came with the bike was roached, but I had a good, though cosmetically challenged, OEM seat in my stash, so my upholsterer fitted a fresh black cover in the correct pattern. I don't use or care for the look of passenger seat cowls (I carry a tailpack on the seat) so I didn't attempt to source an original.
Mirrors are Emgo reproductions for the '00-01 VFR800, my go-to replacements for the ungainly and problematic "condom" originals.
Tires are Bridgestone Battlax T32 in OEM sizes, which have proven to be a sure-footed, confidence-inspiring sport touring tire, providing smooth, neutral handling.
I decided to splurge on a shiny new slip-on muffler, and chose the Delkevic high mount stainless steel round model, purchased directly from Delkevic. I absolutely wanted the high mount to show off the 8-spoke wheel and I think the polished finish goes well with the white bike color. Together with a trimmed rear fender and removed passenger peg bracket, the rear of the bike now has a visually "lightened" look. I left the "db killer" in place and the sound is low and mellow with no bark, and not obnoxiously loud, even at full tilt — just what I was after.
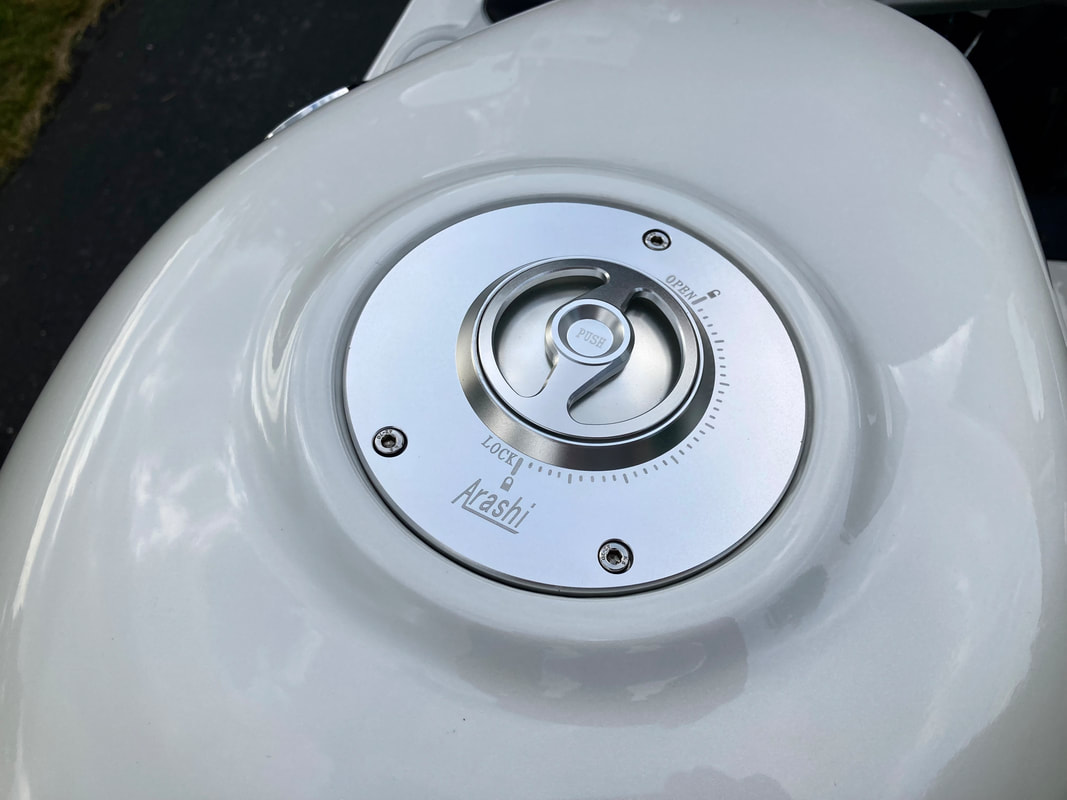
I also happened upon a very cool fuel filler cap from Arashi on eBay. It's CNC aluminum in a satin finish, exquisitely styled, keyless and really improves upon the industrial look of the original (I have no need to lock my filler cap). As it was delivered, the gasket sealing to the tank opening was seeping when the fuel sloshed about, but I addressed that by adding a 2mm rubber shim under the gasket. China.
The original windscreen was unusable but I found a taller Givi touring screen offered on a VFR forum and thought I'd try that, eventually deciding I prefer the original, so I got a reproduction directly from MRA, in dark tint.
The Corbin seat that came with the bike was roached, but I had a good, though cosmetically challenged, OEM seat in my stash, so my upholsterer fitted a fresh black cover in the correct pattern. I don't use or care for the look of passenger seat cowls (I carry a tailpack on the seat) so I didn't attempt to source an original.
Mirrors are Emgo reproductions for the '00-01 VFR800, my go-to replacements for the ungainly and problematic "condom" originals.
Tires are Bridgestone Battlax T32 in OEM sizes, which have proven to be a sure-footed, confidence-inspiring sport touring tire, providing smooth, neutral handling.
I decided to splurge on a shiny new slip-on muffler, and chose the Delkevic high mount stainless steel round model, purchased directly from Delkevic. I absolutely wanted the high mount to show off the 8-spoke wheel and I think the polished finish goes well with the white bike color. Together with a trimmed rear fender and removed passenger peg bracket, the rear of the bike now has a visually "lightened" look. I left the "db killer" in place and the sound is low and mellow with no bark, and not obnoxiously loud, even at full tilt — just what I was after.
I also happened upon a very cool fuel filler cap from Arashi on eBay. It's CNC aluminum in a satin finish, exquisitely styled, keyless and really improves upon the industrial look of the original (I have no need to lock my filler cap). As it was delivered, the gasket sealing to the tank opening was seeping when the fuel sloshed about, but I addressed that by adding a 2mm rubber shim under the gasket. China.


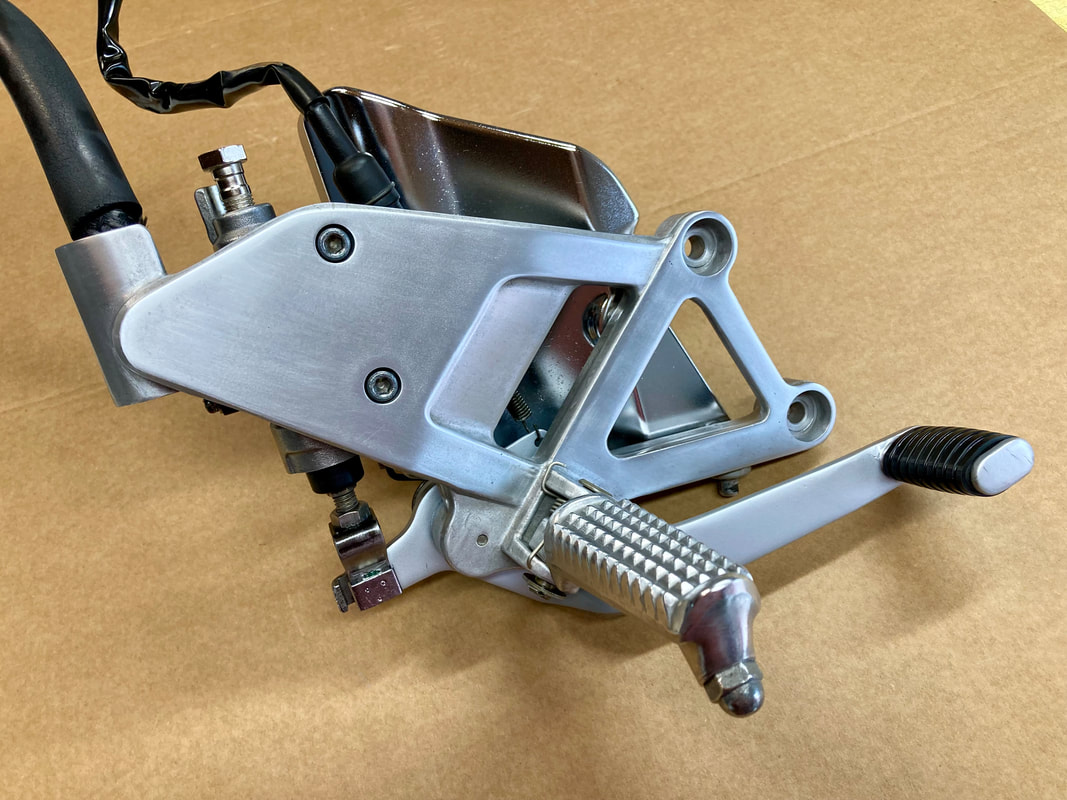
Finally, in the spirit of being kinder to my joints, I wanted to lower the footpegs a bit and chose a set from Knight Design. They offer two styles of billet-cut aluminum, I chose the less aggressive Sidetrax style in anodized silver; also offered in black. The company says they provide a 1 1/4" drop and extend outward about 3/4". That seems like a substantial drop, but on a trip to the mountains last Fall, I had no issues with them dragging, though I don't achieve the lean angles I once did.
There is an issue with the levers, however — neither the brake nor shifter have enough adjustment to accommodate these pegs. I rigged the brake lever by cutting off the lower adjustment threads to the bare minimum needed (thanks for that tip, Chris), which gave just enough additional downward adjustment to make that side work. The shift lever, however, needed to come outward a full inch to allow a natural foot position for shifting. This I addressed with the welder by splicing in an additional inch where shown in the photo. Now, the braking and shifting is back to a familiar feel. I have a spare lever if I ever want to return to the original pegs.
There is an issue with the levers, however — neither the brake nor shifter have enough adjustment to accommodate these pegs. I rigged the brake lever by cutting off the lower adjustment threads to the bare minimum needed (thanks for that tip, Chris), which gave just enough additional downward adjustment to make that side work. The shift lever, however, needed to come outward a full inch to allow a natural foot position for shifting. This I addressed with the welder by splicing in an additional inch where shown in the photo. Now, the braking and shifting is back to a familiar feel. I have a spare lever if I ever want to return to the original pegs.

What have I accomplished? My investment of a few thousand dollars and 100+ hours of labor have given me a rider-grade classic VFR that I have no qualms about using on a daily basis, trailering, or parking outside a hotel for a few nights. I love the clean aesthetic achieved with the pearl white and limited graphics. The combination of higher bars, lower pegs and maybe a small sheepskin seat pad make the bike all-day comfortable. The suspension is supple while still composed and reactive to inputs. On last year's mountain ride the bike made me look better than my waning skills warrant. (Here's a link to that ride report: http://v4dreams.com/shop-blog/blue-ridge-dreamin-a-ride-report )
The third-gen VFR makes a gorgeous styling transition from the earlier creased edges to the later "soapy" curves. And, I have no reliability concerns with my projects, as I go to great pains to touch every part, check every connection, torque every fastener, etc., the result of an aviation background, no doubt.
As one of my final build projects, I found this one particularly satisfying. Not only did I save this VFR from a slow death, but it's also tailored to my style, both riding and aesthetically. It's a great way to live the classic motorbike experience…with undeniable panache of the legendary Honda V4.
Photo album: https://flic.kr/s/aHBqjBADva

 RSS Feed