Honda's V4 Interceptors
V4 Dreams
  • Home
  • Shop Blog
  • Maintenance
  • Products
  • My VFRs
  • Historical

Bargain 8th-gen In The Frozen North

12/11/2018

0 Comments

 
PictureClick on image for the C-list ad.
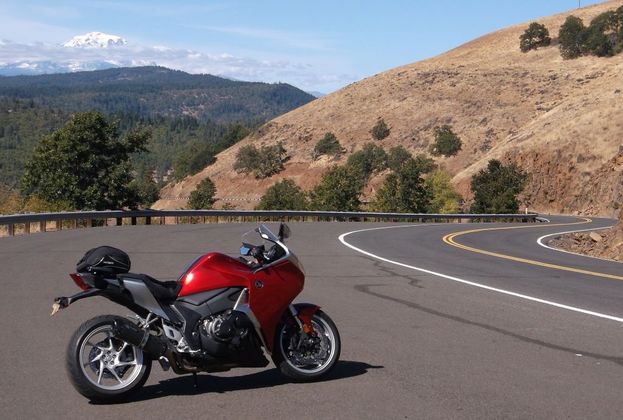
What: 2014 VFR800
Where: Menomonie, Wisconsin
Why: The latest VFR for great money
Price: $4995

Mired in the grip of the Wisconsin tundra, AIR Tec Sports is offering this used VFR800 (standard model) for only $4995. Their own website prices it at $5995, so this Craigslist ad must be a winter special.

No matter, 'cause this is a proper bargain. Showing just under 24,000 miles this one comes with factory saddlebags, fresh tires, fresh service and a Two Brothers slip-on muffler. Get it while it's hot...or, in this case, cold.

0 Comments

Matching V4s

12/9/2018

0 Comments

 
Coordinating furniture, sure. Matching dinnerware, of course. But color-coordinated bikes? ADVrider Tbusa thought it would be a great idea, apparently. Pictured are his 2014 Interceptor and ex-cop ST1300. The ST has to be the cleanest police bike conversion I've ever laid eyes on — looks like it's on a dealer's showroom. Then again, taking a look around this guy's garage, I can see that he's a perfectionist. Nice set of V4s.
0 Comments

Panel Surgery

12/7/2018

0 Comments

 
Picture
On a recent project I needed to salvage a set of 1986-87 infill panels, which fit between the fuel tank and side fairings. These parts have become very hard to find so I wanted to attempt to save this set.

While the right-side panel was simply cracked, the left-side had its lower half damaged beyond repair. Luckily, I had another left-side panel with a mismatched upper half from an F2 model. The obvious solution was to mate the good pieces into one usable left panel.

After carefully cutting both parts across the middle on an identical line, I plastic welded the halves together.
​

​Here the two left-side panels are pictured after making my cuts. The black pieces were originally together, as were the bluish-colored ones. The parts on the right will be tossed and the left made into a useable piece.


Picture

Here, the left panel is joined and the right panel has its welding repairs made. The welding repairs have been ground smooth and the first coat of body filler is applied.


Picture

​Here's a look at the welded back sides.

After much grinding, filling and sanding, the parts were cleaned up and finish painted. I use a trim paint from SEM called Trim Black after prepping with their XXX Adhesion Promoter (both available from Amazon). The parts are shown ready for paint.
(click on an image to enlarge)
Picture


​I didn't get a separate photo of the finished parts, but here they're fitted to the bike.

Job done!

0 Comments

PNW VFR on ADV

12/5/2018

0 Comments

 
One of my favorite sub-sites on ADVrider.com (registration required) is the VFR thread. As long as it involves VFR's anything goes, and VFR owners from all over the globe contribute. And sometimes we're treated to some glimpses of enviable riding spots, like these courtesy of BarKnee from Portland, Oregon.
Mt. Adams and the Columbia River areas.....
Picture
(click on an image to enlarge)
0 Comments

Rainey At Speed

12/4/2018

0 Comments

 
Wayne Rainey was one of Honda's many fabled racers, and along with Bubba Shobert and Fred Merkel netted Honda the AMA Superbike titles from 1984 through 1988. Wayne also rode for Yamaha and Kawasaki and was, in fact, the 500cc World Champion three times (!). But it was the intense track rivalry between Rainey and Kevin Schwantz that made those Superbike races the stuff of legend, and the VFR was the weapon of choice.
Picture
0 Comments

Third-gen Staintune on eBay

12/4/2018

0 Comments

 
PictureClick on image for the eBay link.
Here's an item I don't see come available often. This is a Staintune muffler to fit the 1990-93 VFR750. Staintune is a well-known family-owned brand from Australia that's been in the moto exhaust business for 30 years. Their pipes are manufactured from stainless steel and sure are good-lookin'.

This pipe has been previously used but looks like new. It will bolt right up to the stock system. I don't have any personal experience with the noise level of these pipes, but I'm sure it'll wake up the inner growl of your V4. Hurry, auction ends Wednesday.

0 Comments

Fairing Saver

12/2/2018

0 Comments

 
Picture
Here's a technique I use to help save the upper mounting tabs on the '86-87 side fairings. These two fairings sit below the seat and cover the battery and fuel pump areas. They use two pop-in plastic tabs and a lower Dzus to mount them.

The problem is that the upper tab is always a very tight fit and after 30+ years they will often break off if forced.

Tip: To remove the fairing I always push the tab from behind with a padded tack remover blade levered against the fuel tank while gently pulling from the front side (pictured below, without the tank in place).

My fix is to enlarge the grommet hole, which will allow the grommet to expand, giving a larger space for the tab.

​With the panel removed, I pull out the rubber grommet and use a round file to enlarge the hole by a few millimeters. The round grommet will still fit and the fairing's tab will now slide in and out with much less drama. If it's still tight, I add a bit of grease or greaseless lubricant to the grommets.

(click on an image to enlarge)

0 Comments

Super Sabre

12/1/2018

0 Comments

 
I came across this VF750S Sabre build on the interwebs some time ago. I was impressed that someone chose the Sabre platform for this street tracker/cafe racer custom — the bulky V4 with shaft drive can't be easy to convert to a genre that's synonymous with lightness and minimalism, but there's a boatload of CX500 customs out there that belie that point.
Picture
I'll have to say our guy pulled it off pretty well. The drivetrain, tank and exhaust are original pieces, but that's about it. Modern upside-down forks, bobbed tail and the change to a proper round headlight are all incorporated pretty well, but the icing on this cake has to be the wire wheels laced up to hubs that were never intended to see spokes. To my eye: The original air shock out back would look better with a traditional coil-over, the kickstand foot should be trimmed, the stock mufflers aren't quite to scale, and I prefer the look of a bobbed front fender, but the great thing about a custom is that there's no rules but your own. Nice work.
0 Comments

Crystal White '93 In MI

11/28/2018

1 Comment

 
PictureClick on image for the Craigslist link.
What: 1993 VFR750F
Where: West Bloomfield, Michigan
Why: Low miles, approaching collectible
Price: $4800
Of the third through eighth-generation VFRs, arguably the rarest is the 1993 model available only in resplendent Pearl Crystal White. This is the final year of the third-gen VFR, and is sought after for its standout visuals in a sea of Honda reds. White wheels had had their day and this would be the last VFR with that distinctive trait. And later model owners covet the eight-spoke rear wheel, which retrofits through the sixth-gen bikes. This generation (RC36) introduced major changes from the U.S. spec RC24/26 bikes, including the single-sided swingarm, 17-inch wheels, revised cylinder head design and more. Additional weight was also part of the equation, which was remedied with the forth-gen refresh.

This example is available in the Detroit area, shows only 15,750 miles, and sports a Vance & Hines 4-into-1 muffler. Otherwise stock looking, the rear fender has been bobbed and the U.S.-spec external turn signals incorporated into the tail light assembly, a common modification which tidies up the rear nicely. The seller indicates all stock parts are included and describes the bike as "super clean" with "no issues." The photos show nearly perfect paintwork and the wheels look so good that I verified with Jeff, the seller, that they've not been refinished and, in fact, all the paint is original. The left fork leg shows a paint shadow from a previous sticker.

The asking price of $4800 is easily double that of the average third-gen VFR. But, the year, miles and condition of this one certainly place it above average. As always, the buyer will need to decide if the value is there. 

1 Comment

Cut 'n Buff

11/27/2018

0 Comments

 
When the paint guys on Overhaulin' or Speed Is The New Black need to get their paintwork to show car standards, they use a technique called "cut 'n buff." It's a labor intensive process of smoothing out the top layer of paint (typically clearcoat) in order to remove the lumps, bumps and imperfections to leave a smooth surface, which is then machine-buffed to a high gloss, which the eye sees as a mirror finish. The "cut" portion is done with very fine grades of wet-sanding paper. It's a learned skill — too little and the finish isn't the best it could be, too much and you've sanded through the clear into the color or primer. The "buff" is accomplished with machine buffing using specific grades of cutting compounds, followed by machine polishing.

On my projects my goal is always to bring the original paintwork up to the highest level I can. Part of this might involve touching up nicks and scratches, but the real magic can be achieved with a process similar to cut 'n buff, which I learned as "color sanding." The concept is the same, but the idea with color sanding is to remove just enough damaged paint to get down through the decades of scuffs, surface scratches and environmental damage — sun, pollution, petrified bugs, whatever.
Picture
For the sanding portion of the process I use the finest grit I can get away with, working my way to a final sanding with 5000-grit. 3M provides wet-sanding paper and sponges up to 5000-grit. I begin with the 2000 or 3000 and go rougher only when necessary.

After cleaning the part to be color sanded, I fill a small, clean pail with fresh water with a few drops of dish soap added. With frequent dippings into the water, I gently wet-sand the entire painted area then wipe dry with a clean cloth to check my progress. A deeper scuff may require a stronger grit, remembering that the goal is to achieve the greatest effect but without sanding through the clear coat. This is especially true with pearl paints because the pearl coats are applied on top of the color and sanding away the pearl changes the hue of the finish color. And, I have to accept that some "patina" just can't be sanded away, but in any event the piece as a whole will end up glossier with more vibrant color — hence the term "color sanding."

Practicing on an old part will give a good feel to how much sanding you can get away with before damaging the part with excessive sanding.

Below are a couple of examples of common fairing scuffs that will come right out with a gentle sanding.
(click on images to enlarge)

(Below) This process works just as well on plastic fixtures like tail light, turn signal and headlight lenses. Here I'm using 1000-grit paper on a tail light lens, which I will follow up with 1500, 3000 and 5000. Yeah, it's a lot of sanding.
(Below) For the buffing portion of this process I use my Griot's Garage small orbital polisher with 4-inch buffing pads. I have a selection of compounds but my go-to is Meguiar's Mirror Glaze #83, followed by Meguiar's Ultimate Compound. I finish up with a quality wax, hand applied. This is yet another behind-the-curtain example of the hours of work required to bring these machines back to their best.
(Below) Some of the finished product.
0 Comments
<<Previous
Forward>>

    THE SHOP BLOG
    •••

    An on-going account of miscellaneous information, project bikes and noteworthy VFRs for sale


    Archives

    May 2025
    April 2025
    March 2025
    February 2025
    January 2025
    December 2024
    November 2024
    October 2024
    September 2024
    August 2024
    July 2024
    June 2024
    May 2024
    April 2024
    March 2024
    February 2024
    January 2024
    December 2023
    November 2023
    October 2023
    September 2023
    August 2023
    July 2023
    June 2023
    May 2023
    April 2023
    March 2023
    February 2023
    January 2023
    December 2022
    November 2022
    October 2022
    September 2022
    August 2022
    July 2022
    June 2022
    May 2022
    April 2022
    March 2022
    February 2022
    January 2022
    December 2021
    November 2021
    October 2021
    September 2021
    August 2021
    July 2021
    June 2021
    May 2021
    April 2021
    March 2021
    February 2021
    January 2021
    December 2020
    November 2020
    October 2020
    September 2020
    August 2020
    July 2020
    June 2020
    May 2020
    April 2020
    March 2020
    February 2020
    January 2020
    December 2019
    November 2019
    October 2019
    September 2019
    August 2019
    July 2019
    June 2019
    May 2019
    April 2019
    March 2019
    February 2019
    January 2019
    December 2018
    November 2018
    October 2018
    September 2018
    August 2018
    July 2018
    June 2018
    May 2018
    April 2018
    March 2018
    February 2018
    January 2018
    December 2017
    November 2017
    October 2017
    September 2017
    August 2017
    July 2017
    June 2017
    May 2017
    April 2017
    March 2017
    February 2017
    January 2017
    December 2016
    November 2016
    October 2016
    September 2016
    August 2016
    July 2016
    June 2016
    May 2016
    April 2016
    March 2016
    February 2016
    January 2016
    December 2015
    November 2015
    October 2015
    September 2015
    August 2015
    July 2015
    June 2015

    Categories

    All

    RSS Feed

Site powered by Weebly. Managed by HostGator