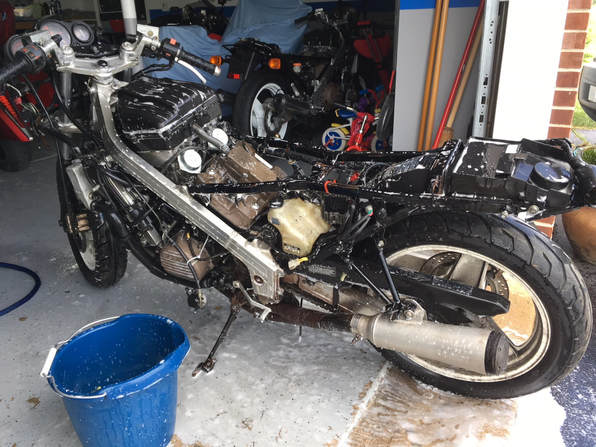
It's time to determine if Project 17 is a viable running motorbike. The only thing I know about this bike's history is that the previous owner bought it as a parts bike and apparent stablemate for his running VFR750. He claimed he never ran the bike and that it sat in his pole barn for seven years. In my experience one can usually add about 50% to any time period claim with these old bikes, so at this point I'm assuming that this bike hasn't had fire in it's belly for at least 12 years. The date code on the barely worn tires are from 1997 so if we go by the tire evidence it could easily be closer to 20 years since this one has seen the road.
In any case, I'll go through the steps that I take when beginning a rescue of a 32-year old Honda VFR. First up is a soapy bath and general degreasing. This is messy work, so it's always best to start with most of the crud removed. Then it's onto the service rack.
In any case, I'll go through the steps that I take when beginning a rescue of a 32-year old Honda VFR. First up is a soapy bath and general degreasing. This is messy work, so it's always best to start with most of the crud removed. Then it's onto the service rack.
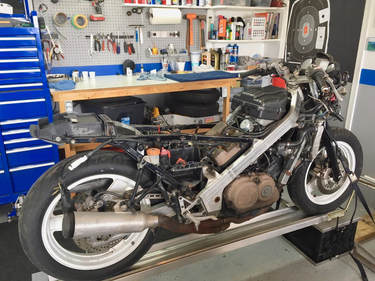
I have no idea of the condition of the carburetors (and I've found some gems) so the carb set will need to come off for an inspection on the workbench. The evaporative canister mounted near the front exhaust pipes indicate this is a California-spec model, so several additional vacuum hoses will need to be dealt with. I'll show the removal process, even though I'll be tossing the whole mess in the trash bin.
(Below) I start with radiator removal. I do this because I know that I'll be doing a valve adjustment check and having the radiator completely out of the way makes the process much easier. Drain the coolant via the lower radiator hose, remove the two hoses, unbolt the upper and lower mounting bolts, unplug the fan connector and remove the radiator from the left side.
(click on any of the small images to enlarge)


(Below) To begin the carb removal, remove the air cleaner and housing. Be prepared for anything when the cover comes off — in this case only a few mouse meal remnants were found, and no telltale mouse pee smell. That corrosive liquid will work its way downward into the carbs and wreak all kinds of havoc, so I've dodged that bullet. In fact, the carbs look surprisingly clean. A UNI brand foam/oil filter had been installed.


(Below) Next, I unscrew the four upper carb boot ("insulator") clamps. The lower clamps can remain tightened. Then loosen, but don't remove, the choke ("enricher") cable clamp. Leave the screw in place to prevent dropping the assembly now or during reassembly. Unhook the choke cable.


(Below) I then remove the two throttle cable bracket screws (right photo) which allow the cables to be slackened and easily removed. Leave the bracket off but put the two screws back in their holes for safe-keeping. My first indication that these carbs have been dealt with before is that the lower bracket screw is incorrect.


(Below) Now the emissions stuff needs to be dealt with. I just cut the five hose connections in question, but they can also be removed if you wish to re-use the hardware. Some of the tiny clamps were missing, again indicating that someone had worked on these carbs previously. One of the vacuum hoses was cracked and leaking at carb #4, which highlights the issue with all this old emissions hardware — lots of opportunities for difficult-to-find leaks. In any case, here's the connections.


(Below) Let's get the carbs off. With everything loose, the rack is ready to lift off, but it will be stuck pretty tightly, so I gently lever the rear half free and then lift straight up to remove. I use a bent-tip lever with a plastic scraper protecting the valve cover, and lever straight up under the rearmost carbs (#1 & #3), gently pushing upward at the lower point of the diaphragm cap. If they seem immovable, check that the boot screws are very loose. Please resist the temptation to resort to a hammer.


(Below) With the carbs on the bench, drain the float bowls into a container using the drain screws. In this case the carbs were empty of fuel. Have a peek with a flashlight into the intake tracts for skeletal remains or any other debris, then stuff some clean paper towel into the tracts. If you're going to clean the engine area, cover the intake holes with squares of cut-up plastic bag and zip-tie in place.


(Below) Here's what you should see in the intake tract; nice and clean with not too much carbon build-up on the valve stems. You may also see some blue scribbling on the engine block. Those are notes from the assembly line. Tip: Replace that little radiator hose before reinstalling the carbs. See the "Maintenance" section for a how-to.


(Below) The final step is to remove the air baffling above the front cylinders. This plastic cover is held in place by two plastic "plugs" firmly stuffed into frame holes on either side. I use two flat-blade screwdrivers to pry the plugs upward completely out of their holes. Shown here is the left side; the right is a tighter fit because of the wiring harness passing above it. Just wrestle the harness out of the way. Lift the baffle up on the left side, then out. Tip: Install in reverse: lower the right side into place first. That deteriorating brown foam stuff is sound deadening — as it disintegrates it will be sucked into the air cleaner housing. Feel free to scrape and scrub it off.


Here's a look at the emissions hardware. It serves as a means to "clean" the carb fuel vapors which otherwise evaporate into the atmosphere. I'll remove it all and simply vent the line exiting at the rear of the carbs into the air. That's how it's done on the 49-state bikes. There's also five small vent tubes at the carbs which will need to be plugged. I'll cover the carb and valve work in later posts.
Next up, valve clearance check, compression check and carb cleaning.
Next up, valve clearance check, compression check and carb cleaning.
 RSS Feed