(click on images to enlarge)

|
|
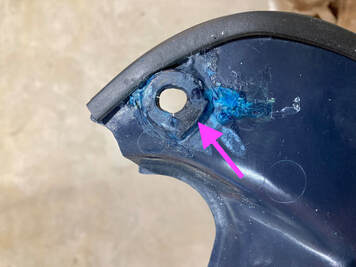
As I progress on the bodywork detailing on Project 42, a 1986 VFR750, I've come to the fairing infill panels which fill the space between the side fairings/fuel tank/instruments. These panels have become almost impossible to obtain if yours are missing or damaged, and I've gone to some lengths in the past at preserving these. As seen below, the panels for Project 42 are intact, but suffer from cracks at both upper mounting holes, along with typical fading and discoloration. These have discolored from their original blue (they should match the instrument nacelle) to black, with several fuzzy blue spots. It's obvious the color change is environmental, as the backsides are still factory blue. I need to address all these issues as I want to preserve their originality. (click on images to enlarge)  (Left) I'm going to address the cracks by reinforcing from the backside only — if I make repairs to the front they will need to be painted and I don't want that, so I've chosen to live with the hairline cracks on the frontside. Here, a portion of the circle was missing so I cut a wedge of scrap ABS and fitted it into place. I do this repair with a combination of plastic welding and Plast-aid. It's not my neatest work, but not visible on the bike so I'll just smooth out the repairs and dab on some color. (Below) The color on these panels is cast in the plastic — not painted — which means that the color can be brought back to the surface by sanding away the black discoloration. I begin with 1200-grit wet/dry, which makes pretty short work of removing the blue spots and black color. In these photos you can see the blue slurry produced as I sand. When I rinse and dry I can see where more sanding is required at the edges. I then work through 1500, 2000, 3000 and 5000-grit. Yes, it's a lot of sanding. (Below) When I'm happy with the final sanding, I'll finish with an application of 303 Protectant. This will leave a streaked finish which the bottle instructions address with a simple water rinse and drying. The panels can also be polished with a mild polishing compound to bring out a shiny appearance, but I'm after the muted factory sheen, so I stop at this point. Here's a look at the hairline cracks still visible — I'll call it patina. Normally, I would have removed the rubber trim strips for this work, but these were so solidly glued in place that I just left them — they're usually falling off of their own accord. Here's the final result. I probably spent about three hours labor on this project, but I saved the original pieces to be preserved with their machine…cracks and all.
0 Comments
Your comment will be posted after it is approved.
Leave a Reply. |
THE SHOP BLOG
|