Before the initial engine start of Project 17, or any project, I go through some basic mechanical checks. With the carbs on the bench and radiator removed, now is the time for a valve clearance check followed by a compression test.
This is straightforward wrench-turning and is covered well in the FSM (Factory Service Manual), but for those unfamiliar, here's how I go about it.
I begin by blowing out the spark plug holes and the general area with compressed air. I'll be removing the plugs for this operation and we don't want any debris to enter the engine as we remove the valve cover. Remove the eight cover bolts and the covers. They may require some gentle tapping with a soft hammer. The front lifts off toward the front wheel but the rear is a tighter fit. Unhook the wiring harness along the right frame rail and lift it up and clear, which will allow the cover to be removed by lifting the left side first, then up and out.
(click on any small image to enlarge)


Below we see the valve area exposed. In the center is the famous gear-driven cam set. The cam lobes are visible under the four long aluminum caps, with the valve springs below. Of note here is the lack of any residual oil. This engine has been inactive for so long that the oil has drained completely away. I'll pour some engine oil on the cam lobes and gear set before attempting to rotate this engine.

(Below) Next I'll remove the spark plugs and add some oil to the cylinders, which will be just as dry as the valve area. I like to use the Honda spark plug socket and 12mm socket. The plugs will give an indication of the engine's running condition. Look for any deposits or strange coloration. These plugs actually look normal and indicate very little use. The exterior rust is simply a result of being stored with some water in the plug valley. I'll clean and probably reuse these plugs.


(Below) I'm old school, so one of my go-to products on the shelf is Marvel Mystery Oil. This magical liquid has been around for nearly 100 years. It will effectively loosen stuck valves, piston rings and has lots more (unsubstantiated) claims. I like it as a cylinder lubricant on these stored engines; motor oil will work as well. Simply add a few tablespoons through the spark plug hole however you can. I use a small funnel.


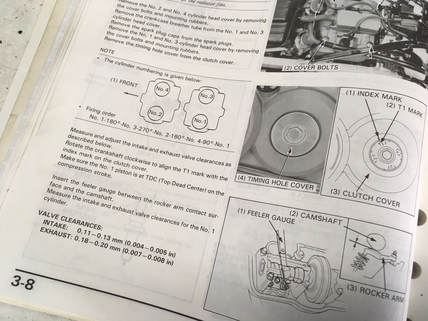
(Below) Let's turn this thing over. Remove the 17mm timing plug along with its rubber o-ring. The same socket will turn the timing gear bolt underneath, rotating the engine. You'll see the timing marks which the FSM's procedure uses to bring each cylinder to TDC (top dead center) for the valve check. I use a simpler, quicker method.


(Below) Note: Shown here is a 1986-87 VFR; the later models are shim style, and are adjusted completely differently.
----------------------------
The idea here is to relieve the valve of any pressure from the cam lobe, which translates into positioning the lobe away from the valve and spring. So, I simply rotate the engine, turning the timing bolt clockwise till I visually see the two lobes on whichever valve set I'm adjusting rotate upward, away from the valve and spring. In both photos below we see the lobes (in this case #1 intake) rotated upward. When checking the clearance, approach from the opposite side of the adjusting locknut and screw — I'm not doing that here just for illustration purposes. In other words, come in from the backside with the feelers (there's an illustration in the FSM).
The tolerances for the VFR are pretty tight, i.e. .004-.005" on the intakes. Simply be sure that at a .004" feeler will fit, but a .006" will not. The clearances in these engines will tighten with normal wear, so being on the loose side is okay (.005"). If adjustment is necessary, I note where the screwdriver groove is situated, loosen the locknut with a 10mm socket, move the screw slightly in the direction needed, snug the locknut and recheck the clearance. With practice, this goes pretty quickly. The rear exhausts are harder to get to, but keep at it till it's right. When your adjustment is good, tighten the locknut (tight!), rotate the engine through a few cycles, and recheck. Move onto the next cylinder. Tip: #1 and #4 intakes can be done on the same rotation, as can the exhausts. When you're finished, reinstall the covers — wiping the gaskets and mating surfaces and carefully torquing the cover bolts. Don't forget the timing plug.


The factory advises a valve check at 8000-mile intervals, but general consensus is that they're good for 20-25,000 miles between checks under normal use (not racing). As we see here, there is an involved procedure to get access to the valves, so I just assume that none of my projects has had a timely valve clearance check. In this case, only two valves required a .001 tightening.
Job done!
At this point I would normally clean up the valve covers and the cylinder valley before refitting the valve covers, but I don't yet know about the health of this engine, so I'm simply installing the valve covers and will move on to the compression check.
Job done!
At this point I would normally clean up the valve covers and the cylinder valley before refitting the valve covers, but I don't yet know about the health of this engine, so I'm simply installing the valve covers and will move on to the compression check.
 RSS Feed