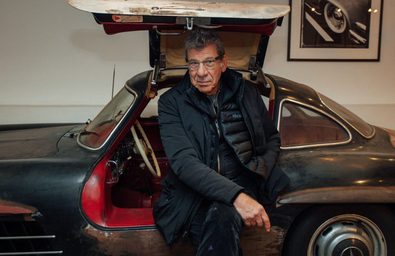
Honda's V4 Interceptors
V4 Dreams
  • Home
  • Shop Blog
  • Maintenance
  • Products
  • My VFRs
  • Historical

A Look Back — 1986 24-hour Speed Record

5/26/2016

0 Comments

 
Motorcyclist Magazine remembers the day that the 1986 Honda VFR set five new world speed records.
Picture
http://www.motorcyclistonline.com/hondas-1986-vfr750f-interceptor
The July issue of Motorcyclist Magazine sports a five-page feature about the day in 1986 that Honda proved the speed and mettle of its redesigned V4 sport bike. Facing fierce performance competition from other manufacturers and needing to overcome the bad juju of the VF's reliability issues, the factory teamed their own riders with a few magazine types in a 24-hour speed and endurance test at a track in Laredo, Texas. The article's author, long-time journalist Mitch Boehm, was one of those riders.

With two 700s and two 750s, the idea was to run one of each and use the others as backup bikes. Early on, the 750 experienced a piston failure (caused by a casting flaw) and blew its engine. The backup bike started a fresh 24-hour run and ended up with the five new records, including the Big One, a 24-hour average speed of 143 mph, blasting the previous year's record set by a Suzuki GSX-R750 at 128 mph. As icing on the cake, the record-setting 750 was then ridden back to California by a Cycle World staffer. Honda had succeeded in winning back some lost credibility by showing, once again, its place as a preeminent engineering company.

Recommended reading.
0 Comments

Awesome T-shirt, But You Better Hurry

5/25/2016

0 Comments

 
Picture
Here's a great T-shirt design from the nutjobs at BlipShift.com.

The reference is, of course, Hwy 129, AKA the "Tail of The Dragon." Blipshift prints a limited number of designs submitted to them and then sells them for only a few days, never to be seen again. This one ends Thursday, the 26th, so better hurry! $18.45 includes shipping. Also available in a poster! Here's the link:

https://www.blipshift.com

0 Comments

Bug-Be-Gone

5/20/2016

0 Comments


How to get those deceased bugs off your bike.

While searching for an anniversary destination recently, Patti and I found that bad weather dominated most of the country except for the upper midwest, so we decided to keep it local and trailered the ST1300 to southwest Wisconsin's driftless area to spend the week motorcycle and horseback riding. We based ourselves in the midst of the state's best road and horse country at Justin Trails Resort in Monroe County and enjoyed four days of perfect riding weather, awesome roads and great scenery.
Picture
How is this relevant? Well, this is farm country and that means bugs...and lots of 'em. When we got back home I had a bike and truck coated in dead bugs. In case you don't know this trick, here's a magic potion to melt those critters away with minimal effort.

It's called hydrogen peroxide and it's about $1 a quart at Wally World. This stuff really is magic — at 90% solution it's used as an oxygen source in rocket fuel while at 3.5% it can bleach your teeth, marinate your meat or melt bugs off your fairing.

Picture
One of its interesting properties is that it oxidizes dead tissue, like bug splats, but doesn't hurt live, like our skin. Just spray it on any surface, let sit for a few minutes and wash your bike as usual with soapy water. As far as I know it doesn't affect plastic, metal or acrylic surfaces in any way so it's safe to use anywhere there's bug remains. Now you know.

0 Comments

Project 15 Gets Naked

5/13/2016

0 Comments

 
Picture
After a few hours of garage therapy Project 15 is stripped and ready for its make-over. No surprises — a few valve clearances had to be adjusted and the compression check is normal. Turns out the steering head bearings need replacing along with fork seals, and that's not uncommon with any bike of this age, even with low miles. The steering bearings are being upgraded to All Balls tapered style. I've completed the carburetor cleaning and inspection, again, no surprises. Fresh fuel lines/filter, and the fuel tube o-rings replaced with new VITON. The low-speed jets were bumped to #40, otherwise the carbs will remain as from the factory. Because I'm keeping the original exhaust system, even the air filter will be OEM. This bike will remain as stock as possible, right down to the hand grips.

One change I will make, in the interest of safety and better performance, are upgraded braided brake lines front and rear. They're black, so they won't be too obvious. Oh, and fresh tires of course — Bridgestone BT-45 in OEM sizes.

This bike is a pleasure to work on. It's obviously been well-kept in a dry environment. There's no stuck bolts, nothing's been stripped, man-handled or modified. Let's get this thing back together.
0 Comments

Market Watch

5/12/2016

0 Comments

 
Picture
What: 2010 VFR1200
Where: Hamilton MI
Why: A shining star fades fast
Sold: $5300 (no reserve eBay auction)

We all know the VFR1200 was no market success. But I'm not sure anyone knows why. It's an excellent machine; fast, composed, smooth, techie, perfectly detailed. But it may have veered too far from the Interceptor formula of a mid-weight sport tourer, and the styling doesn't suit everyone's taste. VFR folks can be a finicky bunch.

Personally, I like the model but like most VFR fans I didn't buy one. Still, I fantasize about a 1200 in the stable and so have kept an eye on the values over the past few years. Well, it may be time to buy.

Here we have a first-year VFR1200 with a couple thousand dollars in extras, low miles and well-kept by a mature owner. It's the "standard" transmission model (no DCT) and sports OEM bags, center stand, larger windscreen and bar risers. The bike represented about $17,000 in value when it was new and just sold for $5300.

Condolences to the seller and congratulations to the new owner.

0 Comments

Fuel Joint O-ring Installation - A Tutorial

5/11/2016

0 Comments

 
Here's How I Repair Those Leaking Carburetor Fuel Tubes — 1986-1993
Honda calls their plastic fuel distribution tubes "fuel joint sets," but I just call them tubes. Their job is to distribute fuel from the inlet line to each carb. There's two tubes, one for carbs 1 & 3, and one for carbs 2 & 4. The point where they enter the carburetor needs to be removable for service and also have a bit of flexibility in use, so they're sealed with o-rings. Like all of our rubber fuel parts they were not designed with modern fuel chemicals in mind, including ethanol. This fact, combined with age, makes them a weak point in the fuel system. I replace them as a matter of course on all my projects, along with the inlet lines. Today we have the advantage of VITON o-rings and TYGON fuel line which can stand up to anything the chemical engineers can throw our way.

The plastic tubes with o-rings are still available from Honda for about $30 each. There's also an eBay seller who offers metal replacement tubes/o-rings for about $85 a set. On my "Products" page I offer a repair kit consisting of four o-rings, two fuel lines and clamps for $16. Whichever direction you choose, the installation is the same, and here's how I do it....
Note: the carbs are numbered as follows: Viewed from the rider's seat, #1 is left rear; #2 is left front; #3 is right rear; #4 is right front.
Picture
As Hippocrates famously said, "First, do no harm." The idea here is to separate one of the carbs from the set in order to slide the tubes away, replace the o-rings, and reassemble, disturbing the carb set as little as possible.  I separate #4 because it affects the others the least. And remember that the tubes are plastic so be gentle.

Here's the required tools: impact driver, screwdrivers, needle nose pliers, cleaning brush, cleaning solvent and oil. A dental pick or tiny screwdriver is also useful for removing the old o-rings.

Like everything mechanical, this process is easier with the carb rack cleaned. We begin by removing the plenum screws — 8 inside the plenum plus 2 on the sides (Note: '90-'93 do not have the two side screws). These screws often require an impact driver to loosen (carefully). With the carb rack then turned upside down (plenum down) on the bench with carbs #2 & 4 facing me, remove the center bracket and its 4 screws. All the linkages will remain in place except the choke rod to carb #4. (click on a photo below to enlarge; '86-87 carbs shown)
Picture
I now remove #1 & 4 tiny sync springs (not the screw and spring, just the springs underneath). It helps to first unscrew them about 5 turns and, after reinstalling the spring, screw the same amount back in. The #3 sync spring needn't be removed. Also remove the two large throttle shaft springs — the ones between the sync screws, not the long heavy springs.

Picture
Finally, remove the choke shaft bracket at #4 by loosening it's set screw and sliding the bracket off the shaft. Also loosen the same bracket at #2, visible in the upper left corner of this photo. This will allow the choke shaft to slide free of #4 when we separate it from the plenum. On '90-'93 loosen the bracket and slide the rod free through #4. The spring and bracket will fall free.

Picture
I wriggle completely free carb #4 and loosen (but leave in place) the remaining carbs. Note that the carb bases are located to the plenum on dowel pins with large sealing o-rings.

Now is the time to note how the lines are routed, you may want to take a photo. I then cut the old fuel lines (assuming they’re being replaced) as short as possible to get them out of the way (don't pull on them, you could break the plastic tubes) and gently free the #2/4 fuel tube and then the #1/3 tube.


Picture
The tubes are identical -- just installed in a mirrored fashion. There are fitting nubs, one per tube — one goes into carb #1 and one into #4 — have a look (note: '90-93 have no fitting nubs).

Those old, hardened fuel lines will make installation more difficult and really should be replaced. Now's your chance.

The two smaller, black air vent tubes will have fallen free, just let them be till installation (note: '90-93 have four vent tubes).


Picture


The fitting nub for carb #4 ('86-87).

Picture


Remove the old o-rings, clean the grooves and install the new.

Picture
I now take a moment to clean the holes where the o-rings will seat with a bit of electronic cleaner (not brake solvent) and small brush, taking care to avoid any debris going into the carbs. If your carbs are disassembled like those in the photo, just blow air or cleaner into the threaded float valve hole visible at the upper left to ensure there's no gunk left behind.


Installation, as they say, is the reverse of disassembly. Only in this case all the pieces have to line up, a bit like herding flys, but it can be done. Note that the longer fuel line locates alongside carb #3 and the shorter one is centered between the carbs. Coat the new o-rings and their receiving holes with a bit of motor oil or grease, mount the new fuel lines and clamps (if replacing) and then work #1/3 tube back into place followed by #2/4 (don't forget the choke shaft — see below), taking care to put the locating nubs back into their slots on carbs #1 & 4.

Picture
The choke shaft will have fallen free of #4, so be sure it and its spring are back in place before mounting #4 on the plenum. When all the fuel and vent tubes are lined up, work all the carbs back into place and fit onto their respective plenum mounting dowels. Don't forget the large o-rings between each carb and plenum — make sure they're back in their grooves.

None of this requires force. If you find yourself reaching for a hammer, take a breath and figure out why. It's a three dimensional puzzle, but it does fit back together.

When everything's back in place, hold the whole affair together while carefully righting the carb rack and loosely reinstall the 8 plenum screws, 2 side screws and then the center bracket on the underside — again, they should all go in and bottom easily if everything is lined up. Once all are in place, tighten them up. Flip the rack upside down and reinstall the missing shaft and sync springs (be careful, these will try to escape across the room). The larger shaft spring goes between #2/4 and the smaller between #1/3. During the reassembly process, you should be continually checking that the throttle and choke mechanisms are free and correct. There should be no binding.

Picture


Apply a bit of motor oil to the pivot and sliding areas of the choke and throttle linkages. Visually check that all the carbs are seated square and flush.


Picture

Install the fuel lines onto the "T" fitting. When installed correctly, the different length replacement fuel lines will look like this, facing carb #1 just like from the factory.

Picture
At this point I determine if the choke (actually enrichener circuit) is opening fully. If the bike would barely run when cold-started with full choke or just didn't seem to be choking enough, I carefully bend the forked fingers (where the choke linkage meets the carb) at carbs #2 & 3 in order to provide more leverage, opening the slides farther. This is done delicately, and requires that the little screw-secured bracket on the shaft be moved out of the way during bending. On the '90-93 the shaft simply slides free through the outboard carb, but for the '86-87 there's a trick to easily moving that bracket out of the way and involves loosening the brackets’ holding screws, sliding the entire shaft free of their little locating pins (the pencil is pointing to it), and rotating the shaft, which allows the bracket to be slid out of the way. Reverse the dance to put the brackets back into place. Play about with it.

Picture
Here's a reference photo ('86-87). On this carb set the vent line is green-colored and gives a good reference to how the grey fuel lines should be routed. Here we're looking between carbs #1 & 3.

After all this fiddling about, the carbs will need to be sync'd on the running bike. Syncing is an important step on any multi-cylinder, multi-carb engine and shouldn't be ignored.

Congratulations, you're done! Your carburetors thank you.

0 Comments

Welcome: Project 15

5/7/2016

0 Comments

 
Picture
This past week I put Project 19 on the road for a 40-mile shake-down ride. The bike ran and rode perfectly...and it looks great! There's a few details to attend to before it's ready for photos and its For Sale sign. In the meantime, the next victim is on the rack for its tear-down and inspection.

Project 15 is a gorgeous 1987 VFR700F2 in Crescent Pearl White with only 11,000 miles. This is a true survivor — I can't find any deviation from original equipment other than tires. Produced in October of '86 with production number 976. I found it last year in rural Ohio along with its stablemate, an '86 r/w/b 700. It runs and looks great, but I'll go through the systems and cosmetics in any case. The pearl white color was advertised as a "limited quantity" in 1986 and became a regular color for '87 along with the blue/silver paint scheme. My plan is to keep it in original condition with the exception of tucking in the turn signals, which is easily reversed. This should be a straightforward project and will definitely be a stunner. Stay tuned.

Picture
0 Comments

Finishing Touches

4/30/2016

0 Comments

 
Picture
I was once pretty heavily involved in the homebuilt aviation scene, and there's an old saying with builders that the last 10% of the build is 90% of the work. I suspect that's true with lots of projects, from building airplanes to building homes. It's the finishing touches that eat up lots of time.

But, I think those little bits are important. Case in point — turn signals.

Project 19 is something of a resto-mod, with aftermarket pipes, carb tuning and performance air filter adding some punch, but the appearance remaining as close to the original red/white/blue as possible. As such, I wanted to keep the OEM signals as a nod to originality.

Picture

Turn signals tend to take a beating over the years, what with them hanging out in the airstream, bumping into garage walls, shovels, kids bikes and sometimes asphalt. Fortunately, Honda chose to make the signal housings of solid-colored plastic, meaning they can be filed, sanded and polished to whatever degree necessary to work out most any rash — no painting required.

So, off to the stash of lights to find a suitable set of front and rear signals.

Picture
Here's a typical signal housing with its scuffed, scratched and dulled finish.

First I remove the lens and bulb, and leaving the stem attached as a handhold, I begin the process of removing scratches by filing with a light metal file, then sanding with progressive grits of wet-dry paper till I have a smooth enough finish that machine buffing is able to bring back the shine. Basically the same process I use to refurbish aluminum parts. Each signal takes nearly an hour of work. And yes, I know reproduction signals are available, but what fun would that be? NOTE: This does NOT work on white colored signals & mirrors — they have a painted finish.

When I'm satisfied that the signals are presentable, the lens' are installed and a final buffing finishes up the cosmetics. I like the signals tucked closer to the body, so I install them with shorter rubber stems. The rears are 3/4" stems from a VF500 and for the fronts I use the VFR rear stems which are 1 1/4" and bring the lights nearly flush to the fairing. The stems are available aftermarket from K&S. One more item checked off the list.

I also use this technique on the mirrors and on windscreens. It ain't easy taking 3000-grit sandpaper to a plastic screen, but is often the difference between returning an original (and unavailable) windscreen to service or dropping it in the dumpster. And I prefer original parts.

Picture
0 Comments

RC30 Project

4/29/2016

1 Comment

 
Picture
Ebay item number 111980437107
Picture
Now here's a project bike to sink your teeth into. Up for auction from Washington state is this wrecked 1990 VFR750R (RC30).

This bike was involved in a street accident and purchased from the insurer with a salvage title. The seller is upfront about the extensive damage and has some of the replacement body plastics available for sale separately. He claims that the frame  geometry is correct and ran the engine briefly ten years ago (!). 

Showing 17,000 miles, the seller has opened the bidding at $12,500, roughly half the value of your average, useable RC30. Your decision may hinge on how much trust you put into the seller's claim of an OK frame, as a replacement is as rare as a combat atheist. Should this end up being a track bike or put back on the street? The salvage title will forever haunt the bike's value as a street bike but, personally, I think a rider-quality RC30 would be the ticket. I think the seller may be shooting for the stars—I would be all over this project at about $7000.

1 Comment

Worth-y Cause

4/28/2016

0 Comments

 
Picture
Bike builder Jeremy Malman knows there's at least two things wrong in this world that he wants to do something about:
*The "skills gap" for skilled, hands-on workers in America; and,
*At-risk kids in this country facing an ever more hopeless future.

His shop, Worth Motorcycle Company, is a non-profit organization in New York City teaching these kids about life, bikes and self-worth. To keep the program alive, Jeremy has started a fund-raising campaign called "Building Worth." Here's the link with more details if you can help.

https://www.razoo.com/us/story/Building-Worth-1

0 Comments
<<Previous
Forward>>

    THE SHOP BLOG
    •••

    An on-going account of miscellaneous information, project bikes and noteworthy VFRs for sale


    Archives

    May 2025
    April 2025
    March 2025
    February 2025
    January 2025
    December 2024
    November 2024
    October 2024
    September 2024
    August 2024
    July 2024
    June 2024
    May 2024
    April 2024
    March 2024
    February 2024
    January 2024
    December 2023
    November 2023
    October 2023
    September 2023
    August 2023
    July 2023
    June 2023
    May 2023
    April 2023
    March 2023
    February 2023
    January 2023
    December 2022
    November 2022
    October 2022
    September 2022
    August 2022
    July 2022
    June 2022
    May 2022
    April 2022
    March 2022
    February 2022
    January 2022
    December 2021
    November 2021
    October 2021
    September 2021
    August 2021
    July 2021
    June 2021
    May 2021
    April 2021
    March 2021
    February 2021
    January 2021
    December 2020
    November 2020
    October 2020
    September 2020
    August 2020
    July 2020
    June 2020
    May 2020
    April 2020
    March 2020
    February 2020
    January 2020
    December 2019
    November 2019
    October 2019
    September 2019
    August 2019
    July 2019
    June 2019
    May 2019
    April 2019
    March 2019
    February 2019
    January 2019
    December 2018
    November 2018
    October 2018
    September 2018
    August 2018
    July 2018
    June 2018
    May 2018
    April 2018
    March 2018
    February 2018
    January 2018
    December 2017
    November 2017
    October 2017
    September 2017
    August 2017
    July 2017
    June 2017
    May 2017
    April 2017
    March 2017
    February 2017
    January 2017
    December 2016
    November 2016
    October 2016
    September 2016
    August 2016
    July 2016
    June 2016
    May 2016
    April 2016
    March 2016
    February 2016
    January 2016
    December 2015
    November 2015
    October 2015
    September 2015
    August 2015
    July 2015
    June 2015

    Categories

    All

    RSS Feed

Site powered by Weebly. Managed by HostGator