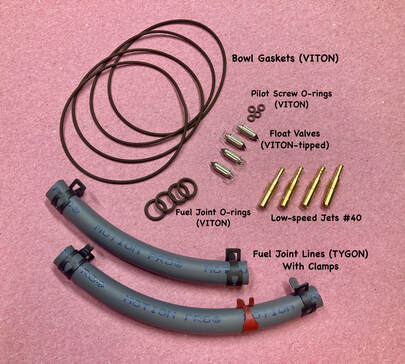
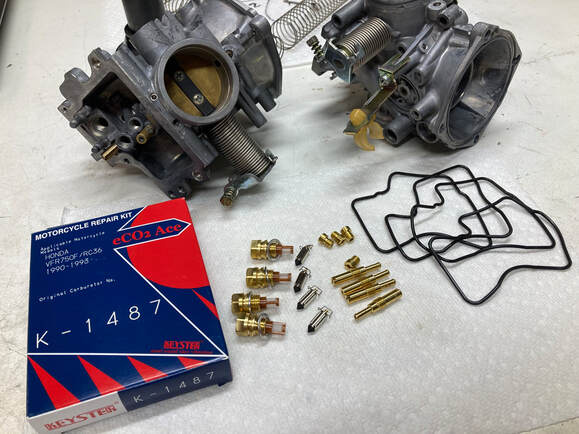
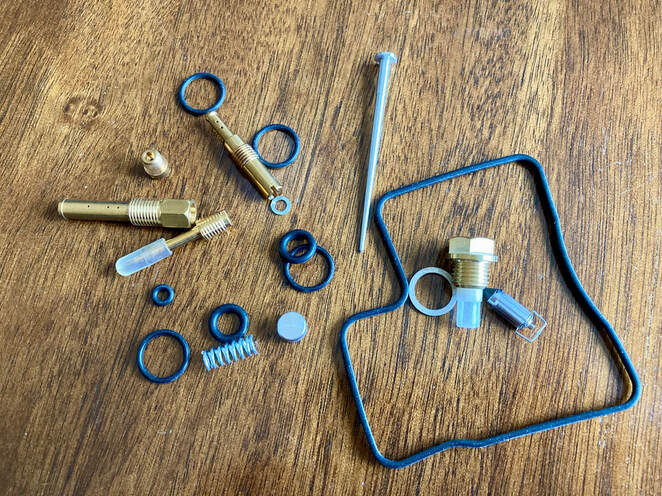
Honda's V4 Interceptors
V4 Dreams
  • Home
  • Shop Blog
  • Maintenance
  • Products
  • My VFRs
  • Historical

First-Year Gen-6 For Sale In Florida

2/18/2024

0 Comments

 
PictureClick on image for the eBay listing
What: 2002 VFR800 Interceptor
Why: Low miles, great cosmetics
Where: Miami, Florida
Price: $4400 or offer

The first thing that caught my eye with this VFR800 VTEC was the perfect-looking Italian Red bodywork. After reading the description and zooming in on the photos, I can't seem to find any telltale signs of ground contact or other common rash. Assuming original paintwork, that's impressive in a 22-year old motorcycle. Then again, this beauty shows just 4488 miles, our seller having added only 131 miles in his 16 months of ownership.

The bike appears quite complete and original, with a few little mods; the rear fender has been chopped, there's aftermarket hand levers and master cylinder covers, gas tank filler cap, bar risers, Throttlemeister throttle lock/bar ends and the rear footpeg brackets removed (included in sale). This one is not equipped with optional ABS, and there's no mention of maintenance items due for attention. I think this would be a great candidate to return to stock configuration and keep as a beautiful example of the first-year RC46 VTEC Interceptor, and it might be difficult to argue with the asking price.
​
For lots of tech and riding impressions from back in the day, here's Cycle World's road test from 2002:
https://www.cycleworld.com/sport-rider/red-techno-buff-2002-honda-vfr800-interceptor-full-test/

0 Comments

Airbox vs No Airbox

2/17/2024

0 Comments

 
Years ago I was tuning a Honda 800 V-twin, trying to set the sync and mixture on the two individual carburetors…with no luck. It would stumble, fall flat or even die when adding throttle, unless I messaged the throttle to get higher RPM. After some reflection, I decided to install the airbox and filter, and voila, it throttled just fine. Lesson learned.

As a result of that incident, I always install the airbox and filter when tuning VFR carbs, but yesterday I decided to recreate my experience and ran the engine sans airbox. The video below shows the results.
Back in the day, we would routinely swap our inline fours' airbox for individual pod filters, and the bikes ran just fine, so my logical brain doesn't easily compute this phenomenon, but there's some science behind it, and that science began in the motorcycle world during the 1980's. Can we still make "modern" carburetors like ours (or fuel injection) run without their engineered airboxes? Yes, but it would take some aggressive jetting tuning, and we would likely be defeating the performance objective by degrading the torque/HP tuning that the engineers worked so hard to achieve. Here's a brief explanation from Kevin Cameron:
https://www.cycleworld.com/what-is-secret-importance-motorcycle-airbox/
0 Comments

Carb Kits

2/13/2024

0 Comments

 
I've spent the past few days rebuilding and tuning carburetors, specifically 3d-gen carb sets. I don't typically have a need for rebuild kits, not that there's anything wrong with a quality set, but I always try to reuse any of the original OEM parts when able, and I've sourced my own seals, so I don't have a need for much of the hardware or seals provided. However, I do replace the float valves and sometimes the low-speed jets if they're too far gone to salvage. I used to be able to get the 3d-gen float valve assembles separately from Sirius in Canada, but they seemed to have stopped stocking those, but do sell the Keyster kit shown below. They list these at about $95 USD but offer them in larger lots for about $71 with shipping and tax. That gives a good idea of their markup. Again, I don't need all of the extras — I don't think I ever met a main jet that couldn't be reused — but I'm kind of stuck. On the plus side, these are made-in-Japan parts and it's always easier to start with shiny new pilot jets. Obviously, this kit is only for the bits in the carb bowl, any seals beyond that will require a more complete kit…or a visit to my "Products" page.
Picture
 Just out of curiosity, I once ordered a Chinese-made rebuild kit for the 2d-gen VFR750 (below) and I received a mystery package of seemingly mis-matched bits and pieces along with a menagerie of seals, incorrect jet sizes and even a new jet needle. I should have know when the listing stated that the kit would fit several years of VF and VFR carbs, which are not compatible. But that little sync spring will come in handy one day, I'm sure. If anyone seriously thinks that all this stuff is of useable quality for $20, shipped from China, they deserve what they get, I suppose.
Picture
Picture
Speaking of reusing parts, don't be too quick to throw out your nasty-looking float blow drain screws. Yes, sometimes they've corroded away the tip with no hope of sealing ever again, but often a few minutes with some 1200-grit wet/dry sandpaper wetted with WD-40 or similar will have them ready for another 30 years. These are NLA from Honda, but are available aftermarket.

BTW, those rubber seals don't actually seal fuel, they just direct the draining fuel out the bottom spigot, so don't fret if yours aren't perfect.

0 Comments

Project 42 Progress

2/7/2024

0 Comments

 
Project 42, a UK-spec 1986 VFR750F, is showing some assembly progress. In this photo we see that the centerstand is mounted along with the refurbished set of Supertrapp slip-on mufflers. All the fairing panels and windscreen have been test fitted, then color-sanded and buffed. Here, I've mounted the head and tail light fairing in order to machine buff them on the bike, which gives me a more stable platform for buffing. Those are spare wheels/tires mounted while awaiting the originals to return from the paint shop.
Picture
Picture
(Right) Here's my basic polishing kit: After sanding with appropriate grades of wet/dry paper, always finishing with 5000-grit, I machine polish using 4-inch pads on a DA machine. In most cases, Meguiar's Ultimate Compound (with an orange cutting pad) will buff out the dull sanded finish, with Ultimate Polish (black polishing pad) the final step. It takes a steady hand and a certain amount of self-confidence to take sandpaper to your shiny paint and clear plastics. Always use the minimum grit possible to get the job done and be especially gentle along the decal edges. These very fine microfiber clothes are strictly reserved for this kind of polishing so there's no possibility of contamination with grit, oils, etc. After use, they're hand-washed and rinsed before machine washing.

This tank now has its original luster back. I'm not after restorative perfection here, just the best that the original parts can be.

Picture
Picture
(Right) After sanding and buffing the windscreen, I repaint the blacked-out backside as several black areas were scuffed clear during its life. This is an easy operation — I clean the black surface, sand lightly with 1200-grit and carefully mask off the clear screen. The black is then sprayed with three light coats of satin black. Here, we're ready for paint.

​(Below) Next up are the turn signals and mirrors. The signals were treated well during the past decades of use, and I will be able to reuse them with sanding and polishing. On the left is a before/after photo showing a sanded and a polished signal. The lens is left attached (as is the tail light assembly) as they get the same treatment, and when finished, I will remove the lenses for cleaning residual polish from the seams. For this project I'm using one NOS and one repainted mirror. Both are fine sanded and polished.

(Below) A common fix I use for the 2d-gen bikes is to enlarge the front turn signal holes. I do this to allow a "relaxed" fitting of the signals, meaning the fairing isn't pressing up or down on the rubber signal stalk. I remove only about 2mm of plastic around the perimeter — the rubber trim strip still fits snuggly but the stalks now have a little more clearance, which helps me to align the signals up/down and front/rear, allowing a nice, level appearance. TIP: Drooping signals may be able to be fixed by swapping the stalks side-to-side if they're not too far gone. It worked for this project, both front and rear.
One of the under-appreciated tasks of a thorough bike refurbishing is re-fitting of the body panels. After a few decades of use and abuse, it's often a time-consuming and frustrating process to get all the panels aligned. I sometimes need to remove/install a headlight fairing, for example, a dozen times in order to tweak its mounting points to allow proper alignment of the lower panels, which are all affected by the headlight fairing mounting. Even the windscreen can be visually twisted by a misaligned front fairing (typically caused by a tip-over). It becomes a 3-dimensional puzzle that simply takes time and attention to detail. But it's one of the many details which sets your bike apart from most.
0 Comments

And Now For Something Completely Different

2/6/2024

0 Comments

 
PictureClick on image for eBay link
When I bumped into this eBay classified listing, it took me a few seconds to wrap my mind around what's going on with this fuel tank…what's with the two metal caps atop the tank?

The answer came with the photo of the tank's bottom — someone decided to channel the popular 90's ram air trend (like the Bimota pictured below) by, apparently, installing two tubes through the tank, presumably to increase airflow to the carburetors? I'm not sure if the caps are removable and if flexible tubes are supposed to be connected to them. Our seller doesn't mention this unique modification but describes the tank as "very nice" and is asking $150 OBO plus $20 shipping from Iowa.

0 Comments

Recommended Viewing: "El Camino"

2/5/2024

0 Comments

 
"Without Honda, we'd still be in the dark ages."
I bumped into this video series via my ADVrider.com weekly email digest. In search of a mid-winter psychological moto boost, I gave it a look…and ended up bingeing for a couple of late-night me-time YouTube sessions. Host Neil Graham, a long-time Canadian moto journalist, leads us through an eclectic collection of beautifully filmed and well narrated 20-minute segments — from enticing back-road rides to the relevance of the chopper and more. Neil is deadpan, insightful, well-researched, semi-funny and unapologetic about his views and selection of material. In other words, this is not your father's moto-vlog. Give it a try, here's the trailer….
Neil Graham is also an engaging writer. For much more from his keyboard, visit his website:
https://www.thebluegroove.com
0 Comments

New Product — Fuel Line Kit For 2d-Gen VFR

2/1/2024

0 Comments

 
Picture
$28 (includes shipping)

I'm often asked what I do about replacing the original fuel lines for my projects. Every one of my projects has come to me with the original 37-year old fuel lines still installed, their best-by date having expired long ago, so I always replace all the components.

Here's what I do. The 8mm (5/16") section from the fuel tank to the filter is replaced with TYGON line, the filter is a new Japanese-made item identical in size and style to the original, and the remaining 10mm (3/8") lines are modern fuel line from a name-brand manufacturer (Continental, Gates, AC Delco). The clamps are easy-to-use spring clamps in the correct sizes, and all lines are cut to correct length, shipped as shown, assembled and ready to install. I source made-in-USA parts whenever possible.

I'm offering this kit for sale. The $28 price includes shipping to all U.S. states. Contact me (with a shipping address) for actual shipping costs outside the U.S.

Coming next: A carb rebuild kit for the 2d-gen, with just the essential items I use for every rebuild.

0 Comments

Nice 5th-Gen For Sale In Florida

1/30/2024

0 Comments

 
PictureClick on image for the eBay link
What: 1998 VFR800 FI
Why: Low miles, mostly original
Where: Miami, Florida
Price: $5250 OBO

A favorite among VFR-isti is the 1998-2001 fifth-generation model, and here we have a clean, mostly original example with an incredible 6600 indicated. I don't see any obvious signs of distress in the beautiful Italian Red paint, and the seller states that the bike is "in great condition, an honest 9/10." The mirror condoms are a bit ill-fitting, but that's easily dealt with, and the seller makes no mention of the Yoshimura slip-on, which will surely make this V4 sing. Even the rear fender appears to be intact, but I don't see a passenger seat cover. Based upon the photos and description the asking price seems right…too bad it's a bit too early for a fly-n-ride for those of us up north.

0 Comments

Refurbishing Infill Panels — 2d-Gen

1/22/2024

0 Comments

 
As I progress on the bodywork detailing on Project 42, a 1986 VFR750, I've come to the fairing infill panels which fill the space between the side fairings/fuel tank/instruments. These panels have become almost impossible to obtain if yours are missing or damaged, and I've gone to some lengths in the past at preserving these. As seen below, the panels for Project 42 are intact, but suffer from cracks at both upper mounting holes, along with typical fading and discoloration. These have discolored from their original blue (they should match the instrument nacelle) to black, with several fuzzy blue spots. It's obvious the color change is environmental, as the backsides are still factory blue. I need to address all these issues as I want to preserve their originality.
(click on images to enlarge)
Picture
(Left) I'm going to address the cracks by reinforcing from the backside only — if I make repairs to the front they will need to be painted and I don't want that, so I've chosen to live with the hairline cracks on the frontside. Here, a portion of the circle was missing so I cut a wedge of scrap ABS and fitted it into place. I do this repair with a combination of plastic welding and Plast-aid. It's not my neatest work, but not visible on the bike so I'll just smooth out the repairs and dab on some color.

​(Below) The color on these panels is cast in the plastic — not painted — which means that the color can be brought back to the surface by sanding away the black discoloration. I begin with 1200-grit wet/dry, which makes pretty short work of removing the blue spots and black color. In these photos you can see the blue slurry produced as I sand. When I rinse and dry I can see where more sanding is required at the edges. I then work through 1500, 2000, 3000 and 5000-grit. Yes, it's a lot of sanding.
(Below) When I'm happy with the final sanding, I'll finish with an application of 303 Protectant. This will leave a streaked finish which the bottle instructions address with a simple water rinse and drying. The panels can also be polished with a mild polishing compound to bring out a shiny appearance, but I'm after the muted factory sheen, so I stop at this point. Here's a look at the hairline cracks still visible — I'll call it patina. Normally, I would have removed the rubber trim strips for this work, but these were so solidly glued in place that I just left them — they're usually falling off of their own accord.
Here's the final result. I probably spent about three hours labor on this project, but I saved the original pieces to be preserved with their machine…cracks and all.
Picture
0 Comments

Tool Time — Dent Pulling

1/20/2024

0 Comments

 
Picture
I don't want to talk about it, but….
Shortly after final assembly of Project 39, my personal '93 VFR750, in an instant of inattention, I dropped the bike in the shop. It landed on a carpeted area which mitigated some damage, but the right handlebar moved rearward at impact and dented the freshly-painted fuel tank. 

This is not acceptable, so I showed my painter, Steve, and after a suitable, well-deserved scowl from him, he determined that paintless dent removal was not an option (no interior accessibility) and he would need to repaint. He's working on another task for me right now, so I took the tank back home and decided to try out an inexpensive tool I'd seen on YouTube — a dent puller kit.

PictureClick on image for Amazon link
These ingenious gadgets use hot glue applied to little tabs of various sizes & shapes, which are glued to the dent and then pulled straight out with a special puller attached to the tabs. The kit also supplies a light-weight hammer & driver with various-shaped plastic tips to drive down any raised spots resulting from the pulling action.

With nothing to lose, I began repeatedly glueing/pulling/tapping, watching in amazement as the dent slowly disappeared. Now, this technology is obviously meant for the thin sheet metal used on modern cars, not heavy gauge motorbike fuel tanks. The glue has only so much holding power, and would often pop off at its limit. I probably glued/pulled 30 times before deciding I'd progressed as far as possible on this dent. In the end, I think I got the dent to about 90% removed, but the metal remains a bit "lumpy." Amazingly, the initial impact and all the pulling/tapping never affected the paint, which remains perfectly intact. I will likely still have the tank repaired/repainted, but at least I made the job quicker and easier for my painter. I do think this device would be very effective for automotive use.

I tried to photograph the final result, but the camera doesn't pick it up well. If the bike's overall presentation was of average quality, I would accept this repair, but that's not the case with #39.
(click on an image to enlarge)

0 Comments
<<Previous
Forward>>

    THE SHOP BLOG
    •••

    An on-going account of miscellaneous information, project bikes and noteworthy VFRs for sale


    Archives

    April 2026
    March 2026
    February 2026
    January 2026
    December 2025
    November 2025
    October 2025
    September 2025
    August 2025
    July 2025
    June 2025
    May 2025
    April 2025
    March 2025
    February 2025
    January 2025
    December 2024
    November 2024
    October 2024
    September 2024
    August 2024
    July 2024
    June 2024
    May 2024
    April 2024
    March 2024
    February 2024
    January 2024
    December 2023
    November 2023
    October 2023
    September 2023
    August 2023
    July 2023
    June 2023
    May 2023
    April 2023
    March 2023
    February 2023
    January 2023
    December 2022
    November 2022
    October 2022
    September 2022
    August 2022
    July 2022
    June 2022
    May 2022
    April 2022
    March 2022
    February 2022
    January 2022
    December 2021
    November 2021
    October 2021
    September 2021
    August 2021
    July 2021
    June 2021
    May 2021
    April 2021
    March 2021
    February 2021
    January 2021
    December 2020
    November 2020
    October 2020
    September 2020
    August 2020
    July 2020
    June 2020
    May 2020
    April 2020
    March 2020
    February 2020
    January 2020
    December 2019
    November 2019
    October 2019
    September 2019
    August 2019
    July 2019
    June 2019
    May 2019
    April 2019
    March 2019
    February 2019
    January 2019
    December 2018
    November 2018
    October 2018
    September 2018
    August 2018
    July 2018
    June 2018
    May 2018
    April 2018
    March 2018
    February 2018
    January 2018
    December 2017
    November 2017
    October 2017
    September 2017
    August 2017
    July 2017
    June 2017
    May 2017
    April 2017
    March 2017
    February 2017
    January 2017
    December 2016
    November 2016
    October 2016
    September 2016
    August 2016
    July 2016
    June 2016
    May 2016
    April 2016
    March 2016
    February 2016
    January 2016
    December 2015
    November 2015
    October 2015
    September 2015
    August 2015
    July 2015
    June 2015

    Categories

    All

    RSS Feed

Site powered by Weebly. Managed by HostGator