Honda's V4 Interceptors
V4 Dreams
  • Home
  • Shop Blog
  • Maintenance
  • Products
  • My VFRs
  • Historical

Mecum Las Vegas '22 Results

1/31/2022

0 Comments

 
The 2022 Mecum Las Vegas auctions concluded this past weekend. I had hoped to be there with my 1112-mile 1986 VFR700 but a smart buyer grabbed it from me last Fall, so I was left as an internet spectator. Here's the results listed for the various V4 models crossing the block this year.
Picture
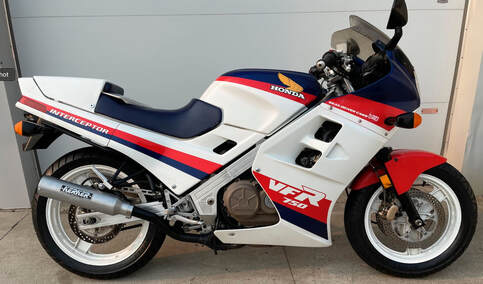
1986 VFR750F
Sold: $7700
This RC24 shows 21,371 miles and presents well. Mecum's typically uninformative description states simply, "running condition." The bike appears to be in mostly original condition with damage-free cosmetics, period correct Kerker slip-ons and Fox shock. The passenger seat cowl is present but the windscreen molding is missing. An above average example with a bit less than average miles. The selling price indicates a general rise in second-gen values — and it's about time.

Picture
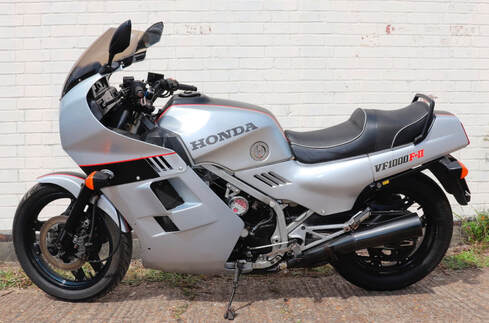
1984 VF1000 F2
Sold: $2420
The auction listing is a little confusing on this Euro-spec VF1000. It's listed as an '84 but the description states that the fully-faired F2 was introduced after the '85 model year. In any case, this is a unique take on the big-block VF in the U.S. and sports the extra fairings, a second radiator and twin headlights. This example looks to be in average condition with 41,842 miles and an aftermarket seat.

Picture
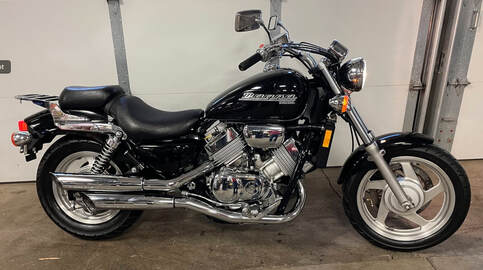
2001 Magna 750 (VF750C)
Sold: $2200

This V4 power cruiser stayed in Honda's lineup until 2003 and featured an internally-modified 750cc V4 tuned for mid-range power with 5-speed transmission. This example shows beautifully with only 8043 miles on the odometer. It's selling price seems to indicate the general lack of interest in the mid-displacement cruiser market.

Picture
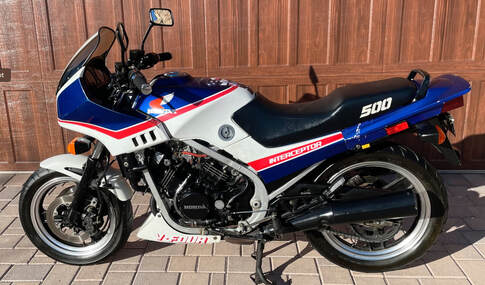
1985 VF500F
Sold: $3300

This mini-'ceptor is represented as an original survivor and certainly shows the appropriate patina, all Armor-All-ed up for the auction. Showing 10,530 miles, I would call this bike an average example, and the seller should be very pleased with the sale price.


Picture
1992 VFR400 (NC30)
Sold: $13,750

Here's a beautiful example of the final-year VFR400, cleverly coded by Honda as the NC30 to channel it's famous sibling, the RC30. This model was never offered in the U.S. market but have become a desirable (and now legal) import for collectors and lovers of small displacement point & shoot sport bikes. This one shows 11,657 miles and proudly displays its classic 90's livery. Very nice.

Picture
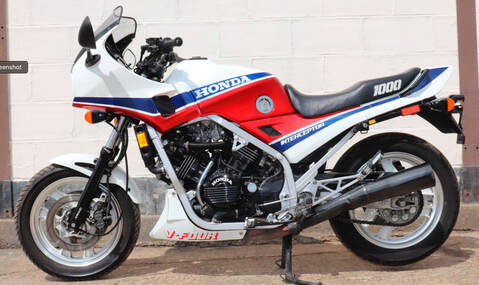
1988 VF1000 FE
Sold: $5170

This Euro-spec VF1000 is designated "FE" and is a lovely survivor despite its 64,468 kilometers. There's some expected patina including some left-side muffler rash and the mirrors are not original to the model. This is a very unique bike here in the U.S., and a pretty cool alternative to the over-priced and less-friendly "R" model.

Picture
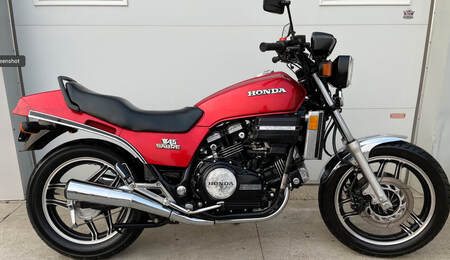
1982 V45 Sabre (VF750S)
Sold: $1980

This may be the buy of the weekend — a first-year V4 Sabre in very original condition. No word on the miles (or anything else) but this appears to be a well-preserved example. Aluminum corrosion is an issue with the early VFs, but this one doesn't look too bad, and the irreplaceable mufflers are intact. A lot of motorbike for under $2000.

Picture
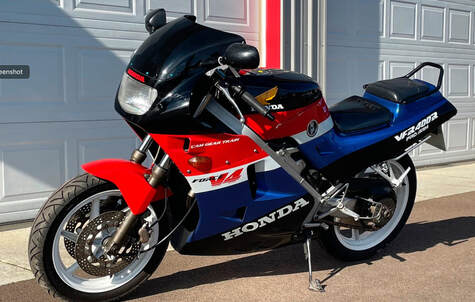
1987 VFR400 (NC24)
Sold: $7700

The NC24 is the second generation of the VFR400 series ('87-88) and introduced the 8-spoke rear wheel and single-sided Pro-Arm swingarm to the model. No mileage listed, but this example is exquisite in one of the three color schemes available this model year. Well bought and well sold.

Picture
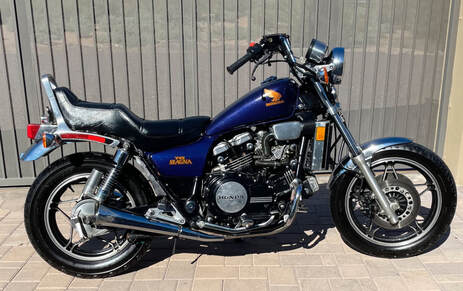
1982 V45 Magna (VF750C)
Sold: $2750

Another first-year example of the V4 lineup, the Magna was Honda's response to the Japanese cruiser trend of the 80's. This example is mostly original, is all shined up and shows 18,580 miles with muffler rash on both sides. These are not sought-after models and I think the seller should be pleased.

Picture
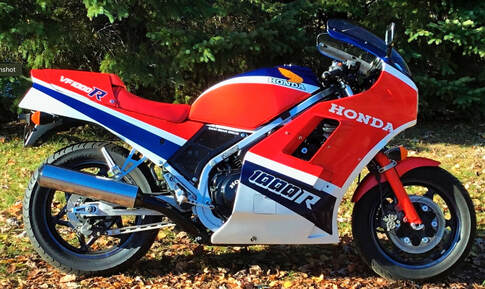
1985 VF1000R
Sold: $12,100

The "R" model VF1000 was sold in the U.S. in 1985-86 but introduced in Europe in '84. A complete redesign of the "F" model, the "R" brought gear-drive cams and many performance upgrades. It was also 85 pounds heavier and was less comfortable, a nod toward its intention as a homologation bike for endurance racing, which never materialized. Still, the "R" remains a desirable classic, and there's no denying the punch delivered by the big-block V4. This bike indicates 27,900 miles and is said to be "highly original." If that's in fact the case, it's an exceptional example and the selling price reflects it.

Picture
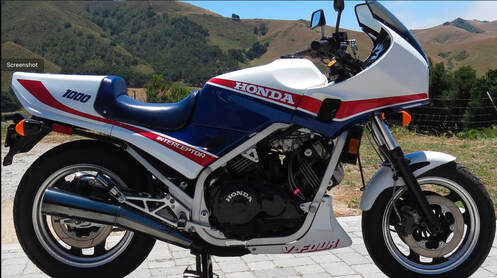
1984 VF1000F
Sold: $7700

Wow, what a beautiful example of the single-year VF1000F. Belying its 38,892 miles, this example sparkles in its classic red/white/blue livery. Looking over the photos, I have to believe this one has had a cosmetic restoration. The listing also states that the engine was rebuilt in 2017. The selling price is the highest I've ever seen for the model, and hopefully, it signals an uptick in value for the traditionally underrated "F" bikes.

Picture
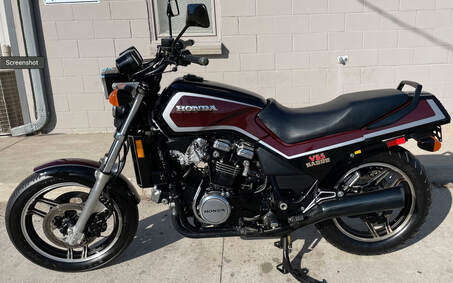
1984 V65 Sabre (VF1100S)
Sold: $1870

Another great buy, this big-block V65 is represented as original and unrestored. These bikes were stoplight brutes, could smoke just about any comers and were direct competitors to Yamaha's V-Max. Available only in 1984 and '85 with its trendy square headlight and long fork styled for a chopper-esque look. This one shows 32,023 miles and is going to bring back some memories for very little money. 


0 Comments

Valve Adjustment; 3rd-gen & Newer (two videos)

1/27/2022

0 Comments

 
Picture
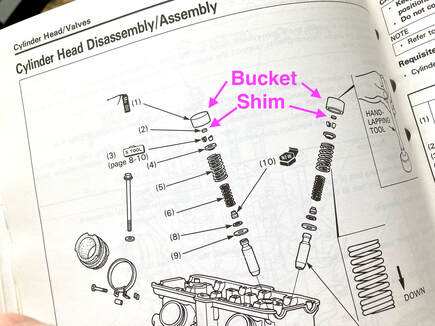
As I progress through the refurbishment of Project 37, a 1993 VFR750, one of the items at the top of the checklist is a valve clearance check and adjustment. Beginning in 1990, the VFR's valve adjustment is accomplished via the "shim-under-bucket" arrangement whereby replaceable shims of varying thickness are exchanged to achieve the recommended clearance, also referred to as "lash." This design provides a very positive mechanical setting which is able to survive high-RPM operations without the threat of "spitting" out a shim as can happen with a "shim-over-bucket" arrangement. Honda must have thought that our high-performance, high-revving engines deserved this design, though interestingly, the earlier generation VF/VFRs seemed to have gotten by with the simpler screw & locknut approach. In fairness, those earlier systems required old-fashioned rocker arms for valve actuation which are more complex and heavier, adding reciprocating mass and, likely, high RPM flexing. But, that earlier design makes our life easier when adjustment time comes about.

In any case, owners of 1990+ machines will need to set aside more garage time (or expect to pay a shop more) in the event their valves are in need of clearance adjustments, which likely leads to this task being put off or outright ignored as part of a normal maintenance regimen. Of course, that's understandable when an owner realizes that, in order to replace a shim, the appropriate camshaft needs to be removed from the cylinder head…and there's four of 'em. So, if you're confident in your wrench-turning abilities, here's a video showing the steps involved in accessing the area for the clearance checks and removing/installing the cams, if necessary.

In this case, all eight valves of the rear cylinders required adjustment along with three of the front intakes and none of the front exhaust. So, three of the four cams required removal.

The second video shows the math exercise required to select the correct replacement shims. I wish I knew how to make math interesting but, alas, I don't.

NOTE: Once I gained access to the valve covers this entire operation took me about 2.5 hours of labor plus the better part of a week waiting for my local dealer to provide the three shims I didn't have on hand. There should be no additional parts needed beyond the required shims, though this is a perfect opportunity to replace the spark plugs. As noted in the shims video, the Haynes service manual is the more thorough guide for this operation.


0 Comments

From The Archives...

1/26/2022

0 Comments

 
Carbs
From December, 2015
Picture
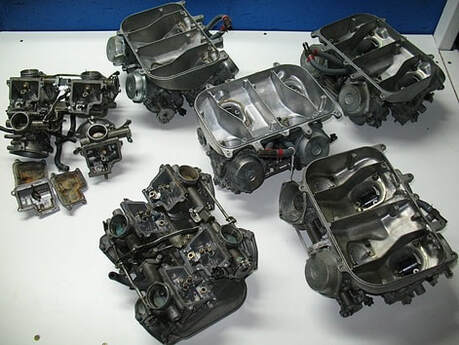
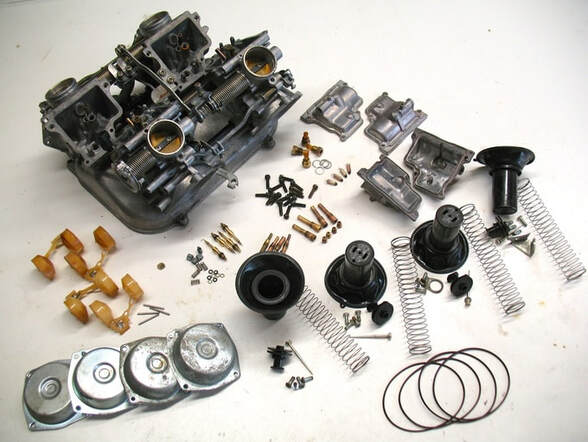
The old carburetor vs. fuel injection debate is long dead. "Fuelies" may have had a rocky start with the old mechanical automotive systems, but the EPA writing was on the wall and technology won out — for the better. The first mass-produced motorcycle injection system appeared on the 1980 Kawasaki Z1000 Classic, and our VFRs joined the game in '98 with the VFR800FI.

But those of us who play with old bikes still fumble about with carbs. I should create a T-shirt which states, "Still Plays With Carburetors." It's often interesting to disassemble a set from the latest project bike to see what mischief has been wrought by previous fiddlers.

Even nostalgic types have to admit that the new-generation performance tuning via digital mapping is more precise, effective and much, much easier than old-school trial & error with needles and jets. It's also a natural approach for this digital generation. But we're stuck with our carburetors and I will say that there's a certain satisfaction in getting all the parts and ports to align and end up with a sweet-running carbureted V4. Or maybe I'm just old.

Picture
0 Comments

Yellow Flash For Sale In Florida

1/18/2022

0 Comments

 
PictureClick on image for the VFRworld.com link.
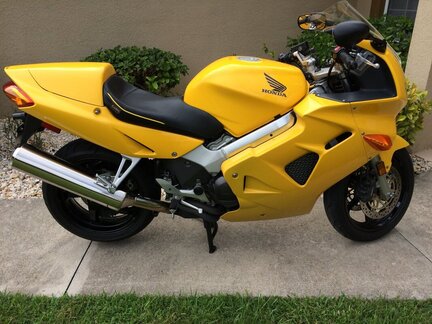
What: 2000 VFR800 FI
Where: Southwest Florida
Why: Exceptionally well-kept 5th-Gen
Price: Asking $5000

1998-2001 VFR fans will tell you in no uncertain terms that theirs is the best generation of Interceptor out there. And owners of the one-year Pearl Shining Yellow bikes may be the most vocal.

They all have a point, of course. Sitting in the sweet spot between the gear-drive cam design of the previous generations and the new age chain-drive VTEC models, the fuel injected 782cc V4 got a few tweaks for the 2000 model year. These included an updated EFI system, oxygen sensors and the "fast idle" lever deleted, while all 5th-gen bikes got Honda's new CBS linked braking system.

This two-owner example presents beautifully despite showing nearly 29,000 miles. Obviously well cared for with full maintenance records and a few nice extras: Bar risers, alarm system, aftermarket windscreen and color-matched Corbin seat. The $5000 asking is at the high end, but I'm thinking you get what you pay for here. If yellow is your color, you'd be hard pressed to find a nicer example.

0 Comments

The Cost Of Deferred Maintenance

1/16/2022

0 Comments

 
Picture
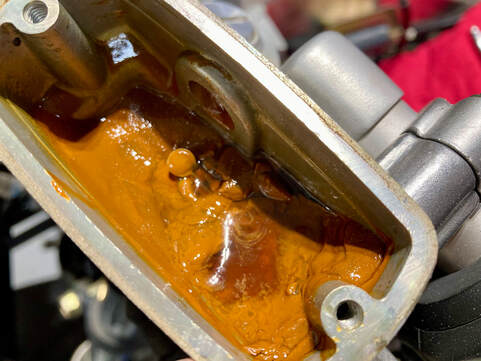
While in the process of dismantling the various systems on Project 37, a 1993 VFR750, I came upon this science experiment inside the clutch master cylinder.

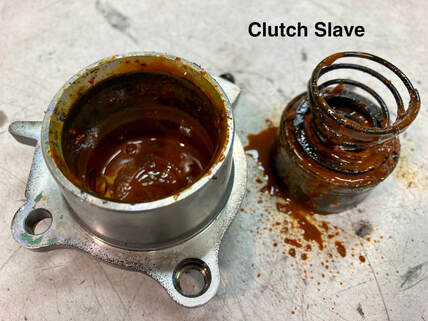
This is exactly why there's a universal recommendation to flush brake fluid every two or three years. Yes, this will clean up with a water scrubbing but the situation is the same downstream in the lines and clutch slave cylinder. In fact, when I attempted to drain the fluid via the slave's bleeder valve it wouldn't even pass this crud.

Picture
Flushing/bleeding your hydraulics isn't difficult, costly or time-consuming, but, if allowed to reach this point, it's just the opposite. This will require a complete system disassembly, cleaning, new master and slave seals and ideally a hydraulic line replacement, which we're planning in any case. If you presented this to a shop you're facing hundreds of dollars in parts and labor. Flushing your own systems costs a $4 container of brake fluid and 30 minutes of garage therapy. Flush your fluids!

0 Comments

Mid-Winter Blues

1/15/2022

0 Comments

 
It's that time of the season again: Today marks my unscientifically-determined mid-point of winter for us occupying the northern half of this little rock hurtling through space. I always like to pause and look over a few summer riding videos as a reminder that this too shall end and return us to the road.

I think that I've featured this video in the past but it's worth another look — here we have Nurburgring Biker making a fast lap of the Nordschleife (North Loop) of the famous Nurburgring circuit nestled in the Eifel Mountains of Germany. He's riding his 2006 VFR800 VTEC in nearly stock configuration, including suspension, with Michelin Pilot Road 3s, an aftermarket slip-on and EBC brake pads. I saw around 240 kph on the straights, which translates to around 150 mph. Enjoy!
0 Comments

Switch Maintenance

1/2/2022

0 Comments

 
Picture
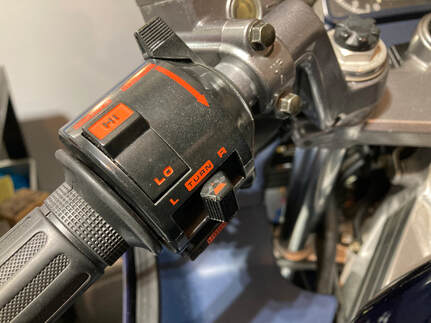
While doing a bit of carb tuning for a client, I was giving this 1987 VFR700 F2 a once-over and discovered that the turn signals were, let's say, reluctant to do their job. The right side signals were sluggish and the left were away on vacation.

The signals all share common electrical components, so if one side are working and the other not, then items like the flasher and fuse are not the problem. I find that an issue like this is often in the handlebar switch assembly; likely just dirty contacts. That proved to be the case here.

When I split the switch case (below, left) I can see that the old grease is gummy and dirty. This is a simple mechanical device — moving the pivoting switch lever left or right moves the opposite end left or right. When we remove that lever assembly (below, right) we see that that lever is actually moving the white-colored sliding plastic block right or left (yellow arrows). That movement makes electrical contact on the face of the black-colored plastic block (pink arrow) which directs the electrical current to the right or left turn signal circuits. When centered, as in the photo, no electrical contact is made. Our problem is that the contacts, which are exposed to dirt and humidity, are no longer making positive contact.

The solution is to spray the contact area with electrical contact cleaner and then coat with a bit of dielectric grease. I also give the switch lever a similar treatment, which makes the switch action smooth and crisp, just like when new. Carefully reassemble the components with their tiny screws, check that the choke cable is in good condition and button everything back up. NOTE: This task is completed with the switch left in place on the handlebar.

0 Comments

Welcome, 2022

1/1/2022

0 Comments

 
Picture
0 Comments

From Lithuania With Love

12/30/2021

0 Comments

 
As our vintage bikes' parts and pieces become less available I find it increasingly necessary to search farther afield for those bits. Case in point, the plastic infill panels for the second-gen Interceptor. Finding these elusive panels in useable, undamaged condition has become nearly impossible. So it was that, when I saw this set pop up on eBay a few weeks back, I clicked the buy-it-now button with little hesitation.

All the way from Lithuania. With no "round-gauge" model available for the European markets, these panels will only fit the U.S.-spec F2 bikes. No worries, as there's something like twice the number of '86-87 700 F2s in America as there are '86 Fs. These will sand and polish to an acceptable level, or possibly be painted for a restoration project. They even included the rubber side gaskets. Thanks, eBay!
0 Comments

Smog Delete

12/26/2021

0 Comments

 
Picture
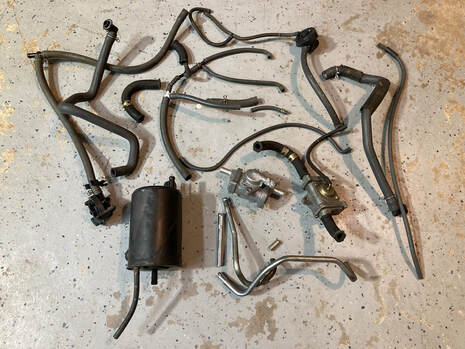
The next item on the list for Project 37, a '93 VFR750, is actually a delete operation. This California-spec model is saddled with the hardware collection you see in this photo. This was Honda's answer to tightening emissions requirements imposed by the California Air Resources Board (CARB), effective with the introduction of the Gen-3 models. I suspect that this California-only requirement may also have been a contributing factor in the absence of the VFR model from the U.S. market for 1988-89.

The purpose of all this plumbing is to capture the carburetors' evaporative fuel vapors and send them back into the engine to be re-burned rather than escape to the atmosphere. A secondary function was to inject fresh air into the exhaust ports (PAIR system), igniting unburned vapors exiting the engine, again preventing vapors escaping out the exhaust pipes. A noble endeavor, but after 29 years or so we have no way of knowing how effective the system is or if it may even be causing a drivability issue. A further rationalization for binning the whole affair is that our old bikes have mostly been relegated to occasional recreational use, and so their contribution to the warming of our planet will be minuscule at best. In any case, out it goes.

Beginning at the carburetors, I simply follow the various hoses along their paths, removing hardware parts as I go, culminating at the charcoal canister located near the #2 exhaust pipe. In addition, I'll unbolt the PAIR injection pipes from the front two cylinders at the exhaust ports. The rear two will be left in place, as they're nearly impossible to unbolt without removal of the shock, etc. These four pipes will need to be plugged, and for that I'll use four allen-head screws, pictured below. Screw or hex-head bolts will work just as well. I use 3/8" course threads.

My technique is to tap threads into the four pipes and insert the plugs coated in an epoxy, in this case JB Weld (this procedure is also covered on the "Maintenance" page). I begin by cutting the brackets off the front pipes, leaving enough pipe to thread and plug. I'll need to tap the rear pipes where they exit on the right side of the engine area. In the photos the new threads being cut are visible on the outside of the soft metal pipes.
(click on an image to enlarge)

The epoxy won't adhere to the oily threads, so I'll carefully clean them with cotton swabs wetted with brake cleaner. When dry, simply coat the threads generously with JB Weld and screw in place with a firm snug. Allow the epoxy to cure before running the engine.
We're not quite finished. There's five vacuum pipe fittings on the carburetors and two hose fittings on the air filter housing which will also need to be plugged.

For the carbs, you can simply slip a rubber vacuum cap over them, but I'm more comfortable with a permanent mechanical seal, just like the PAIR plugs covered above. NOTE: This procedure is only possible with the carburetors separated, so if that's not the case, we'll need to use the vacuum caps.

There's two sizes of pipes on the carburetors. For these I use hardware store self-tapping metal screws, numbers 6 and 8, 1/2' in length. I first gently tap the pipes with a dry screw — go slowly, these are brass pipes and could easily split open. Remove the screw, coat with JB Weld and snug into place. For a neater job, a Dremel cutoff tool will quickly slice the screw head off, but there's not always access for the tool. In any case, they're not visible when assembled.
(Below) Finally, I'll plug the two airbox fittings. There's any number of approaches here, just remember that these two holes locate below the filter element, so anything that enters here has a direct path through the carbs and into the engine. I simply go to my hardware stash, locate a couple of crusty old 8mm bolts, clean everything up, coat liberally in epoxy and install. A little more elegant solution is to coat a suitably-sized vacuum cap in RTV and push into the fitting (right photo).
P.S. (Below) Depending on model, the intake manifold screw plugs (for sync-ing connections) may have short hoses in place of the screw plugs. These hoses and their brass fittings should be discarded and replaced with screw plugs. If you don't have suitable screws/washers available, Honda still supplies them.
Picture
0 Comments
<<Previous
Forward>>

    THE SHOP BLOG
    •••

    An on-going account of miscellaneous information, project bikes and noteworthy VFRs for sale


    Archives

    July 2026
    June 2026
    May 2026
    April 2026
    March 2026
    February 2026
    January 2026
    December 2025
    November 2025
    October 2025
    September 2025
    August 2025
    July 2025
    June 2025
    May 2025
    April 2025
    March 2025
    February 2025
    January 2025
    December 2024
    November 2024
    October 2024
    September 2024
    August 2024
    July 2024
    June 2024
    May 2024
    April 2024
    March 2024
    February 2024
    January 2024
    December 2023
    November 2023
    October 2023
    September 2023
    August 2023
    July 2023
    June 2023
    May 2023
    April 2023
    March 2023
    February 2023
    January 2023
    December 2022
    November 2022
    October 2022
    September 2022
    August 2022
    July 2022
    June 2022
    May 2022
    April 2022
    March 2022
    February 2022
    January 2022
    December 2021
    November 2021
    October 2021
    September 2021
    August 2021
    July 2021
    June 2021
    May 2021
    April 2021
    March 2021
    February 2021
    January 2021
    December 2020
    November 2020
    October 2020
    September 2020
    August 2020
    July 2020
    June 2020
    May 2020
    April 2020
    March 2020
    February 2020
    January 2020
    December 2019
    November 2019
    October 2019
    September 2019
    August 2019
    July 2019
    June 2019
    May 2019
    April 2019
    March 2019
    February 2019
    January 2019
    December 2018
    November 2018
    October 2018
    September 2018
    August 2018
    July 2018
    June 2018
    May 2018
    April 2018
    March 2018
    February 2018
    January 2018
    December 2017
    November 2017
    October 2017
    September 2017
    August 2017
    July 2017
    June 2017
    May 2017
    April 2017
    March 2017
    February 2017
    January 2017
    December 2016
    November 2016
    October 2016
    September 2016
    August 2016
    July 2016
    June 2016
    May 2016
    April 2016
    March 2016
    February 2016
    January 2016
    December 2015
    November 2015
    October 2015
    September 2015
    August 2015
    July 2015
    June 2015

    Categories

    All

    RSS Feed

Site powered by Weebly. Managed by HostGator