RIDE SAFE

|
 Next on the list for Project 17 is checking the cylinder compression before attempting an engine start. Cylinder pressure readings can tell us much about our engine's health — if the piston rings are weak or broken, if the cylinder bore is damaged, if the valve seating is compromised, if the head gasket is leaking. In other words, if everything is okay or not. There's an even more comprehensive check called a leak-down test, where constant air pressure is applied to the cylinder via the spark plug hole while a separate gauge tells us if that pressure is being held within the cylinder. The advantage of a leak-down test is that if a leak is detected it can be pinpointed by listening to the exhaust pipe or intake tract for the telltale hissing sound of escaping air. The leak-down test is common in aircraft maintenance and requires specialized equipment...which I don't have. But the simpler compression check is still a viable check for me, as I don't know the history of these projects. One of the three critical ingredients to combustion is compression, so if I find a cylinder with low or no compression, well....Houston, we have a problem. To Honda's credit, in my years of checking these engines I have never found one with compromised compression readings.  The process is quick and simple and only requires an inexpensive compression tester, shown at right. The tool will provide adaptors to fit different spark plug hole sizes and threads. Rubber o-rings provide sealing with only hand pressure used to seat the adaptor into the plug hole. A proper compression test is done on a recently run (warm) engine — that's not possible for me as my projects haven't been run yet, but the test will still tell me if we have adequate compression.  With all the spark plugs removed and the kill switch "off" (or the plug wires grounded to prevent damage to the ignition system) screw the tester into the plug hole and connect the gauge. Crank the engine over with the starter till the pressure reading stops advancing — that's your reading. Repeat for the remaining cylinders while recording your readings.
While specific values are sometimes provided in service manuals, the bottom line is that all the cylinders should have similar readings, with the lowest vs. highest within about 10% of one another. My typical readings for the VFR are around 150 psi (cold engine). In this case, my readings were 160-197 psi. I don't apply the 10% rule here, again, because this engine hasn't been run in many years. Once the engine has some run time, the readings will be different and probably very close to one another. The reason my readings were high is due to the fact that I'd added oil to the cylinders before testing (to protect the cylinders and rings). Adding oil is a technique used to isolate the reason for low pressure readings — if adding oil increases your reading, then the cause most likely lies with the piston rings (the oil is helping the rings achieve a seal), as opposed to valve seating being the cause. In this case, I'm happy with these readings — they tell me that it's OK to move forward with this project. FYI, I've been experiencing some web site issues for the past ten days or so and haven't been able to access the site. I'm back in business....hopefully.
Yellow Ducatis. Yellow Ferraris. Yellow Hondas? Yep, conservative Honda would occasionally play with the color, and the VFR got the treatment for one year only; 2000. Honda dubbed it Pearl Shining Yellow, and if it strikes your fancy, you're in luck — eBay has three yellow Interceptors listed as we speak....... 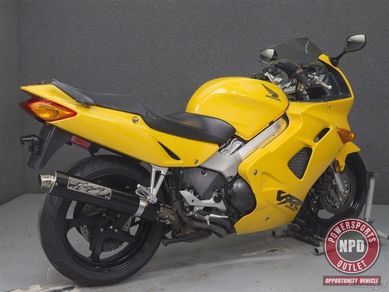 Click on image for the eBay link. Click on image for the eBay link. What: 2000 VFR800F Where: Merrimack, New Hampshire Price: $2150 or make offer Showing 40K miles, the selling dealer calls this an "opportunity vehicle," meaning it has some issues and is for sale in "as is" condition. This looks like an easy fix-up project. The body looks great in the photos and there's no obvious road rash. The Corbin seat looks a bit tired but the Erion Racing slip-on is a nice touch. The "make offer" part makes this one a contender. 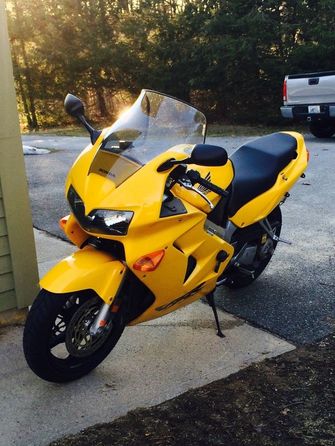 Click on image for the eBay link. Click on image for the eBay link. What: 2000 VFR800F Where: Narragansett, Rhode Island Price: $3000 or make offer Also located in the northeast, this 800 shows half the miles at 20,000, but needs more cosmetic TLC — there's evidence that the frame sliders have been in use. Several nice extras including a Two Brothers slip-on are included. The long-time owner claims excellent mechanical condition with dealer servicing. The seller is calling it an "Anniversary Edition," but I'm not sure why. 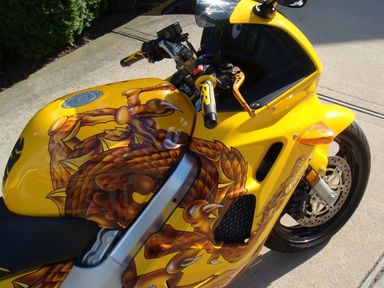 Click on image for the eBay link. Click on image for the eBay link. What: 2000 VFR800F
Where: Merrick, New York Price: $4950 or make offer This unique-looking example will require a unique buyer, and could be a tough sell. An original-owner bike with only 9500 miles and a bunch of boy racer extras, this one has some pretty aggressive custom paint work. Vance & Hines, Pazzo, Scotts, Zero Gravity and more. If the paint speaks to you and you're able to see added value in it, your new ride is waiting in New York state. 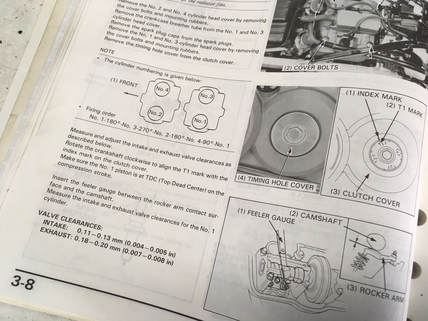 Before the initial engine start of Project 17, or any project, I go through some basic mechanical checks. With the carbs on the bench and radiator removed, now is the time for a valve clearance check followed by a compression test. This is straightforward wrench-turning and is covered well in the FSM (Factory Service Manual), but for those unfamiliar, here's how I go about it. I begin by blowing out the spark plug holes and the general area with compressed air. I'll be removing the plugs for this operation and we don't want any debris to enter the engine as we remove the valve cover. Remove the eight cover bolts and the covers. They may require some gentle tapping with a soft hammer. The front lifts off toward the front wheel but the rear is a tighter fit. Unhook the wiring harness along the right frame rail and lift it up and clear, which will allow the cover to be removed by lifting the left side first, then up and out. (click on any small image to enlarge) Below we see the valve area exposed. In the center is the famous gear-driven cam set. The cam lobes are visible under the four long aluminum caps, with the valve springs below. Of note here is the lack of any residual oil. This engine has been inactive for so long that the oil has drained completely away. I'll pour some engine oil on the cam lobes and gear set before attempting to rotate this engine.  (Below) Next I'll remove the spark plugs and add some oil to the cylinders, which will be just as dry as the valve area. I like to use the Honda spark plug socket and 12mm socket. The plugs will give an indication of the engine's running condition. Look for any deposits or strange coloration. These plugs actually look normal and indicate very little use. The exterior rust is simply a result of being stored with some water in the plug valley. I'll clean and probably reuse these plugs. (Below) I'm old school, so one of my go-to products on the shelf is Marvel Mystery Oil. This magical liquid has been around for nearly 100 years. It will effectively loosen stuck valves, piston rings and has lots more (unsubstantiated) claims. I like it as a cylinder lubricant on these stored engines; motor oil will work as well. Simply add a few tablespoons through the spark plug hole however you can. I use a small funnel. (Below) Let's turn this thing over. Remove the 17mm timing plug along with its rubber o-ring. The same socket will turn the timing gear bolt underneath, rotating the engine. You'll see the timing marks which the FSM's procedure uses to bring each cylinder to TDC (top dead center) for the valve check. I use a simpler, quicker method. (Below) Note: Shown here is a 1986-87 VFR; the later models are shim style, and are adjusted completely differently. ---------------------------- The idea here is to relieve the valve of any pressure from the cam lobe, which translates into positioning the lobe away from the valve and spring. So, I simply rotate the engine, turning the timing bolt clockwise till I visually see the two lobes on whichever valve set I'm adjusting rotate upward, away from the valve and spring. In both photos below we see the lobes (in this case #1 intake) rotated upward. When checking the clearance, approach from the opposite side of the adjusting locknut and screw — I'm not doing that here just for illustration purposes. In other words, come in from the backside with the feelers (there's an illustration in the FSM). The tolerances for the VFR are pretty tight, i.e. .004-.005" on the intakes. Simply be sure that at a .004" feeler will fit, but a .006" will not. The clearances in these engines will tighten with normal wear, so being on the loose side is okay (.005"). If adjustment is necessary, I note where the screwdriver groove is situated, loosen the locknut with a 10mm socket, move the screw slightly in the direction needed, snug the locknut and recheck the clearance. With practice, this goes pretty quickly. The rear exhausts are harder to get to, but keep at it till it's right. When your adjustment is good, tighten the locknut (tight!), rotate the engine through a few cycles, and recheck. Move onto the next cylinder. Tip: #1 and #4 intakes can be done on the same rotation, as can the exhausts. When you're finished, reinstall the covers — wiping the gaskets and mating surfaces and carefully torquing the cover bolts. Don't forget the timing plug. The factory advises a valve check at 8000-mile intervals, but general consensus is that they're good for 20-25,000 miles between checks under normal use (not racing). As we see here, there is an involved procedure to get access to the valves, so I just assume that none of my projects has had a timely valve clearance check. In this case, only two valves required a .001 tightening.
Job done! At this point I would normally clean up the valve covers and the cylinder valley before refitting the valve covers, but I don't yet know about the health of this engine, so I'm simply installing the valve covers and will move on to the compression check. 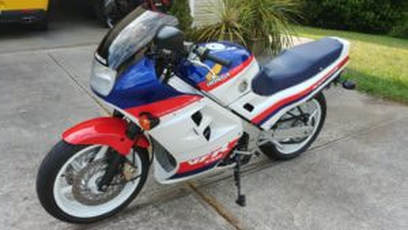 Click on image for more on this VFR project.. Click on image for more on this VFR project.. A few months back I provided reader Curt with some needed carb parts. I always invite our readers to provide some background on their projects and themselves, and Curt responded with a link to the website for his company, National Superbike. Curt does some impressive work on lots of different types and makes of motorcycles. One of his projects is this 1986 VFR750F with lots of tasteful mods and beautiful bodywork. Visit Curt's site for more reports on this and other projects. And some eye candy:  Click on image for the ordering site. Click on image for the ordering site. Coffee table motorcycle books are nice to have around. They look cool, and can even pass as home decor for those of us who think, for instance, that a 40-year old Ducati would look perfectly nice in place of that potted plant in the corner of the living room. They're also a great distraction on a wintery evening when paired with a quiet house and a glass of Bulleit bourbon. So why not a coffee table moto magazine? Craftrad is a German-language hi-class magazine who have partnered with premier internet photo site, Bike EXIF, to bring us their first international issue. It's produced in Europe and is available through Bike EXIF's website for about $21 USD. Judging by the marketing material and site comments, it's a very well-done effort. "146 luxurious pages packed with exclusive stories, photosets, interviews and bike reviews." I can't find anything about how often the magazine will be issued, and that may depend on how many English-speaking folks are willing to pay the price for a high-end motorcycle magazine. And can it compete with Cycle World's equally "luxurious" remake? We'll see. It's time to determine if Project 17 is a viable running motorbike. The only thing I know about this bike's history is that the previous owner bought it as a parts bike and apparent stablemate for his running VFR750. He claimed he never ran the bike and that it sat in his pole barn for seven years. In my experience one can usually add about 50% to any time period claim with these old bikes, so at this point I'm assuming that this bike hasn't had fire in it's belly for at least 12 years. The date code on the barely worn tires are from 1997 so if we go by the tire evidence it could easily be closer to 20 years since this one has seen the road. In any case, I'll go through the steps that I take when beginning a rescue of a 32-year old Honda VFR. First up is a soapy bath and general degreasing. This is messy work, so it's always best to start with most of the crud removed. Then it's onto the service rack. 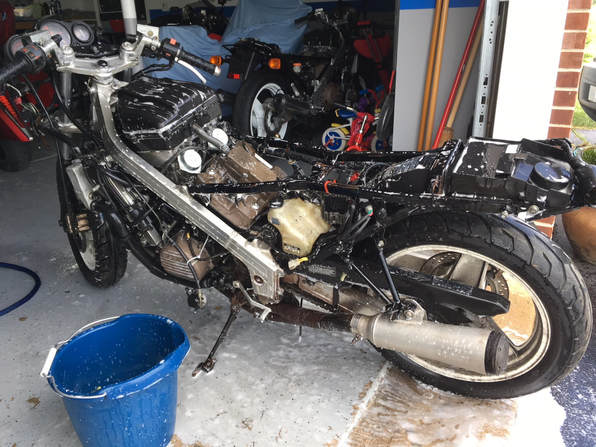 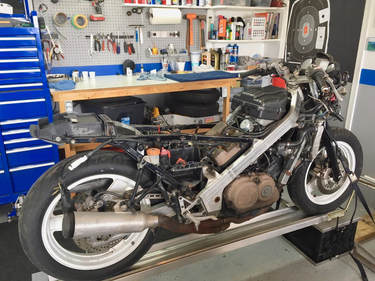 I have no idea of the condition of the carburetors (and I've found some gems) so the carb set will need to come off for an inspection on the workbench. The evaporative canister mounted near the front exhaust pipes indicate this is a California-spec model, so several additional vacuum hoses will need to be dealt with. I'll show the removal process, even though I'll be tossing the whole mess in the trash bin. (Below) I start with radiator removal. I do this because I know that I'll be doing a valve adjustment check and having the radiator completely out of the way makes the process much easier. Drain the coolant via the lower radiator hose, remove the two hoses, unbolt the upper and lower mounting bolts, unplug the fan connector and remove the radiator from the left side. (click on any of the small images to enlarge) (Below) To begin the carb removal, remove the air cleaner and housing. Be prepared for anything when the cover comes off — in this case only a few mouse meal remnants were found, and no telltale mouse pee smell. That corrosive liquid will work its way downward into the carbs and wreak all kinds of havoc, so I've dodged that bullet. In fact, the carbs look surprisingly clean. A UNI brand foam/oil filter had been installed. (Below) Next, I unscrew the four upper carb boot ("insulator") clamps. The lower clamps can remain tightened. Then loosen, but don't remove, the choke ("enricher") cable clamp. Leave the screw in place to prevent dropping the assembly now or during reassembly. Unhook the choke cable. (Below) I then remove the two throttle cable bracket screws (right photo) which allow the cables to be slackened and easily removed. Leave the bracket off but put the two screws back in their holes for safe-keeping. My first indication that these carbs have been dealt with before is that the lower bracket screw is incorrect. (Below) Now the emissions stuff needs to be dealt with. I just cut the five hose connections in question, but they can also be removed if you wish to re-use the hardware. Some of the tiny clamps were missing, again indicating that someone had worked on these carbs previously. One of the vacuum hoses was cracked and leaking at carb #4, which highlights the issue with all this old emissions hardware — lots of opportunities for difficult-to-find leaks. In any case, here's the connections. (Below) Let's get the carbs off. With everything loose, the rack is ready to lift off, but it will be stuck pretty tightly, so I gently lever the rear half free and then lift straight up to remove. I use a bent-tip lever with a plastic scraper protecting the valve cover, and lever straight up under the rearmost carbs (#1 & #3), gently pushing upward at the lower point of the diaphragm cap. If they seem immovable, check that the boot screws are very loose. Please resist the temptation to resort to a hammer. (Below) With the carbs on the bench, drain the float bowls into a container using the drain screws. In this case the carbs were empty of fuel. Have a peek with a flashlight into the intake tracts for skeletal remains or any other debris, then stuff some clean paper towel into the tracts. If you're going to clean the engine area, cover the intake holes with squares of cut-up plastic bag and zip-tie in place. (Below) Here's what you should see in the intake tract; nice and clean with not too much carbon build-up on the valve stems. You may also see some blue scribbling on the engine block. Those are notes from the assembly line. Tip: Replace that little radiator hose before reinstalling the carbs. See the "Maintenance" section for a how-to. (Below) The final step is to remove the air baffling above the front cylinders. This plastic cover is held in place by two plastic "plugs" firmly stuffed into frame holes on either side. I use two flat-blade screwdrivers to pry the plugs upward completely out of their holes. Shown here is the left side; the right is a tighter fit because of the wiring harness passing above it. Just wrestle the harness out of the way. Lift the baffle up on the left side, then out. Tip: Install in reverse: lower the right side into place first. That deteriorating brown foam stuff is sound deadening — as it disintegrates it will be sucked into the air cleaner housing. Feel free to scrape and scrub it off.  Here's a look at the emissions hardware. It serves as a means to "clean" the carb fuel vapors which otherwise evaporate into the atmosphere. I'll remove it all and simply vent the line exiting at the rear of the carbs into the air. That's how it's done on the 49-state bikes. There's also five small vent tubes at the carbs which will need to be plugged. I'll cover the carb and valve work in later posts.
Next up, valve clearance check, compression check and carb cleaning. 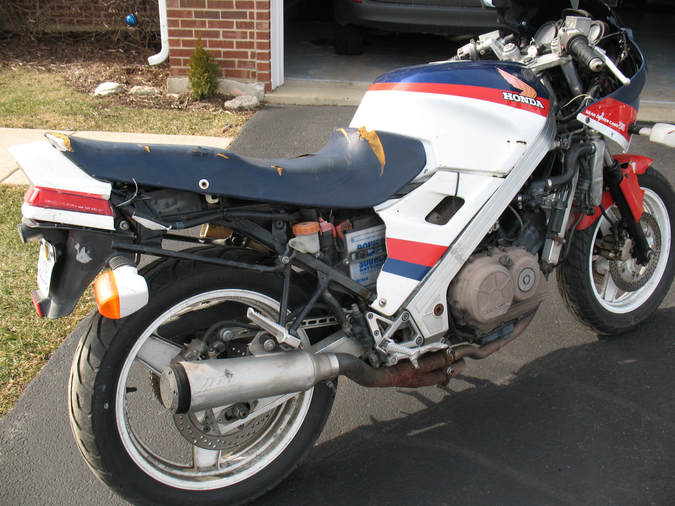 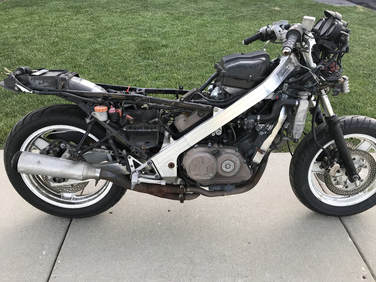 In early 2016 I purchased a package deal of two '86 Interceptors from a seller in W. Virginia. The other one has since left the nest, and now it's time to rescue number 17, a 1986 VFR750F. With 33,000 miles showing, this bike has obviously had some hard knocks in it's time. It's in stock condition with the exception of a set of gnarly SuperTrapp mufflers in place of the originals. There's crash evidence on both left and right sides, even the brake and clutch reservoirs are ground down in a losing argument with the asphalt. The tank and body panels are in equally tough shape but I have a full set of R/W/B survivor panels and tank for this project. Unlike my other finds, I haven't actually run this bike, so first up will be basic mechanical checks, then test run the engine. At that point I'll know if the project is a go or no-go. I'll show how I go about the rescue process in subsequent posts. Here's what we have to work with: (click on an image to enlarge) 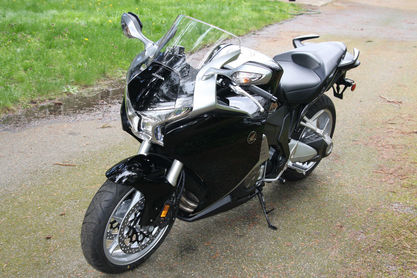 Click on image for the eBay link. Click on image for the eBay link. What: 2013 VFR1200F Interceptor Where: Yelm, Washington Why: New, never titled Price: eBay auction Located in the western shadow of Mt. Rainier, this VF12 was purchased as one half of a matched set by our seller to keep as a collector example. As such, it shows only 2.4 miles on the odometer and is showroom stock. Never titled, it comes with an MCO which can be used to obtain a title, if desired. This bike represents the final year of a four-year run for the 1200F. It is the "standard," or non-DCT transmission. Bidding is active and there's no reserve. Auction ends June 17. |
THE SHOP BLOG
|


 RSS Feed